Binary
In this guide, we will use the binary provided in Astar release.
If you have experience with Rust compilation, you can also build the binary from here.
Let's get started
Let's start with updating our server. Connect to your server and update:
sudo apt-get update
sudo apt-get upgrade
sudo apt install -y adduser libfontconfig1
Create dedicated user and directory
Download the latest release from Github:
wget $(curl -s https://api.github.com/repos/AstarNetwork/Astar/releases/latest | grep "tag_name" | awk '{print "https://github.com/AstarNetwork/Astar/releases/download/" substr($2, 2, length($2)-3) "/astar-collator-v" substr($2, 3, length($2)-4) "-ubuntu-x86_64.tar.gz"}')
tar -xvf astar-collator*.tar.gz
Create a dedicated user for the node and move the node binary:
sudo useradd --no-create-home --shell /usr/sbin/nologin astar
sudo mv ./astar-collator /usr/local/bin
sudo chmod +x /usr/local/bin/astar-collator
Create a dedicated directory for the chain storage data:
sudo mkdir /var/lib/astar
sudo chown astar:astar /var/lib/astar
Set systemd service
To run a stable collator node, a systemd service has to be set and activated. This will ensure that the node is restarting even after a server reboot.
Create a service file
sudo nano /etc/systemd/system/astar.service
Service parameters
Please make sure to change {NODE_NAME}
- Astar
- Shiden
- Shibuya
[Unit]
Description=Astar Archive node

[Service]
User=astar
Group=astar

ExecStart=/usr/local/bin/astar-collator \
  --pruning archive \
  --rpc-cors all \
  --name {NODE_NAME} \
  --chain astar \
  --base-path /var/lib/astar \
  --rpc-external \
  --rpc-methods Safe \
  --rpc-max-request-size 1 \
  --rpc-max-response-size 1 \
  --telemetry-url 'wss://telemetry.polkadot.io/submit/ 0'

Restart=always
RestartSec=10

[Install]
WantedBy=multi-user.target
[Unit]
Description=Shiden Archive node

[Service]
User=astar
Group=astar

ExecStart=/usr/local/bin/astar-collator \
  --pruning archive \
  --rpc-cors all \
  --name {NODE_NAME} \
  --chain shiden \
  --base-path /var/lib/astar \
  --rpc-external \
  --rpc-methods Safe \
  --rpc-max-request-size 1 \
  --rpc-max-response-size 1 \
  --telemetry-url 'wss://telemetry.polkadot.io/submit/ 0'

Restart=always
RestartSec=10

[Install]
WantedBy=multi-user.target
[Unit]
Description=Shibuya Archive node

[Service]
User=astar
Group=astar

ExecStart=/usr/local/bin/astar-collator \
  --pruning archive \
  --rpc-cors all \
  --name {NODE_NAME} \
  --chain shibuya \
  --base-path /var/lib/astar \
  --rpc-external \
  --rpc-methods Safe \
  --rpc-max-request-size 1 \
  --rpc-max-response-size 1 \
  --telemetry-url 'wss://telemetry.polkadot.io/submit/ 0'

Restart=always
RestartSec=10

[Install]
WantedBy=multi-user.target
EVM RPC calls are disabled by default, and require additional flag to be enabled. Please refer to this page (INSERT_LINK) for more info.
Start the service:
sudo systemctl start astar.service
Check the node log to ensure proper syncing:
journalctl -f -u astar.service -n100
Enable the service:
sudo systemctl enable astar.service
You can test the node health through the RPC port with this command:
curl -H "Content-Type: application/json" --data '{ "jsonrpc":"2.0", "method":"system_health", "params":[],"id":1 }' localhost:9944
Next steps
For any usage, wait for the chain to be fully sync by checking the node log.
It all depends on what you plan to do with your archive node.
- In most cases, you will want to access node from outside. In this case, nginx server is the recommended option.
- If you run your dApp on the same server as the node, then you can access it directly with the
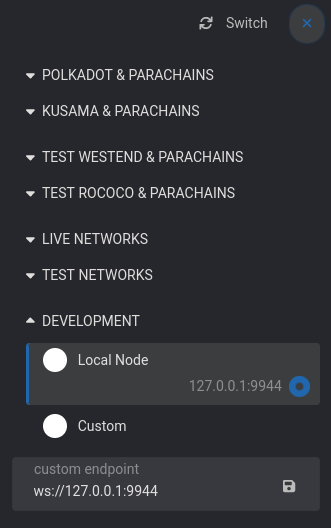
localhostaddress. This setup is recommended for testing purpose only. - If you run the node locally for testing purpose, you can switch the network in Polkadot.js portal and explore the chain:

Extra operations
Get node logs
To get the last 100 lines from the node logs, use the following command:
journalctl -fu astar-collator -n100
Indexers and oracles
To access data from indexers (e.g. The Graph) or Oracles (e.g. Chainlink), you need to add the debug flags below to the node launch command, after the astar-collator line:
--ethapi=debug
Upgrade node
When an upgrade is necessary, node operators are be notified in our Discord and Element group.
Download the latest release from Github
wget $(curl -s https://api.github.com/repos/AstarNetwork/Astar/releases/latest | grep "tag_name" | awk '{print "https://github.com/AstarNetwork/Astar/releases/download/" substr($2, 2, length($2)-3) "/astar-collator-" substr($2, 3, length($2)-4) "-ubuntu-x86_64.tar.gz"}')
tar -xvf astar-collator*.tar.gz
Move the new release binary and restart the service:
sudo mv ./astar-collator /usr/local/bin
sudo chmod +x /usr/local/bin/astar-collator
sudo systemctl restart astar.service
Purge node
To start a node from scratch without any chain data, just wipe the chain data directory:
sudo systemctl stop astar.service
sudo rm -R /var/lib/astar/chains/astar/db*
sudo systemctl start astar.service
Snapshot
Please refer to the snapshot page. :::