Astar Onchain Governance
1. Introduction
Astar onchain Governance is a decentralized mechanism where ASTR token holders can propose, discuss, and vote on important changes and initiatives within the Astar Collective. This onchain governance system lets stakeholders directly influence key network decisions, including protocol improvements, runtime updates, treasury funding requests, and the management of dApp Staking applications.
The governance system ensures that decisions are made collectively and transparently by the community, reflecting the interests of the network's stakeholders. Proposals may cover a wide range of topics that affect the network's development, security, and long-term sustainability. To participate in Astar onchain governance, users have two primary interfaces available: Subsquare and the traditional Polkadot.js interface. Subsquare provides a user-friendly interface designed for broader community participation, while Polkadot.js offers a more technical approach for advanced users.
This guide will walk you through the process of participating in Astar onchain governance using the Subsquare platform. For those who prefer the technical approach, you can refer to the Astar Governance Technical Guide. For a comprehensive understanding of Astar governance structure and processes, we encourage you to read the Astar Governance Overview in our documentation.
:::info Polkadot.js
If you want to learn more about Polkadot.js, check out this Polkadot Official guide.
:::
2. Subsquare for Onchain Governance
Subsquare is the primary governance platform for Astar Network. It lets ASTR token holders view proposals, participate in discussions, cast votes, and track governance decisions from submission to execution.
Through Subsquare, you can:
- View active proposals.
- Participate in discussions.
- Cast your votes on governance decisions.
- Create your own public or treasury proposals.
- Track the progress of proposals from submission to execution.
The purpose of this guide is to demonstrate how to utilize the Subsquare platform for governance actions on Astar Network. Working assumption is that the reader has familiarized themselves with the governance model, and will refer back to the docs if needed. This will be a practical guide for users.
:::info Astar Subsquare
Check out the Subsquare version for Astar here and get familiar with the existing proposals.
:::
1. Account Selection
Both Substrate and EVM style accounts can participate in governance actions on Astar Network through the Subsquare platform, providing flexibility for users across different blockchain ecosystems.
When the user visits Astar Subsquare and clicks the connect button, they will be able to choose from multiple wallet options displayed on the screen.
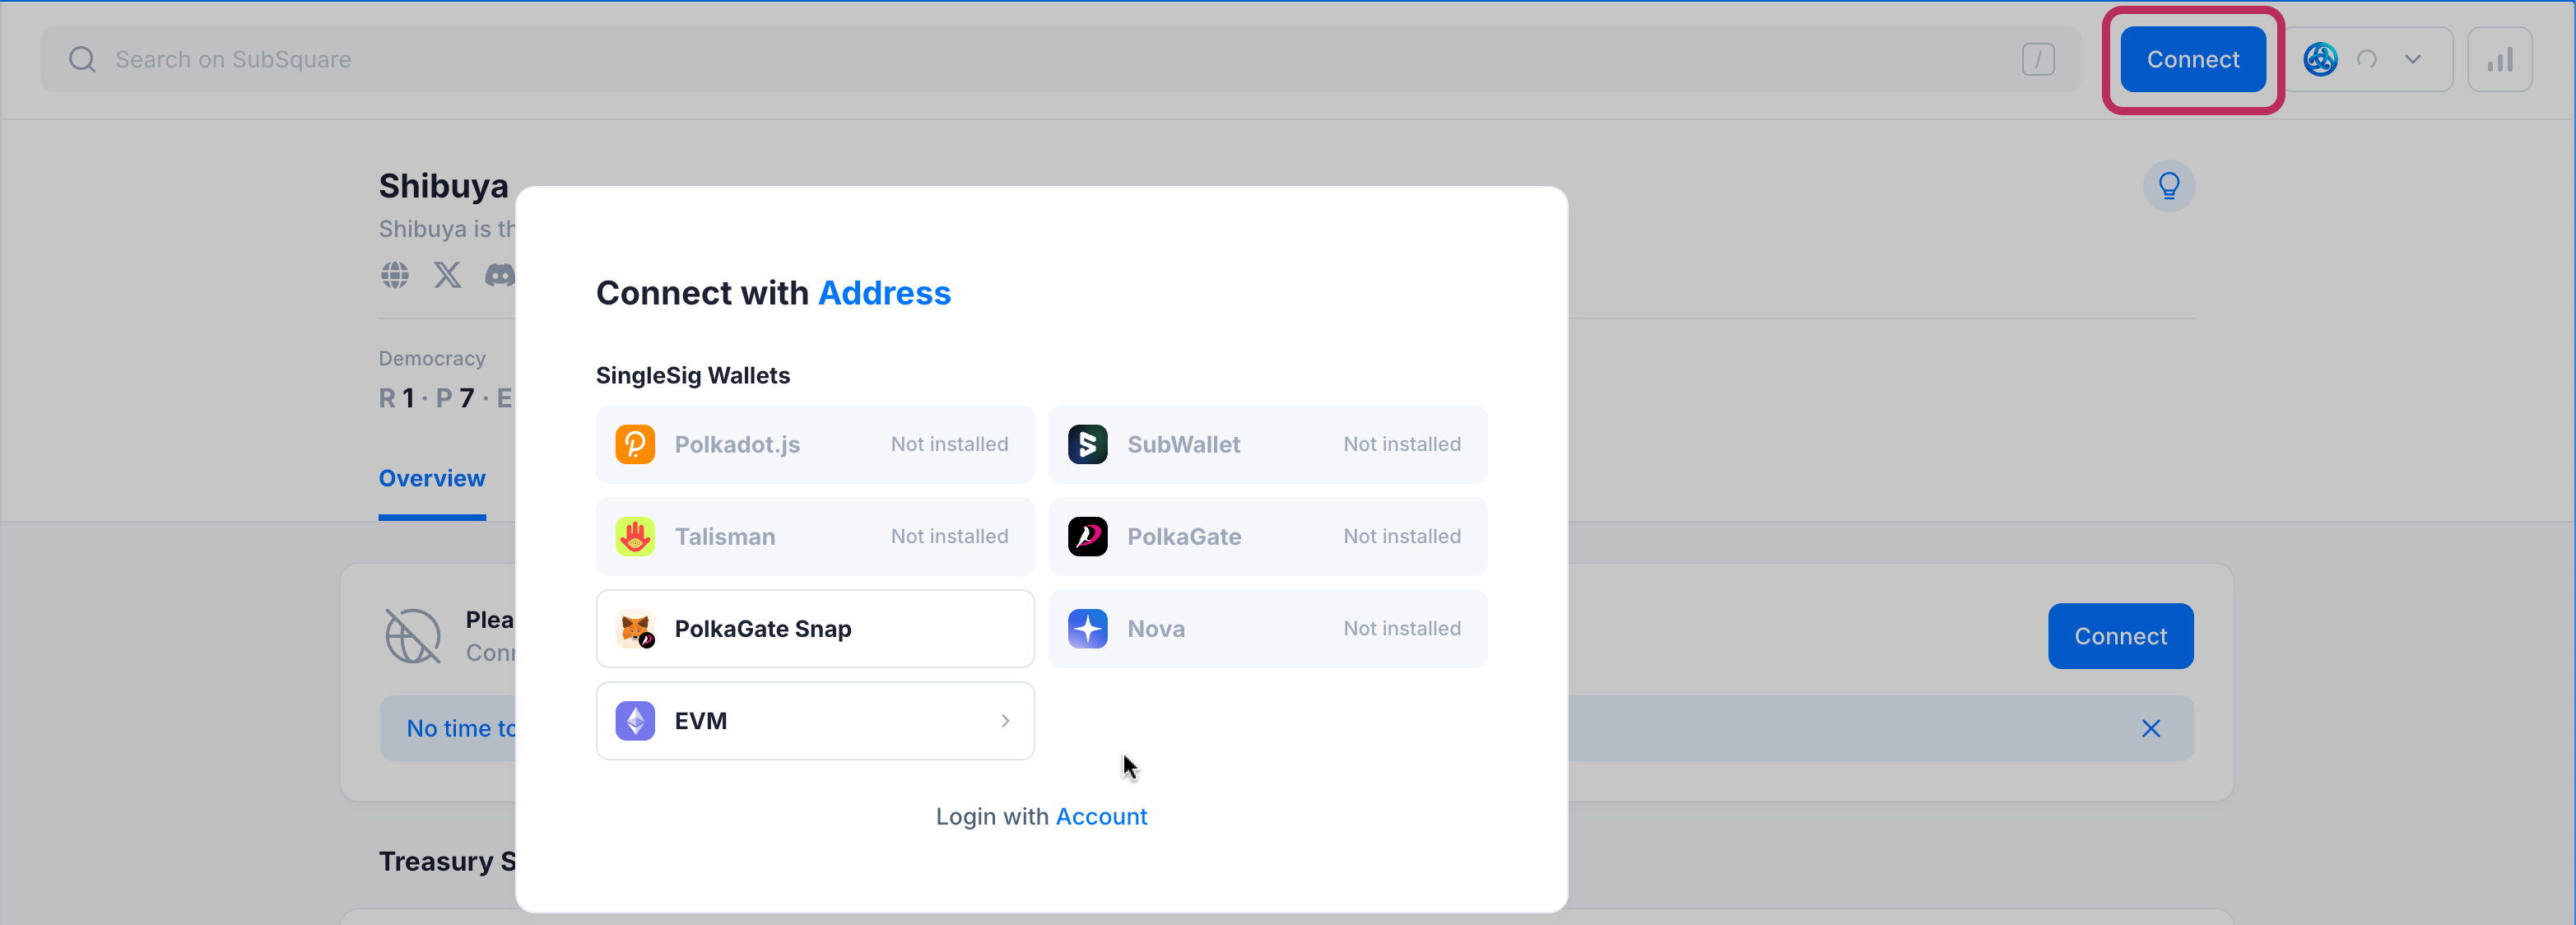
By default, the available compatible Substrate wallet options will be displayed.
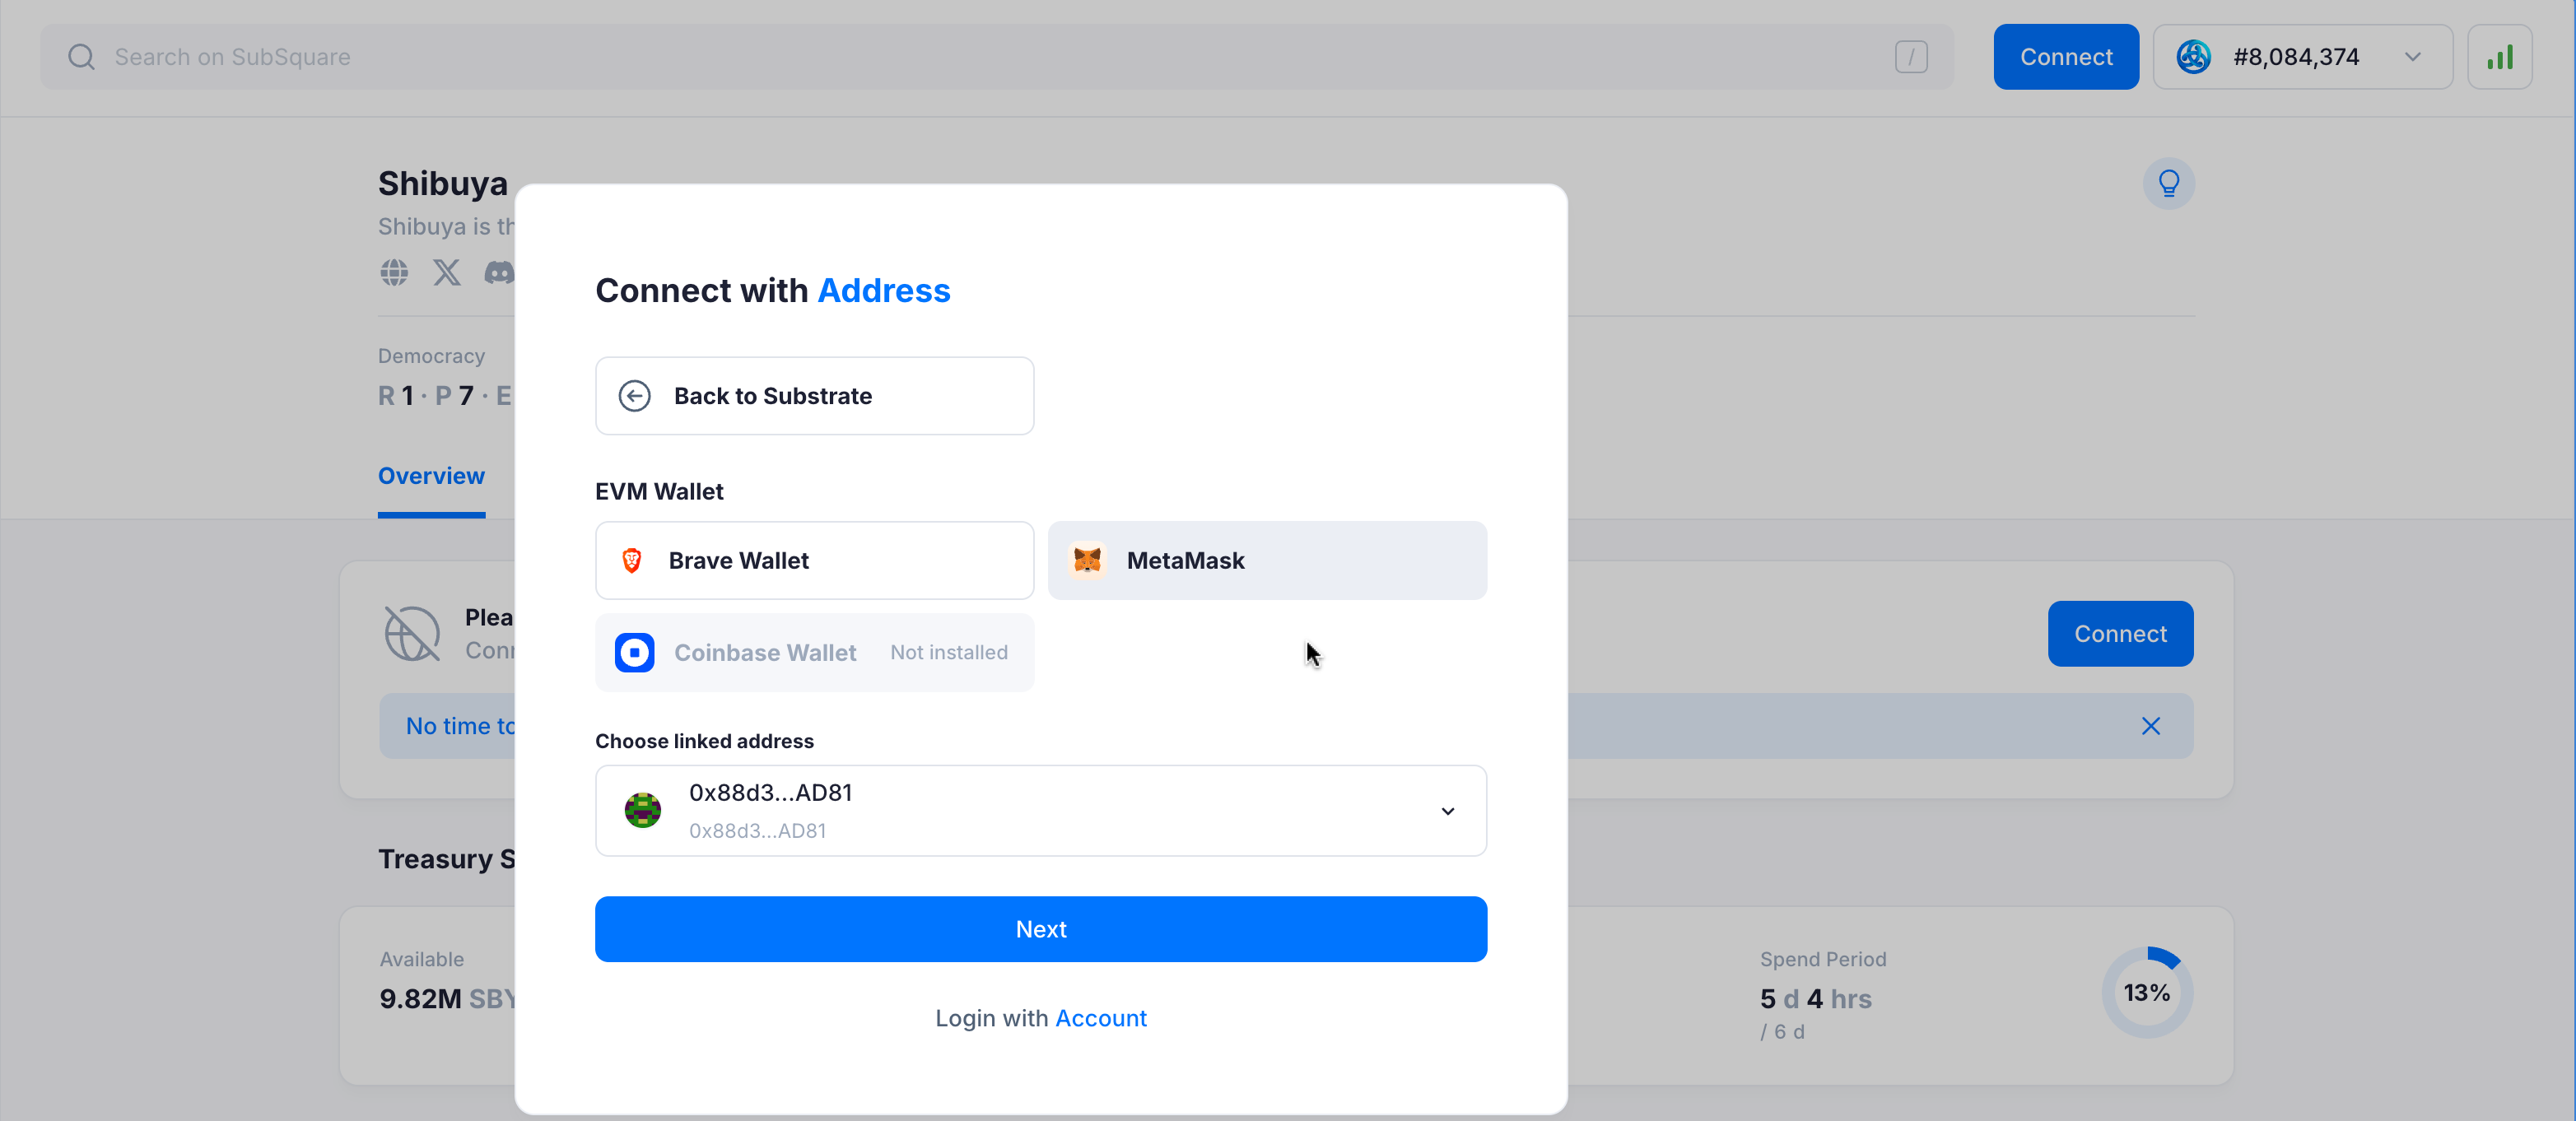
If the users wants to use their EVM accounts, they should select EVM under the option. Here, the users can select the desired EVM wallets.
3. Governance Roles
The Astar onchain governance system is composed of multiple roles, each with distinct responsibilities and powers within the onchain decision-making process.
This section outlines the main governance roles, such as Token Holders, Community Council, Main Council, and Technical Committee. Finally, explains the specific actions each can perform within the network. Understanding these roles is key to participating meaningfully in proposals, voting, treasury management, and overall protocol evolution.
3.1. Token Holder
Token holders are the core of the Astar onchain governance, holding primary decision-making power through their ASTR tokens. They play a central role in shaping the network’s evolution by proposing and voting on runtime upgrades, treasury funding, and referenda that influence key parameters. The stake-weighted and conviction voting systems allow them to increase their influence by locking tokens for longer periods, encouraging long-term alignment with the network’s success.
Now let’s understand what Token Holders can do and how, using the Subsquare platform.
3.1.1. Submitting an Onchain Proposal
All ASTR holders can create an onchain proposal through three different tracks: Public Proposal, Main Treasury, or Community Treasury. In this guide, we’ll walk through the step-by-step process for creating a proposal in each of these tracks.
Track #1: Public Proposal
Step 1: Create the Preimage
The first thing you need to do is create a preimage, which will contain the actions you want to execute onchain. To do this, go to the Advanced/Preimages section in the Subsquare left sidebar.
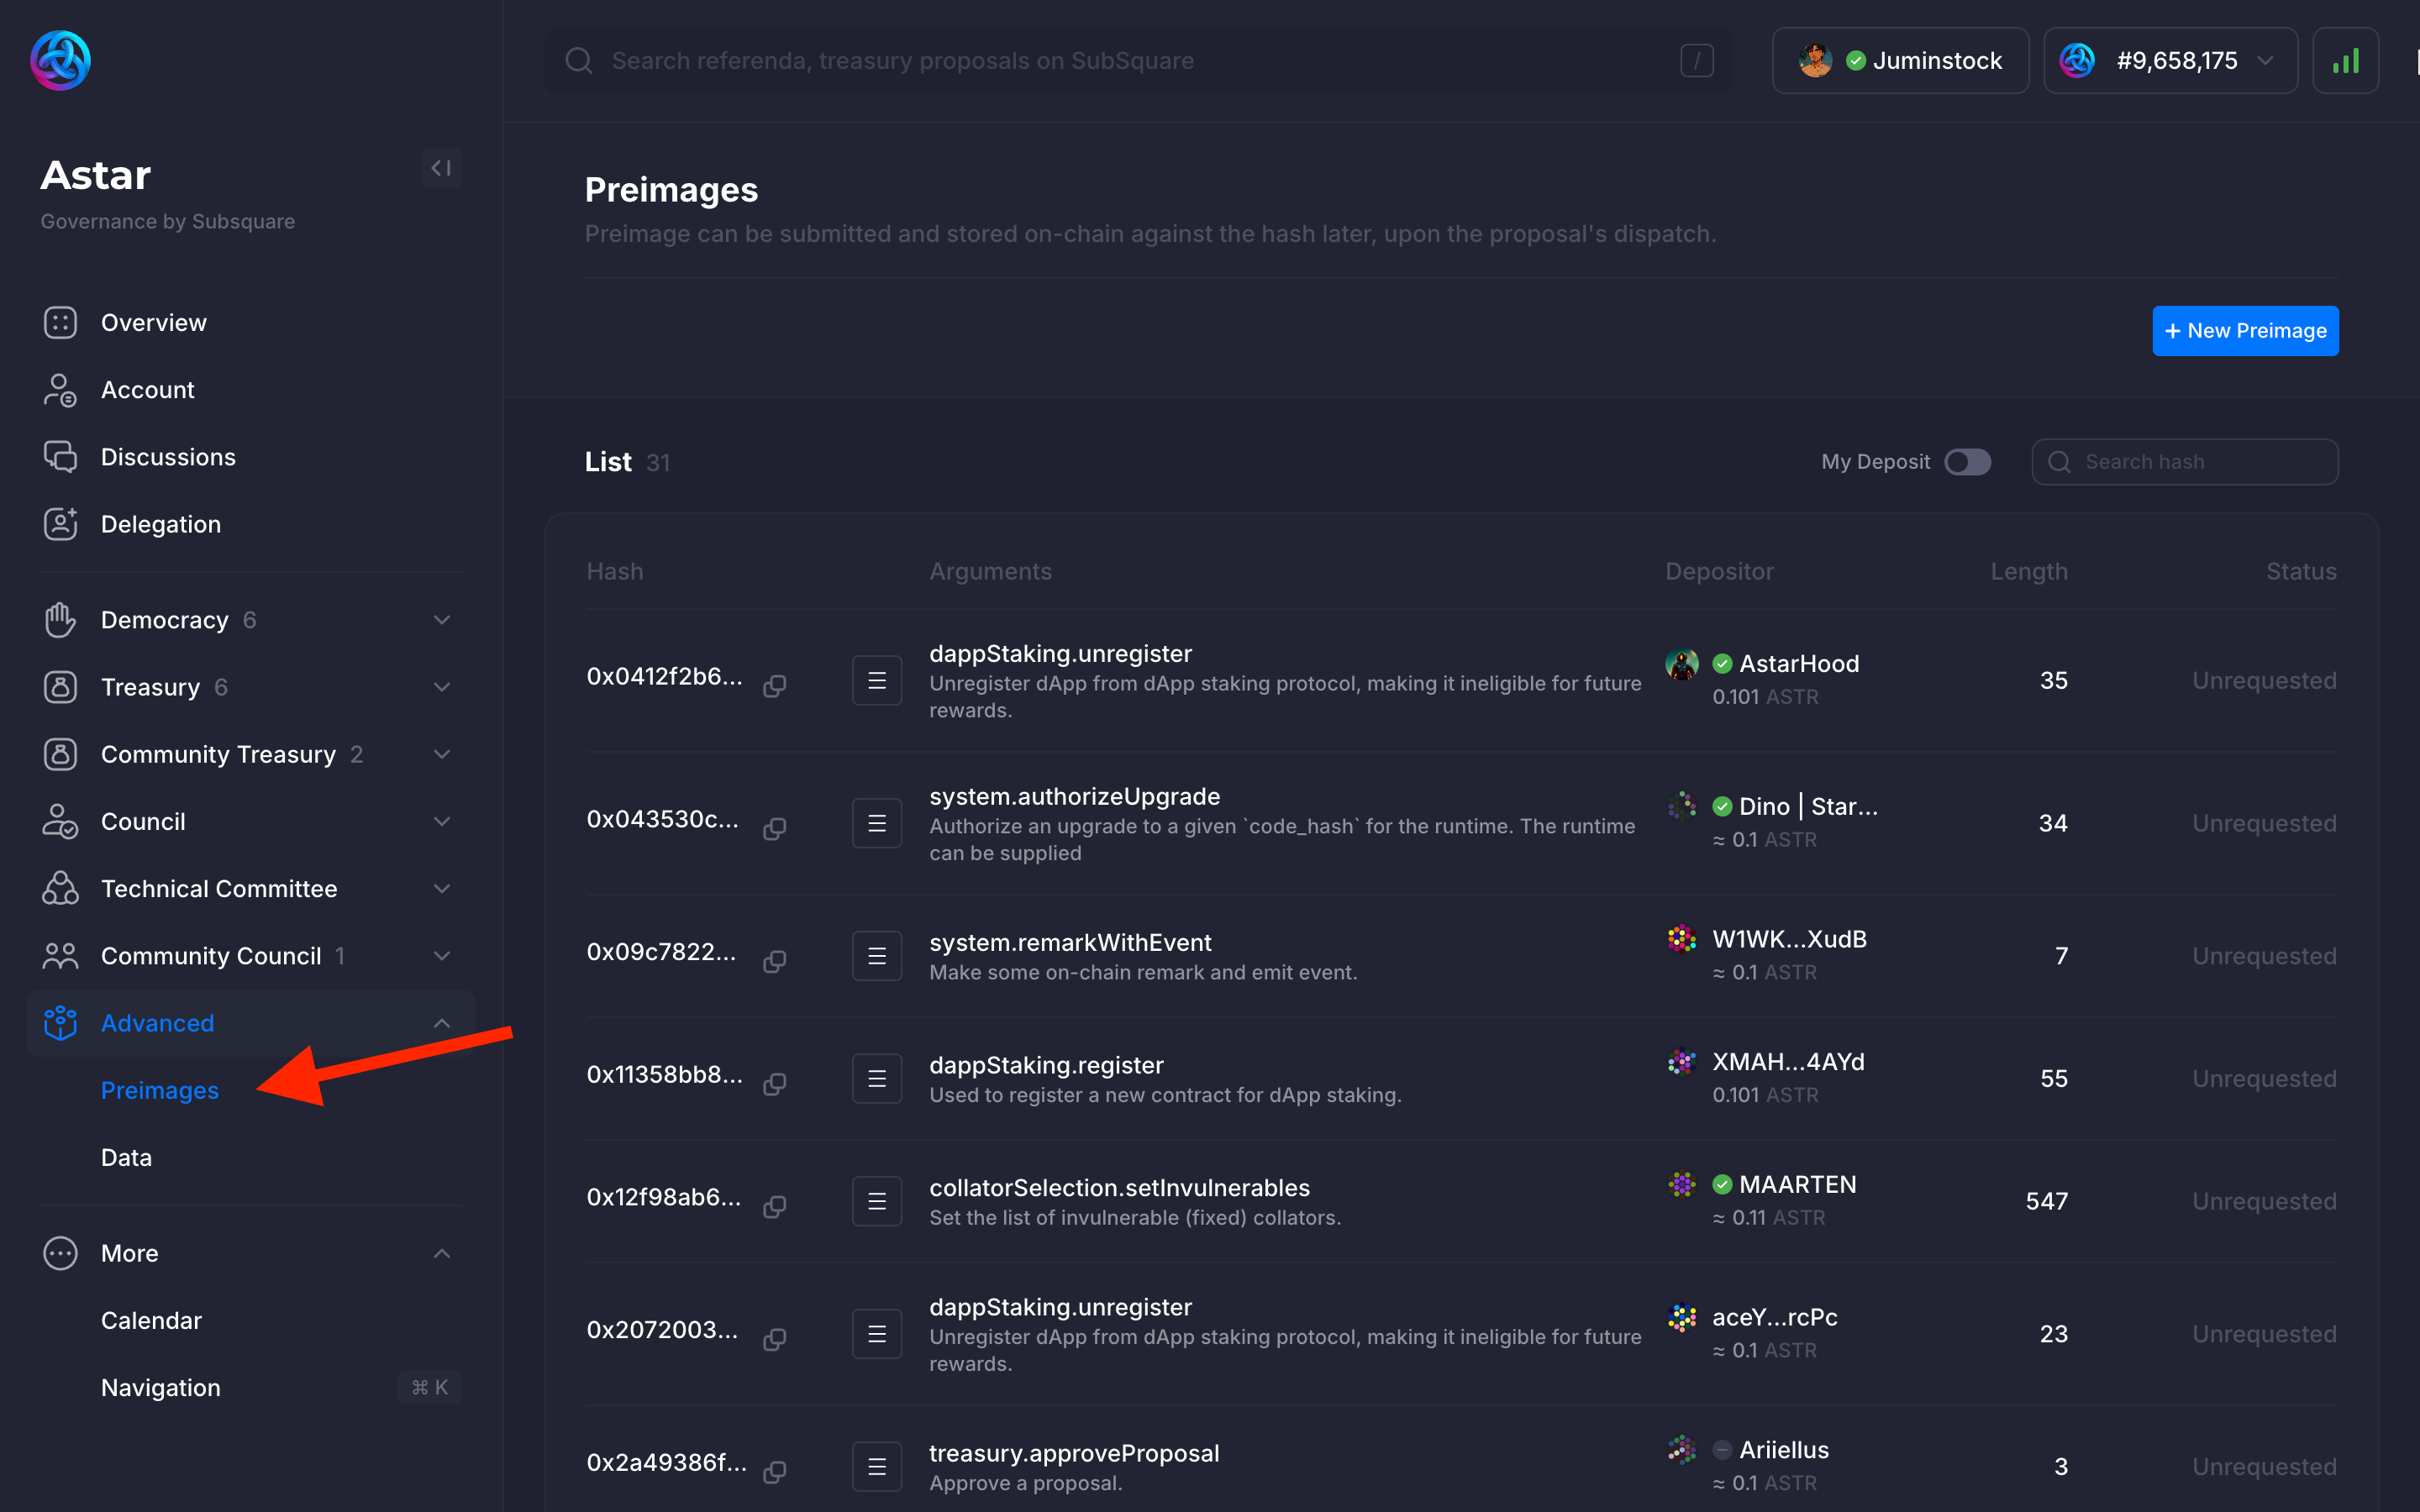
The existing preimages are displayed on the page. They can be reused by anyone to propose a governance action, any number of times. Review the selected params and copy the preimage hash.
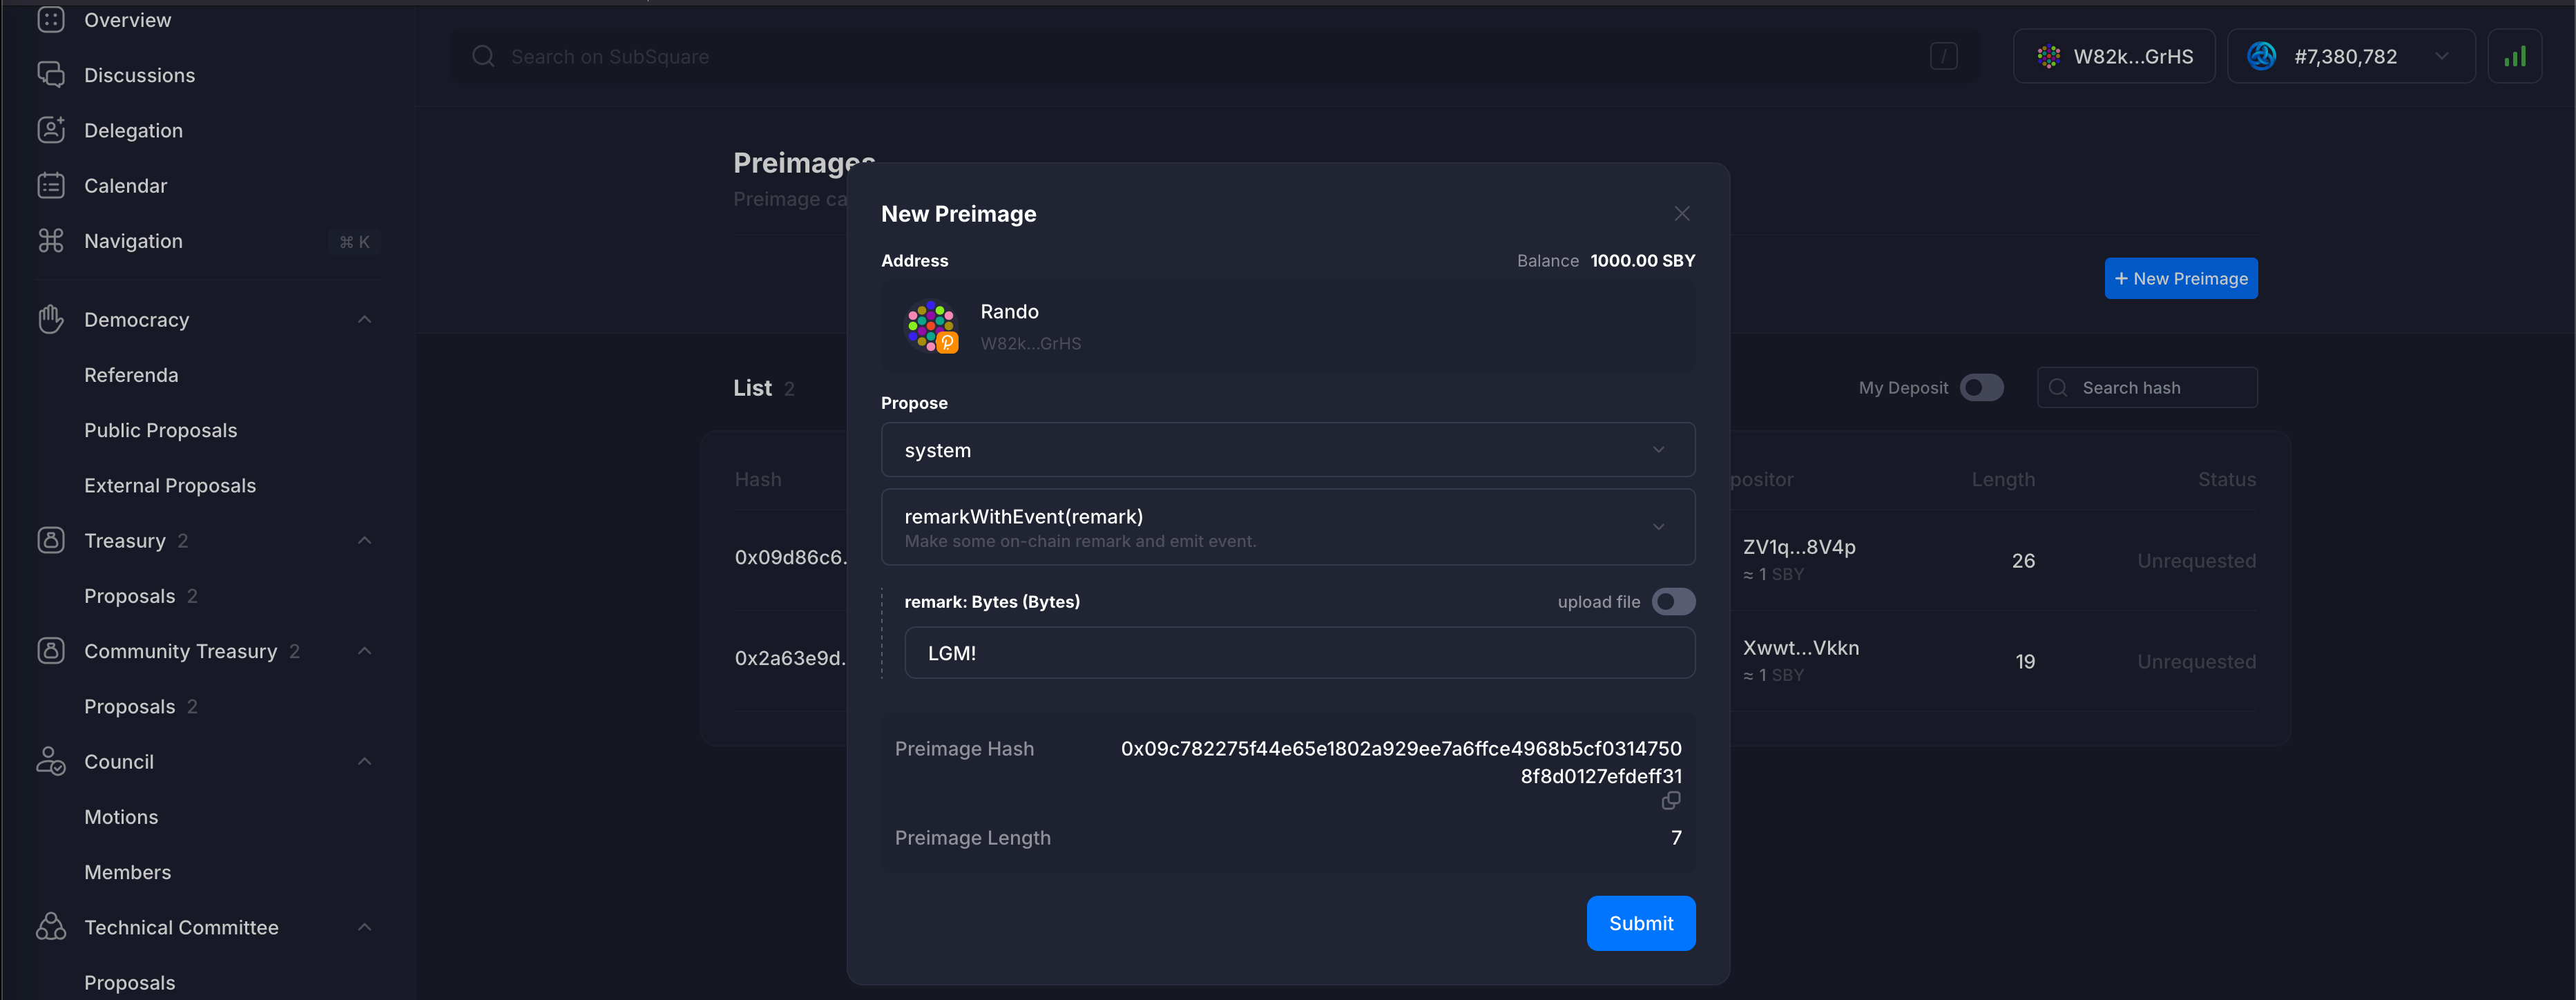
In order to create a new preimage, click on the + New Preimage button.
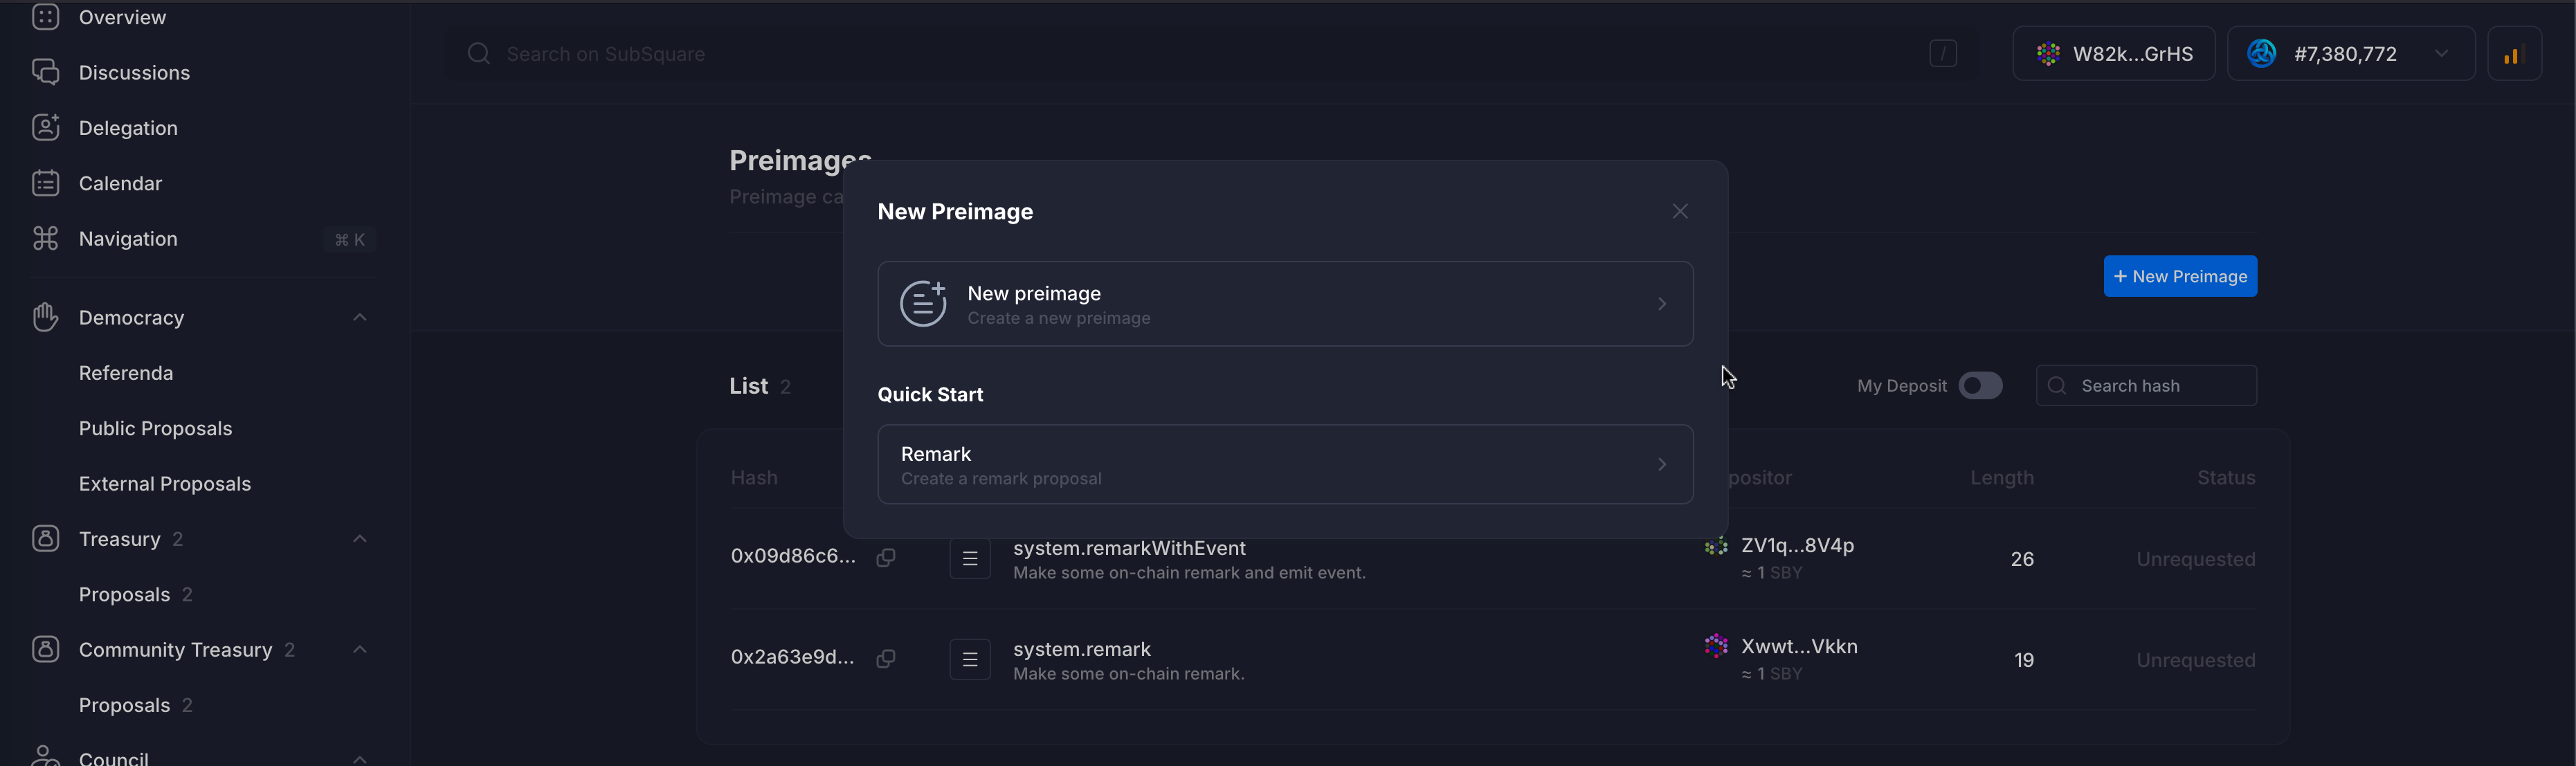
As you can see on the screen, you can either create the preimage, which is the first option, or create a remark proposal using the second option. This time, we’ll go with the first option (New Preimage).
For the sake of this example, we will create a preimage of a remarkWithEvent extrinsic call, containing LGM! as the message.
:::info Hash and Lenght
Please take note of the hash and length; these will be important for later use.
::: Submit the message and wait for the transaction to be confirmed and finalized.
:::info Treasury Spending
If your intention is to request treasury funds through a Public Proposal, there are a few steps you must take before creating the preimage:
- First, go to
TreasuryorCommunity Treasuryand create your proposal. Once it’s created, you’ll be able to edit the description and other visual elements of your proposal. - As soon as the proposal is created, it will provide you with a numeric ID (e.g., 4). You’ll need this ID to create your preimage.
- Finally, in your preimage, you should select the extrinsic
treasury.approveProposal(orcommunitytreasury.approveProposal, depending on where you created the proposal) and paste the ID you obtained.
That’s it! With this preimage, you’ll be able to create a Public Proposal and allow any ASTR holder to vote on the treasury spending proposal you have selected. You can follow the steps below.
:::
Once the preimage has been created, it will be displayed on the main Preimage page.
:::tip Understanding preimage deposits
In the Astar onchain governance, preimage deposits are token amounts reserved when submitting a proposal’s preimage (the encoded call data) to the chain. They help prevent spam and cover onchain storage costs, ensuring the proposal’s details remain accessible throughout the governance process.
The deposit is proportional to the data size, calculated as: Total Deposit = Base Fee + (Bytes × Fee per Byte).
These deposits are not spent but temporarily locked. They are refunded once the governance process concludes successfully. However, if the preimage is withdrawn early or the proposal is cancelled in bad faith, the deposit may be slashed. This mechanism encourages responsible participation while maintaining a balance between accessibility and network security.
:::
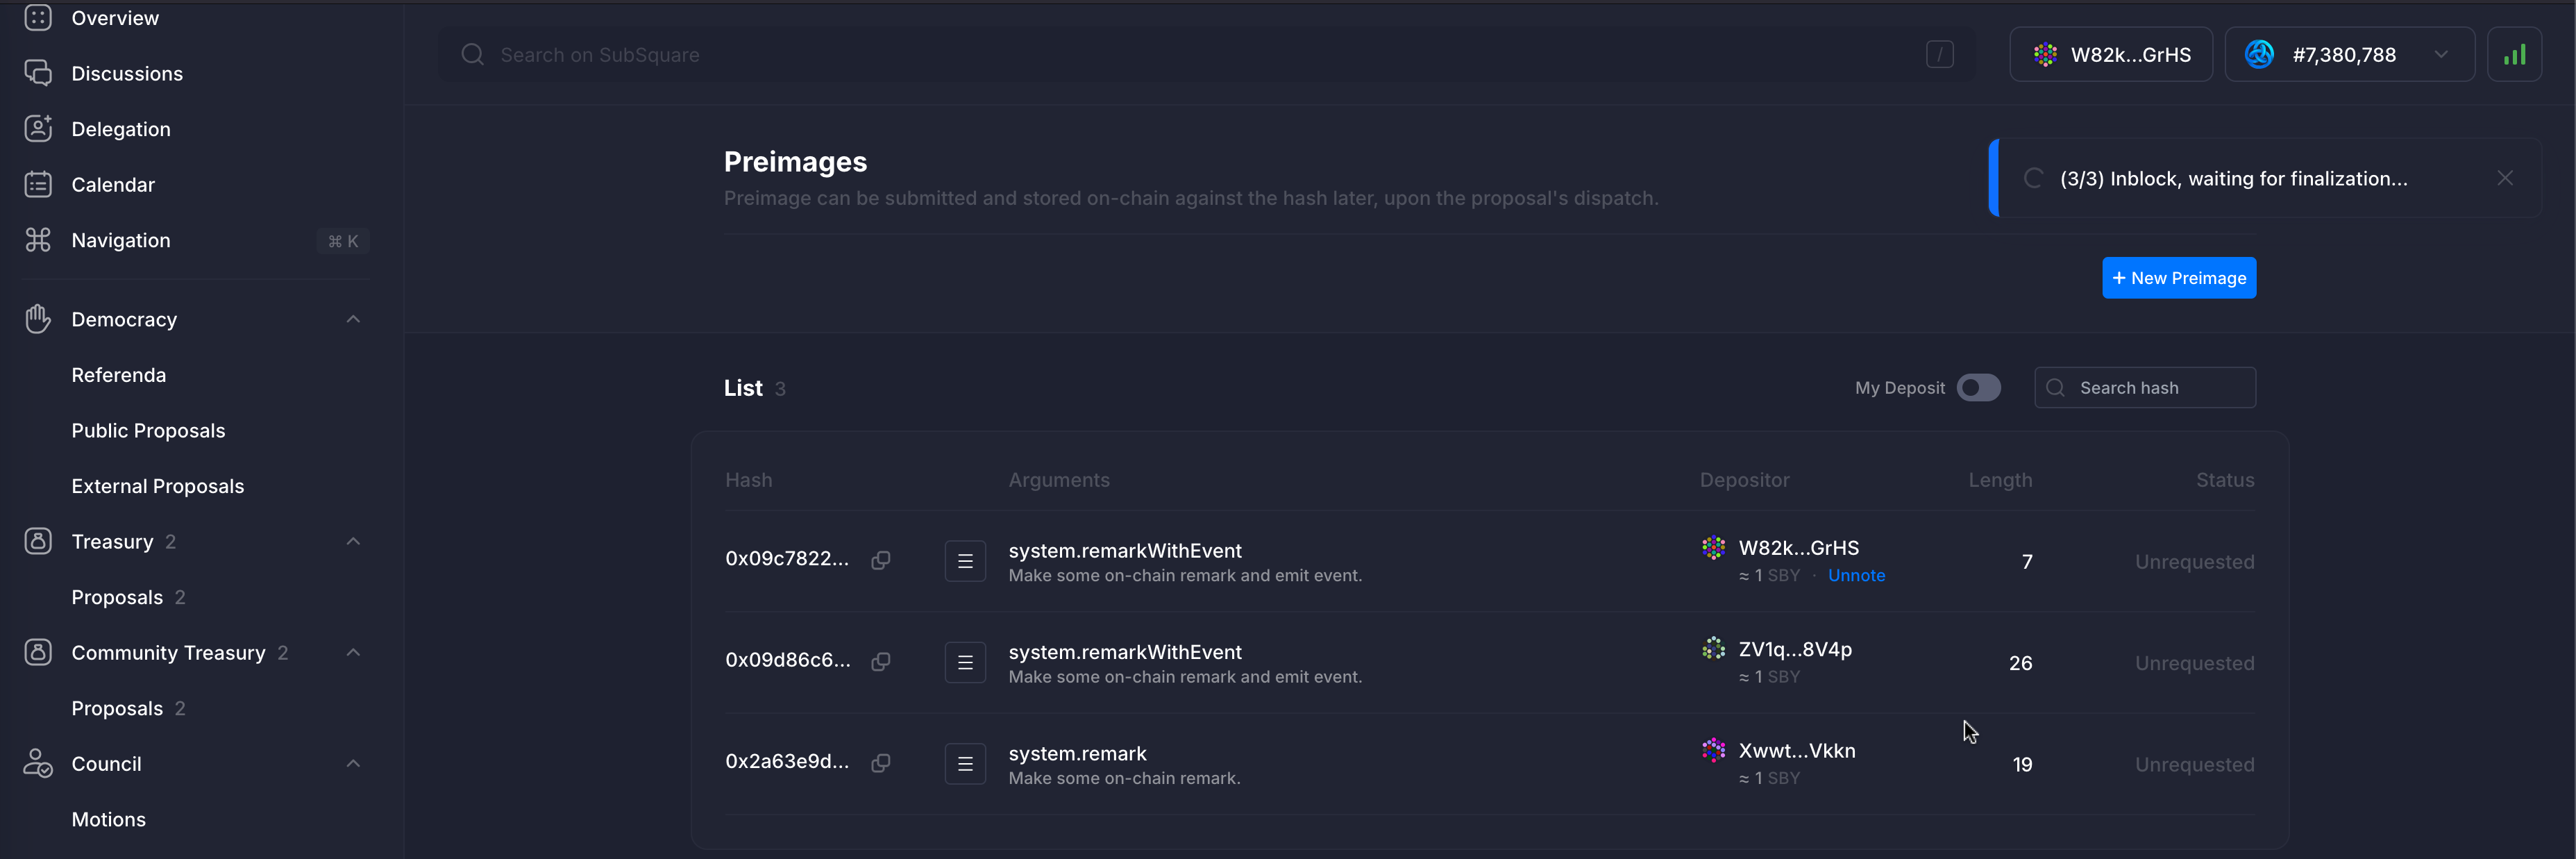
:::info Unnote button
Note that the newly created image has an Unnote button. This is because the current user is the creator of the preimage.
Since at this point the preimage is not yet used in any proposal, it can be unnoted, which will remove it from the list of preimages, refunding the deposit.
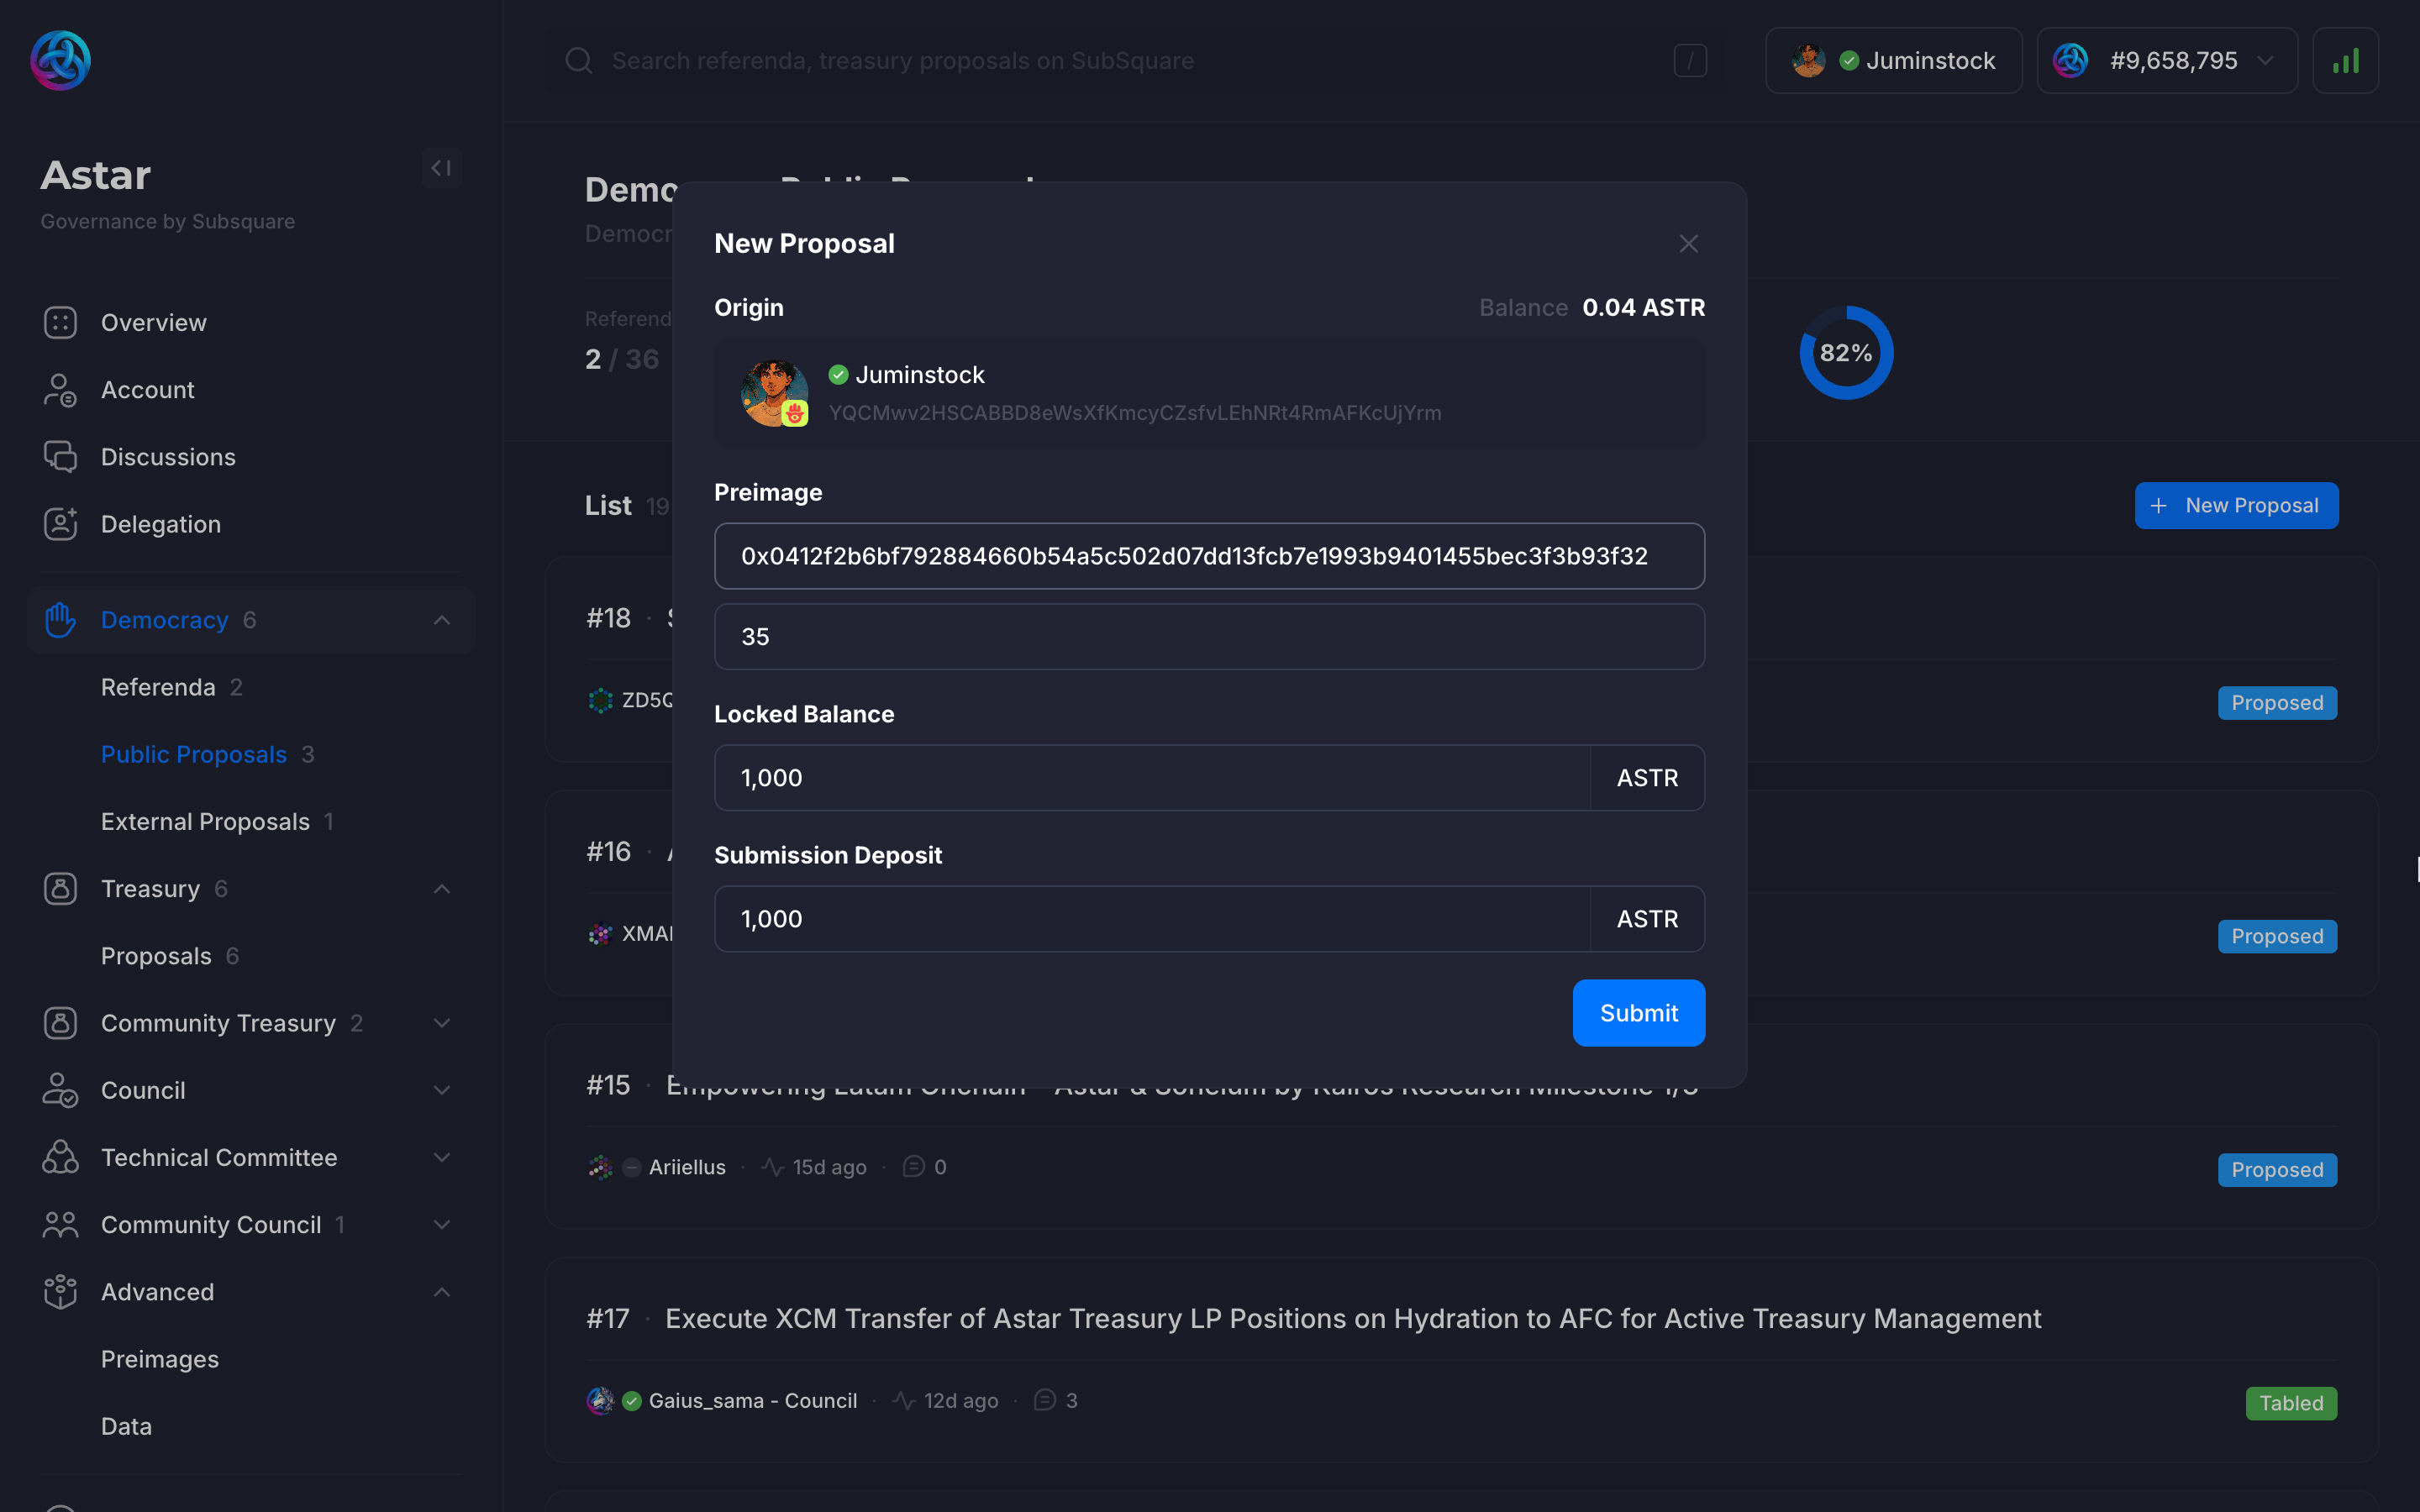
::: Step 2: Create a Public Proposal
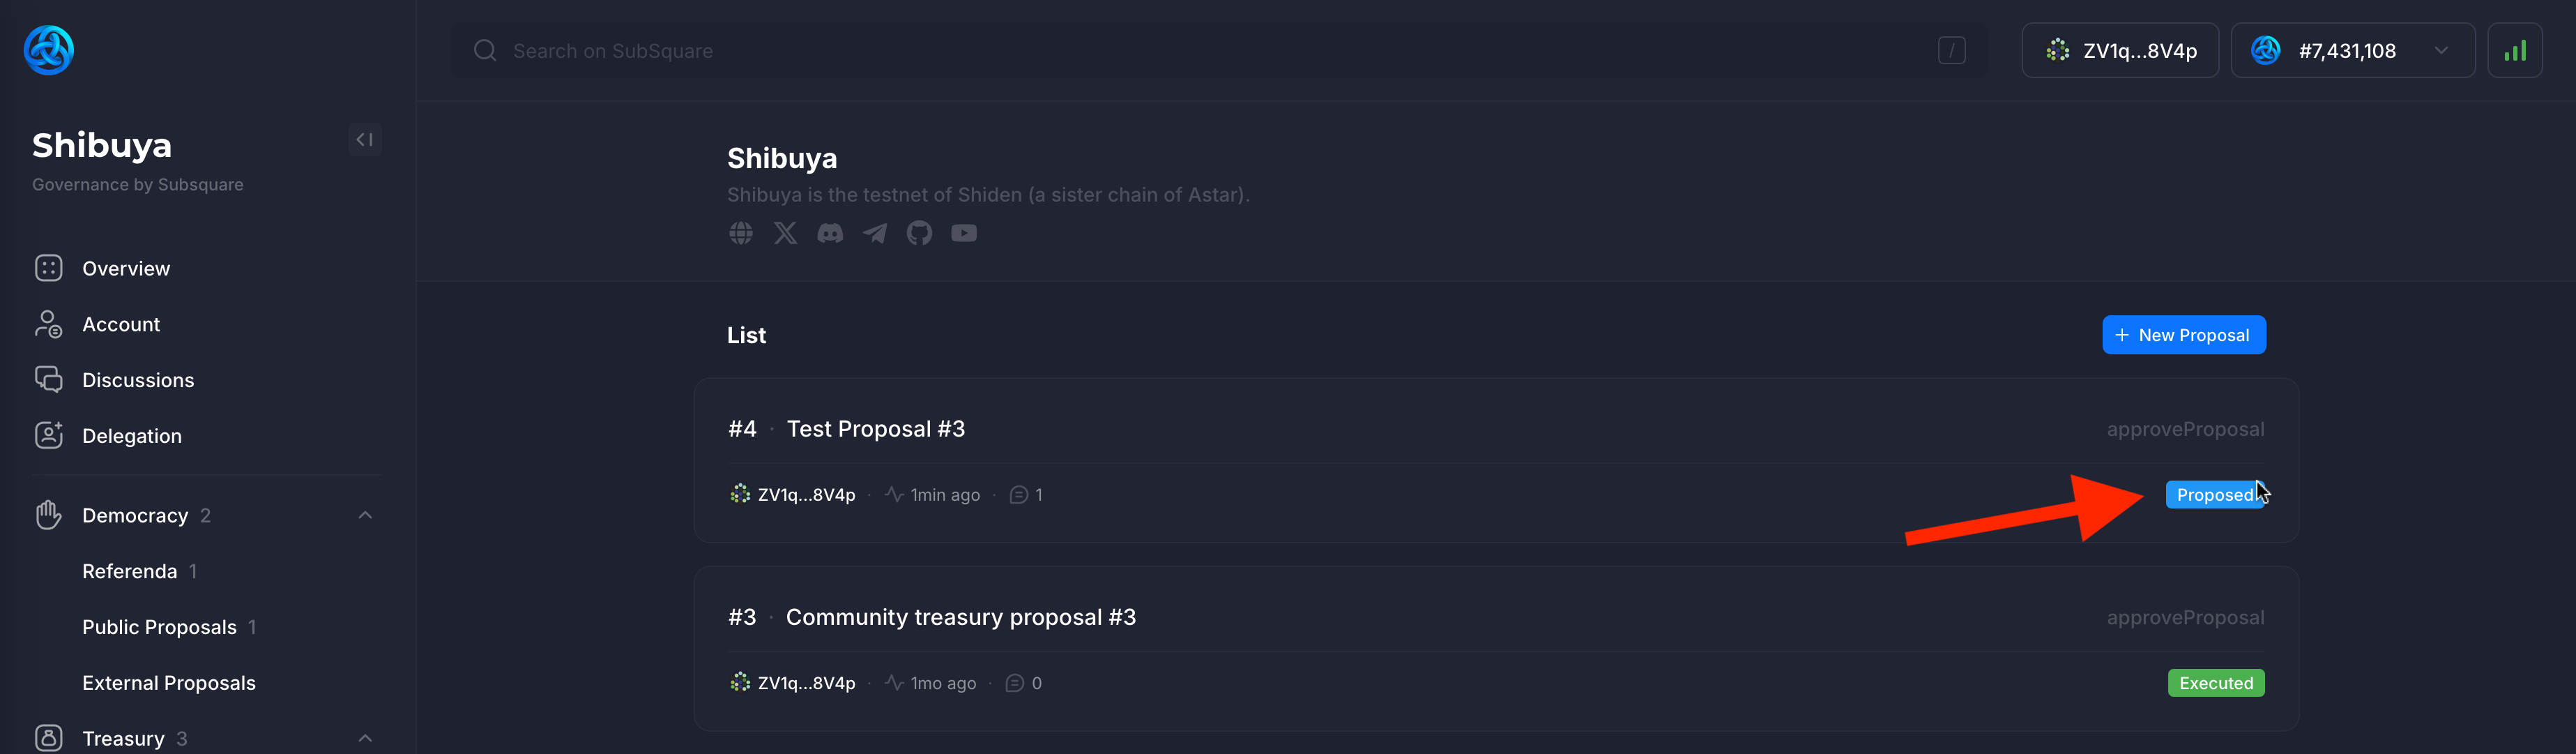
Once the preimage has been created, we can proceed to create the Public Proposal. To do this, go to the Democracy/Public Proposals section in the sidebar.
Here the existing public proposals are displayed. Some have been tabled (upgraded to a referendum), some have been proposed, and others might be canceled.
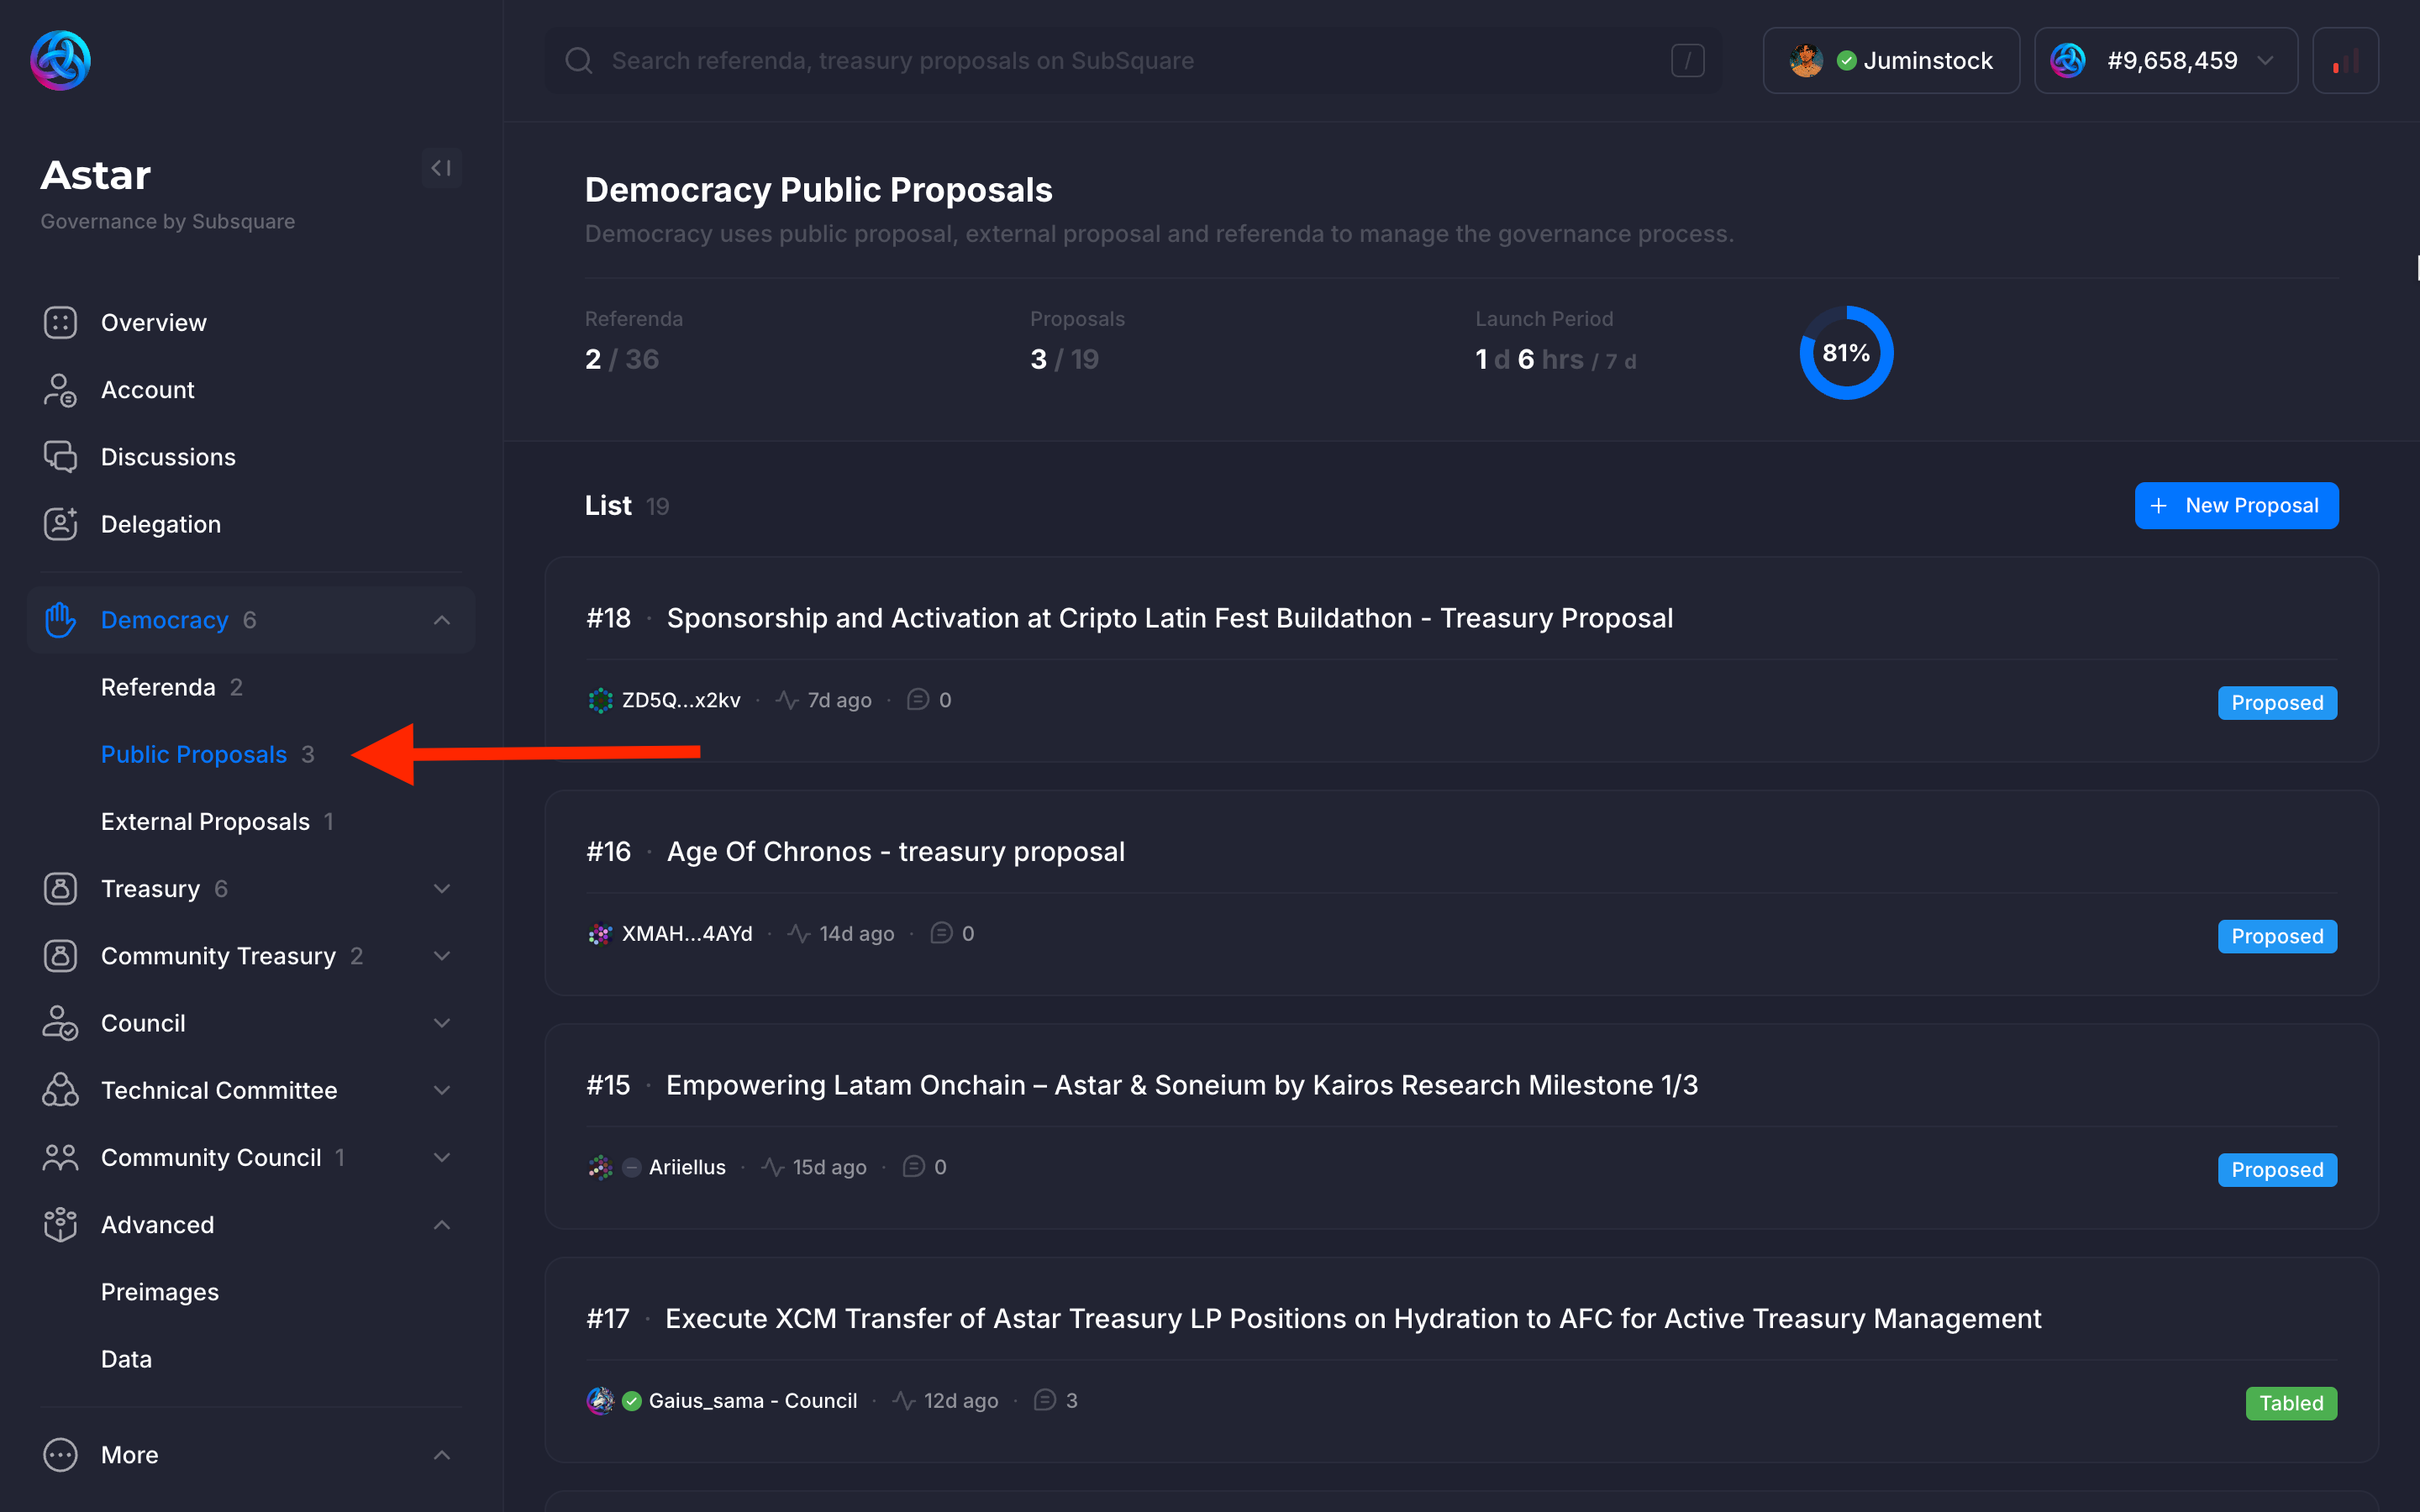
Click on the New Proposal button to create a new Public Proposal. Since a preimage was created in the previous step, it can be used to create a new proposal.
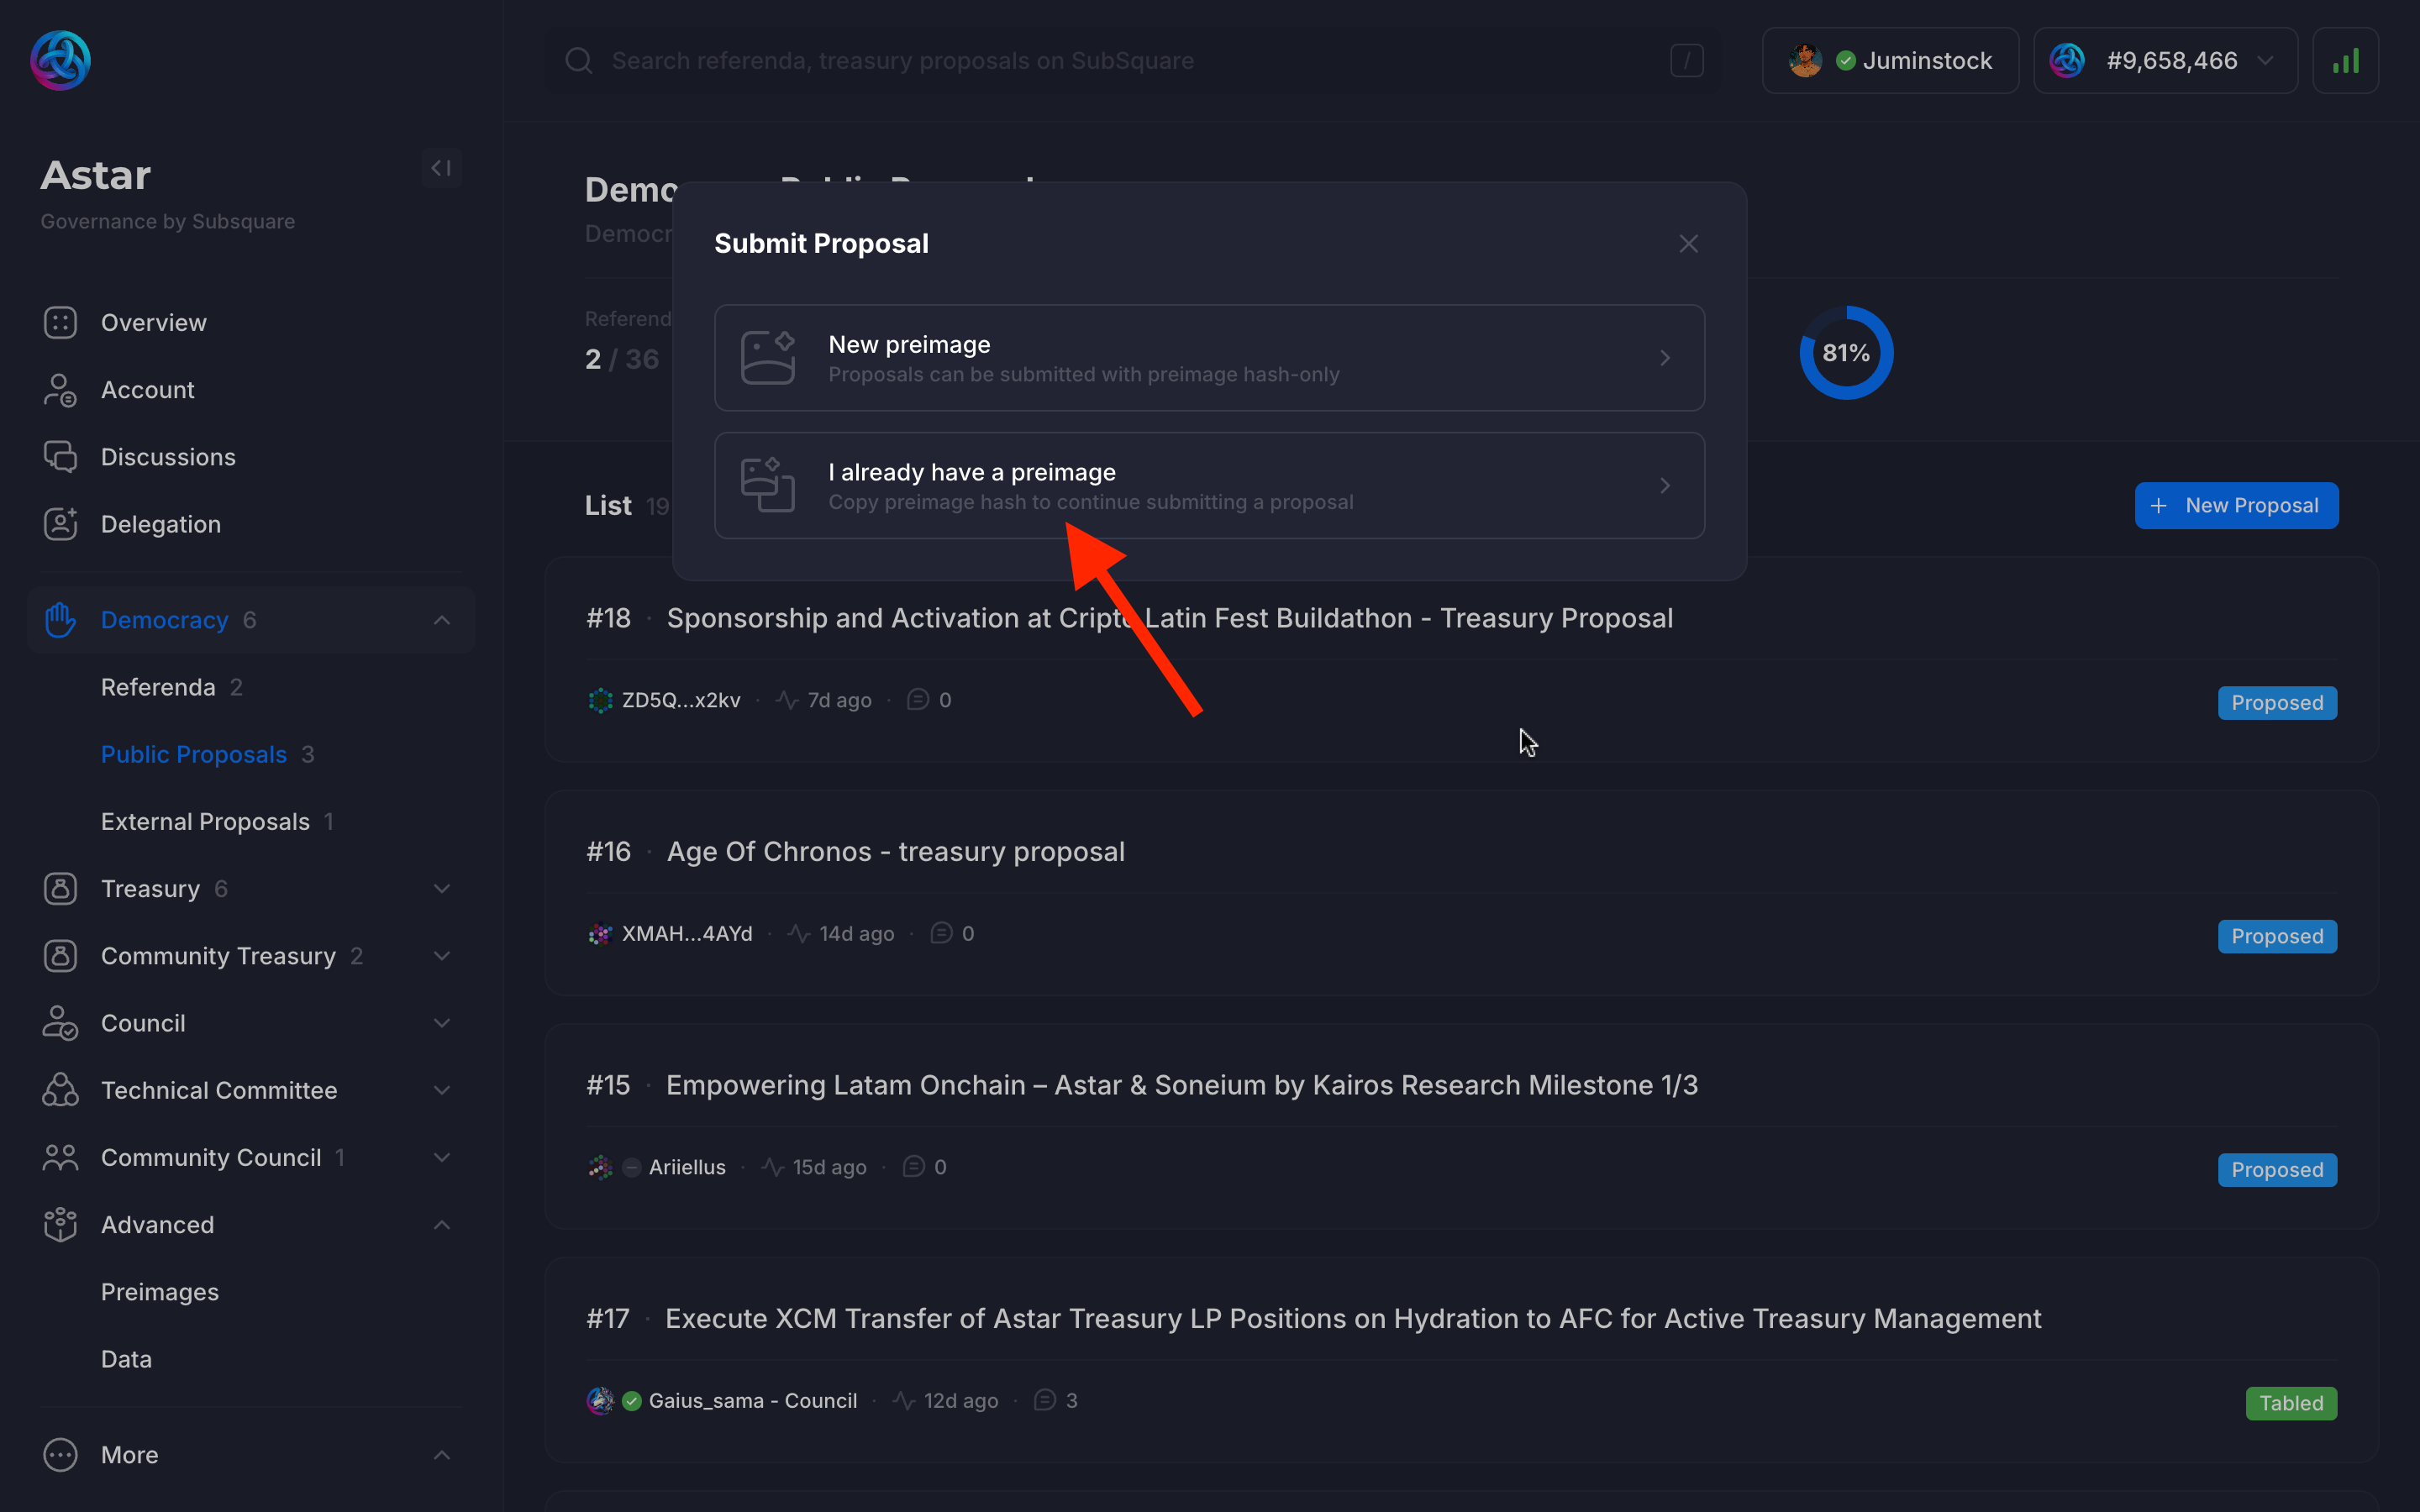
The hash of the preimage is required to create a new proposal. In this case, hash of the preimage created earlier is simply copied and pasted into the Preimage field and the lengh will be automatically filled out.
:::info Locked Balance
The Locked Balance refers to the amount being deposited (not locked) for the proposal. In case the proposal is canceled, the deposit will be slashed. In case the proposal is tabled, the deposit will be refunded.
:::
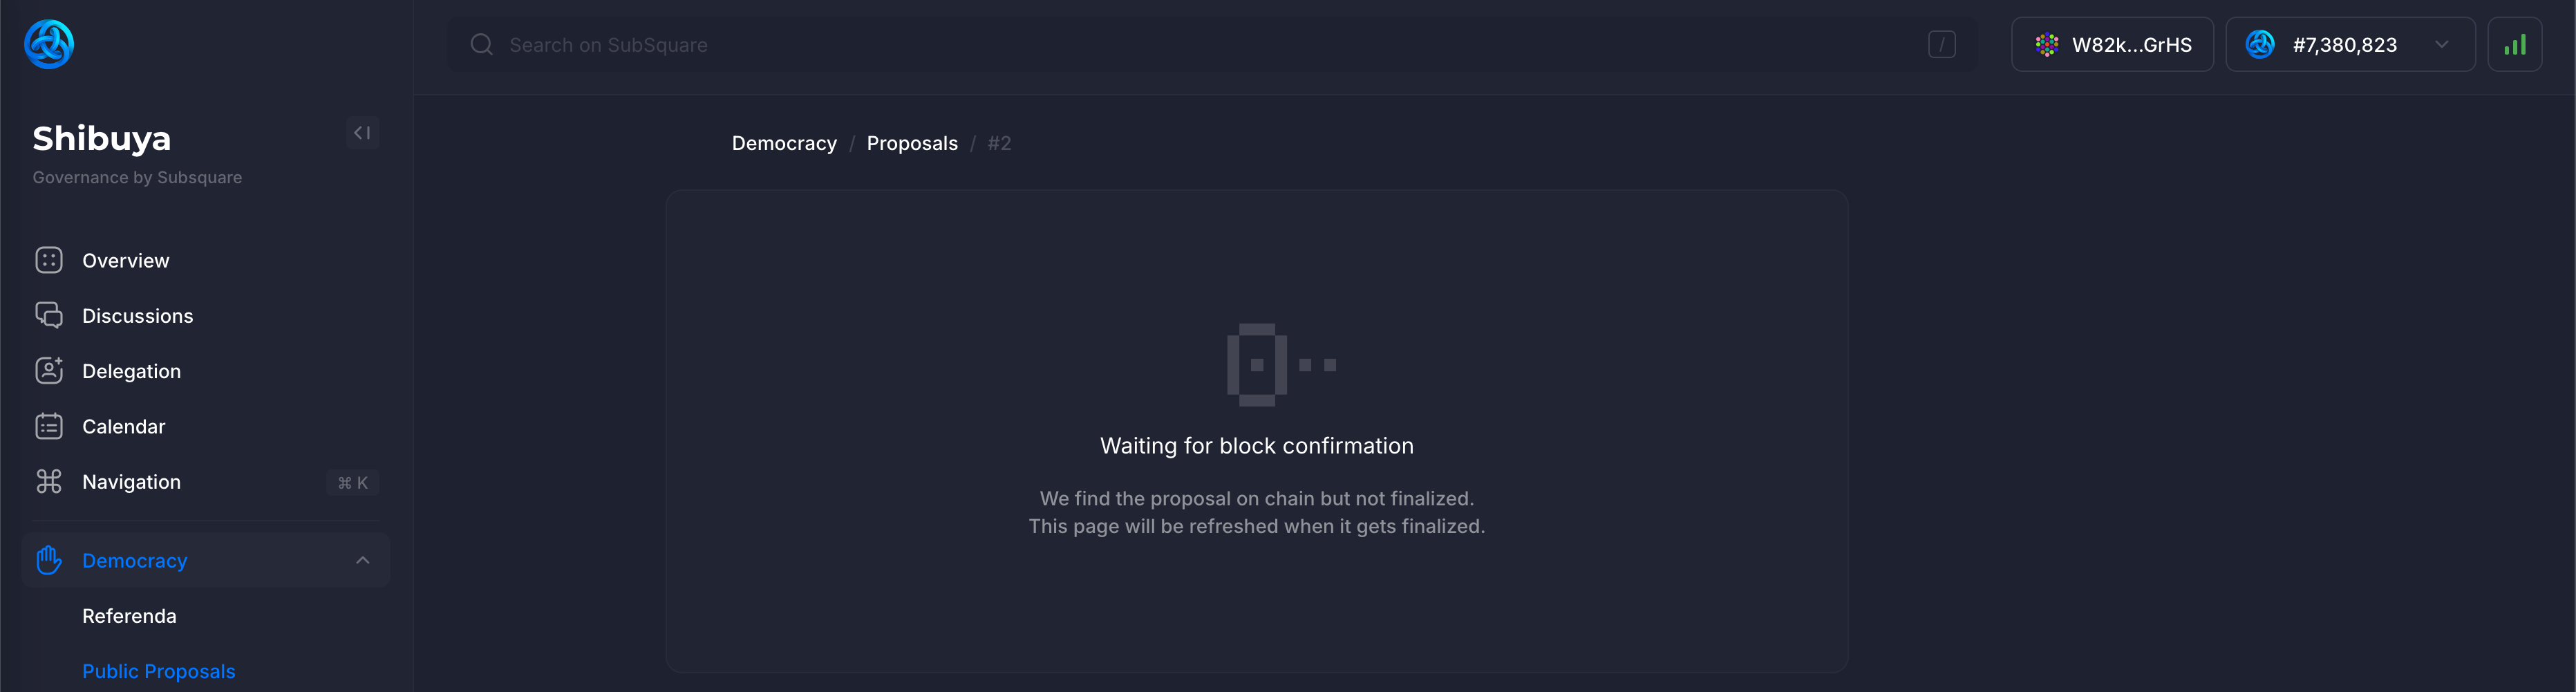
After submitting the proposal, some time needs to pass before the transaction is confirmed and finalized.
Afterwards, it can be observed under the list of public proposals. The status will be marked as Proposed, since it hasn't been tabled (or canceled) yet.
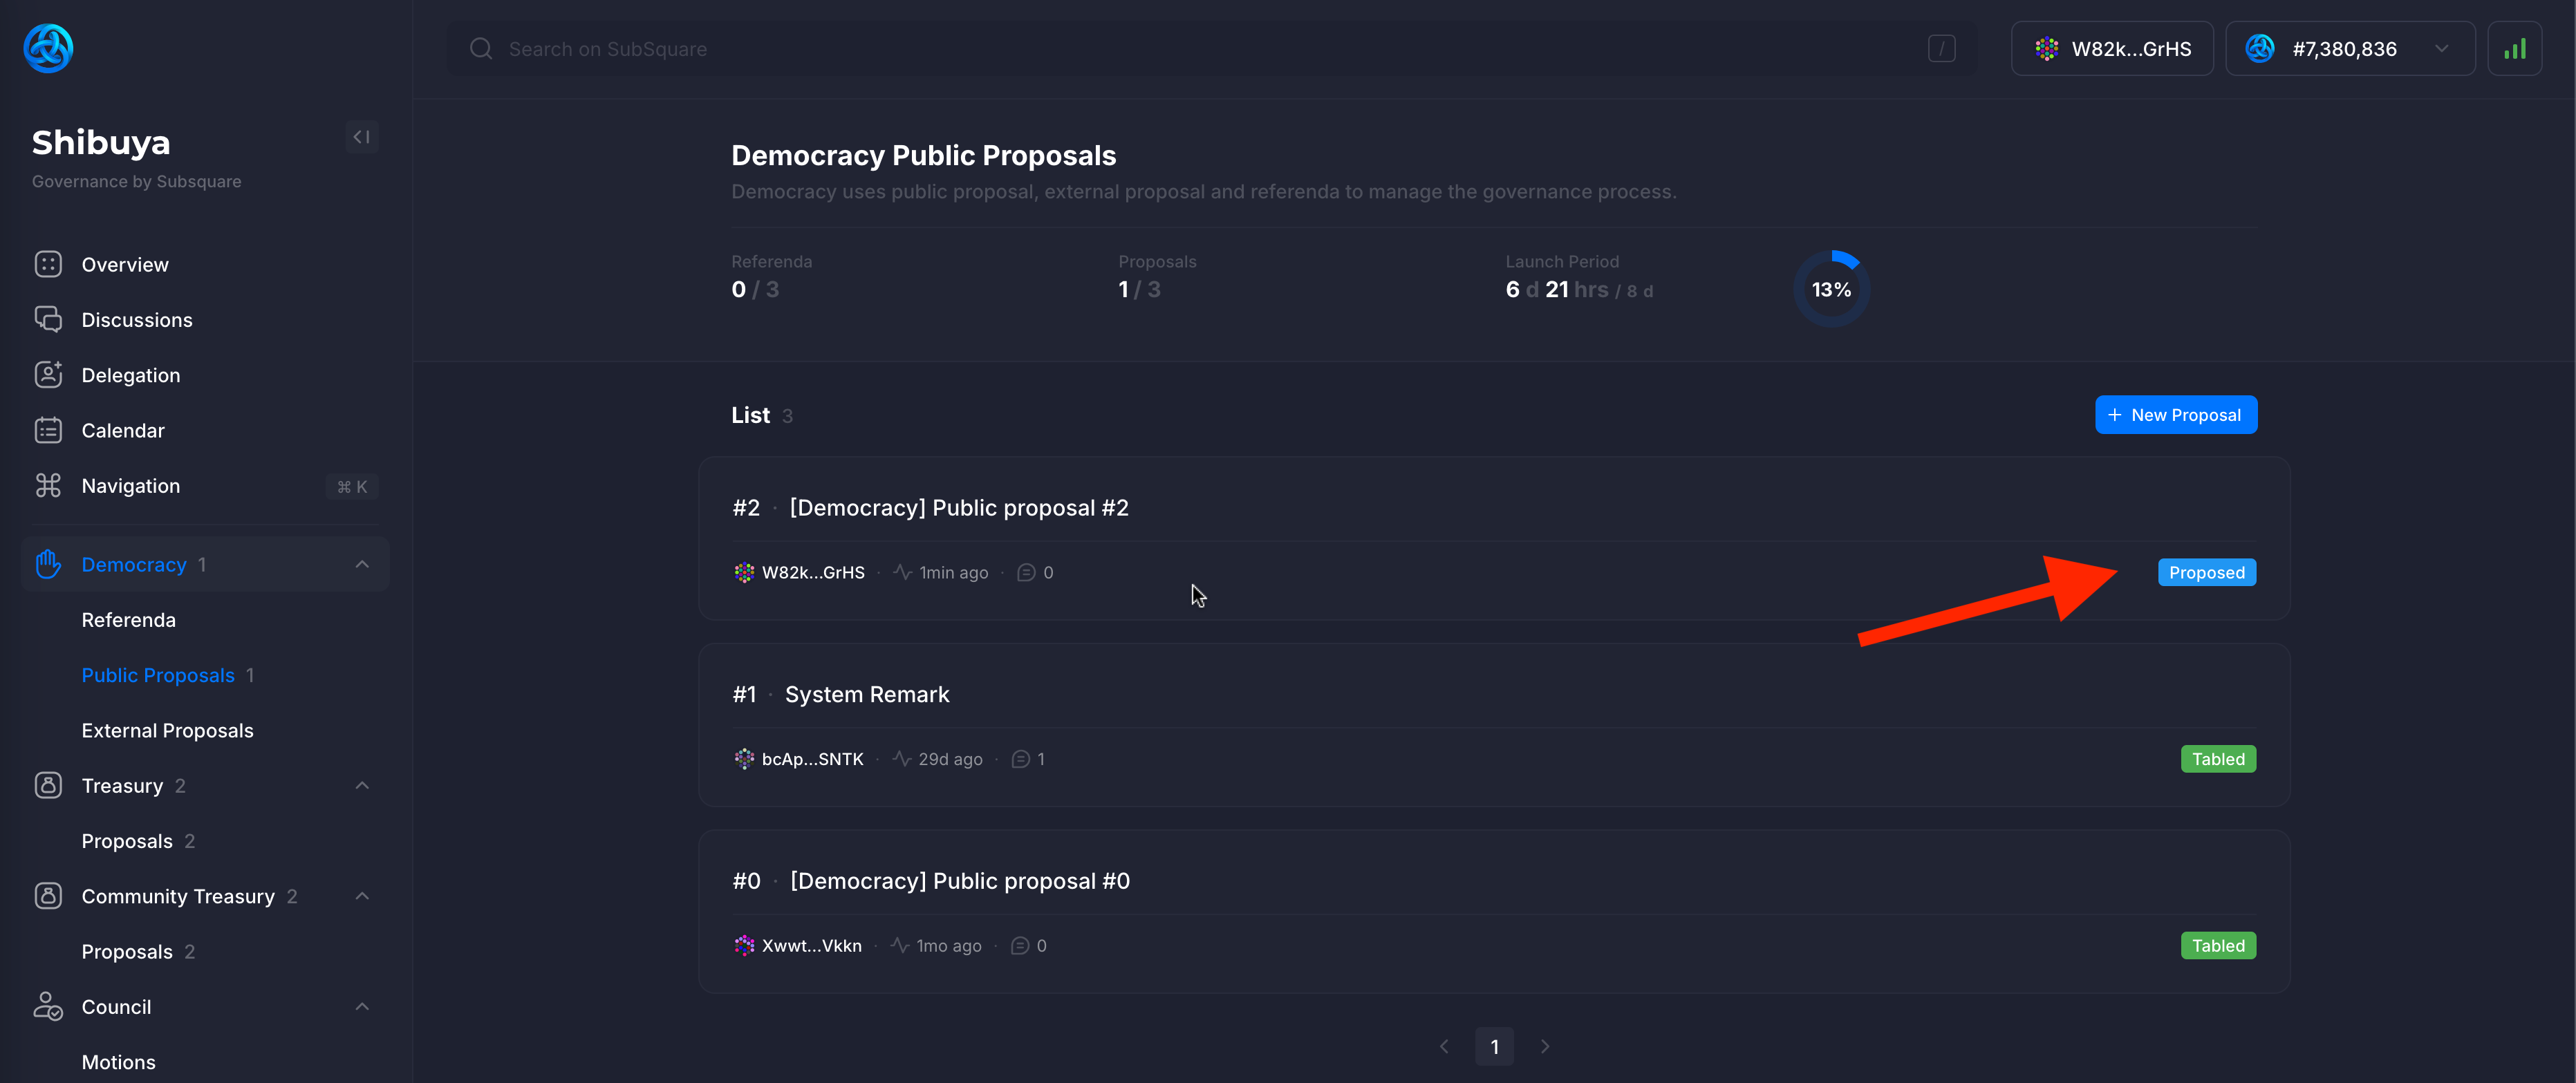
Clicking on the proposal will display more details, and allow to take further actions.
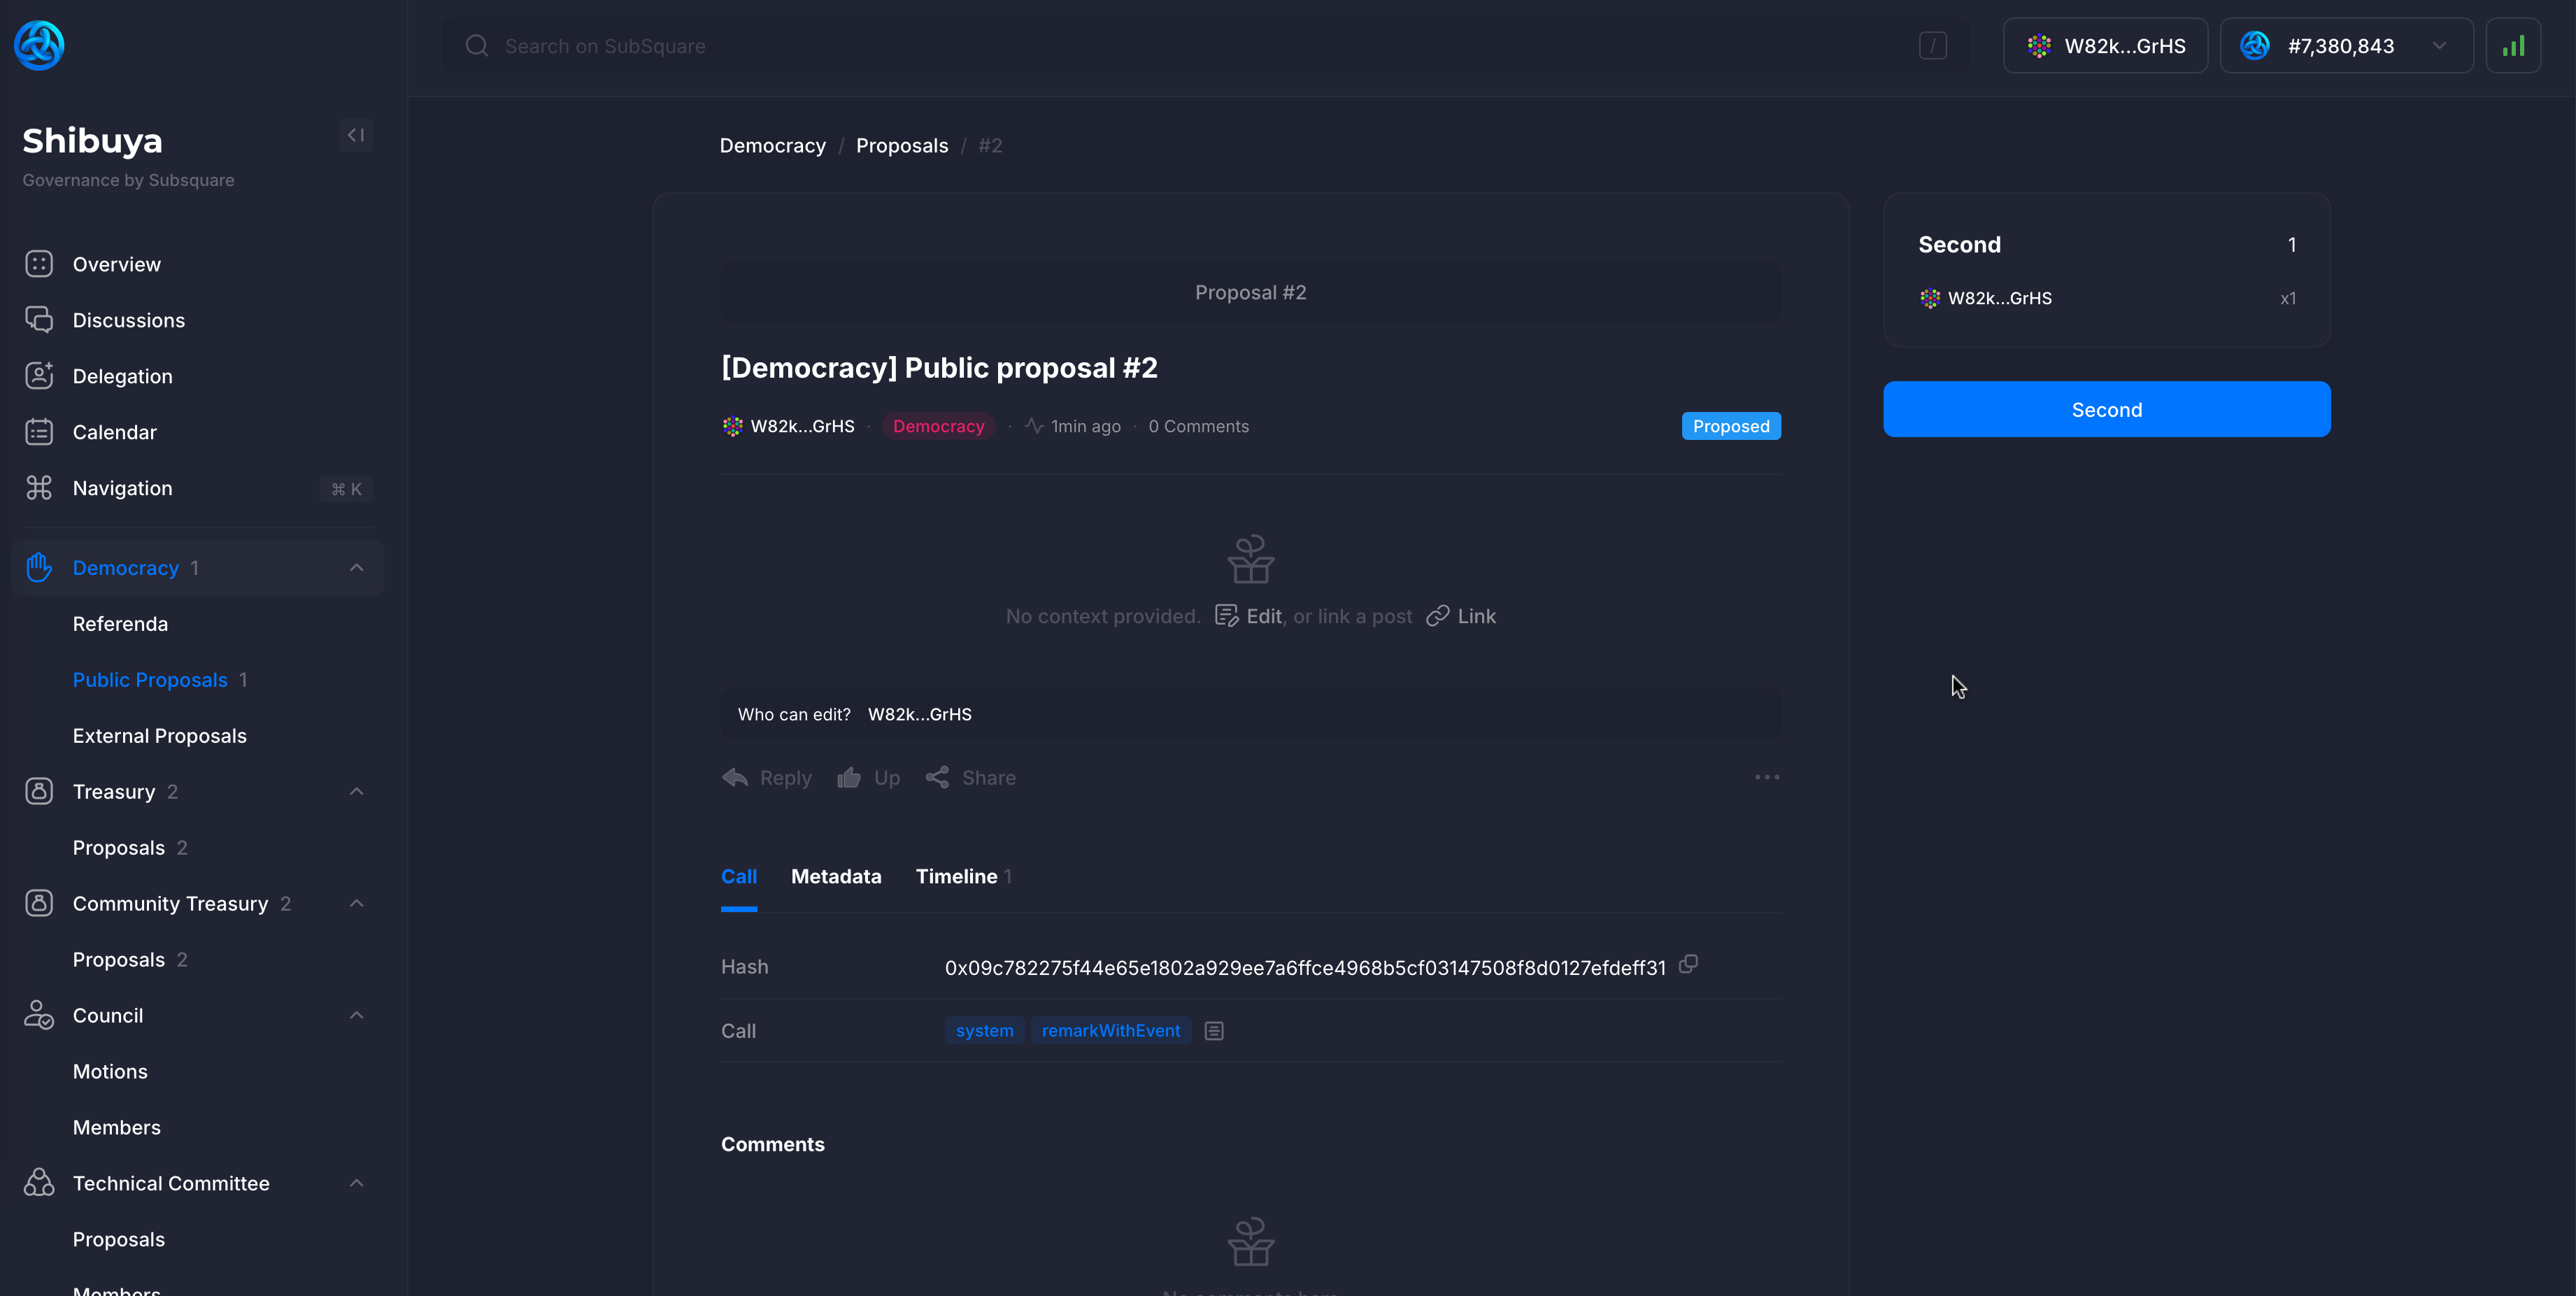
Proposals can be edited by clicking on the Edit button. Title and description can be changed, even a graphic image can be uploaded. Users can discuss the proposal in the comments section.
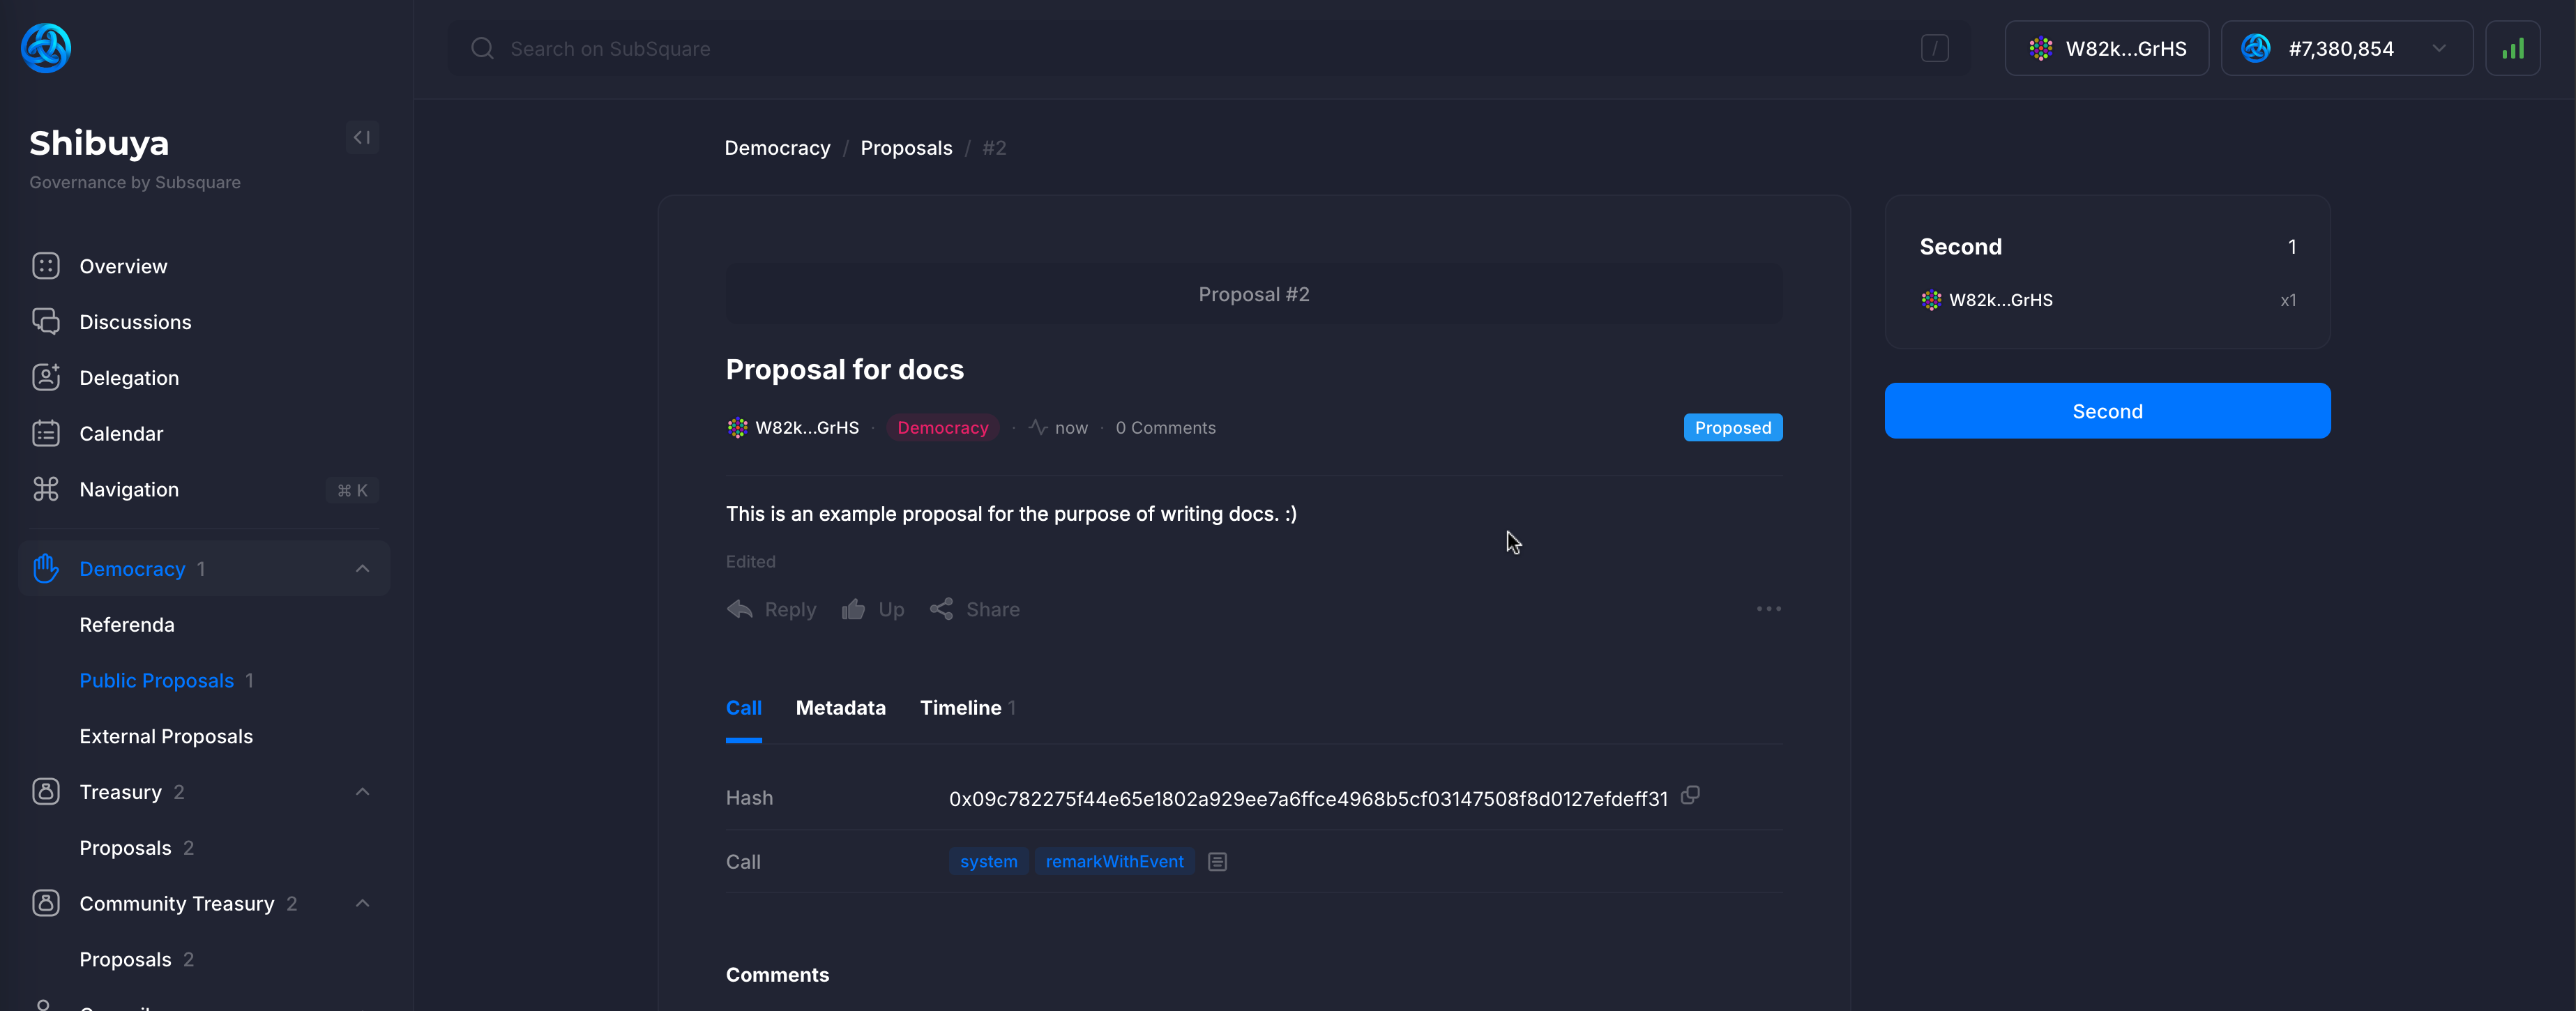
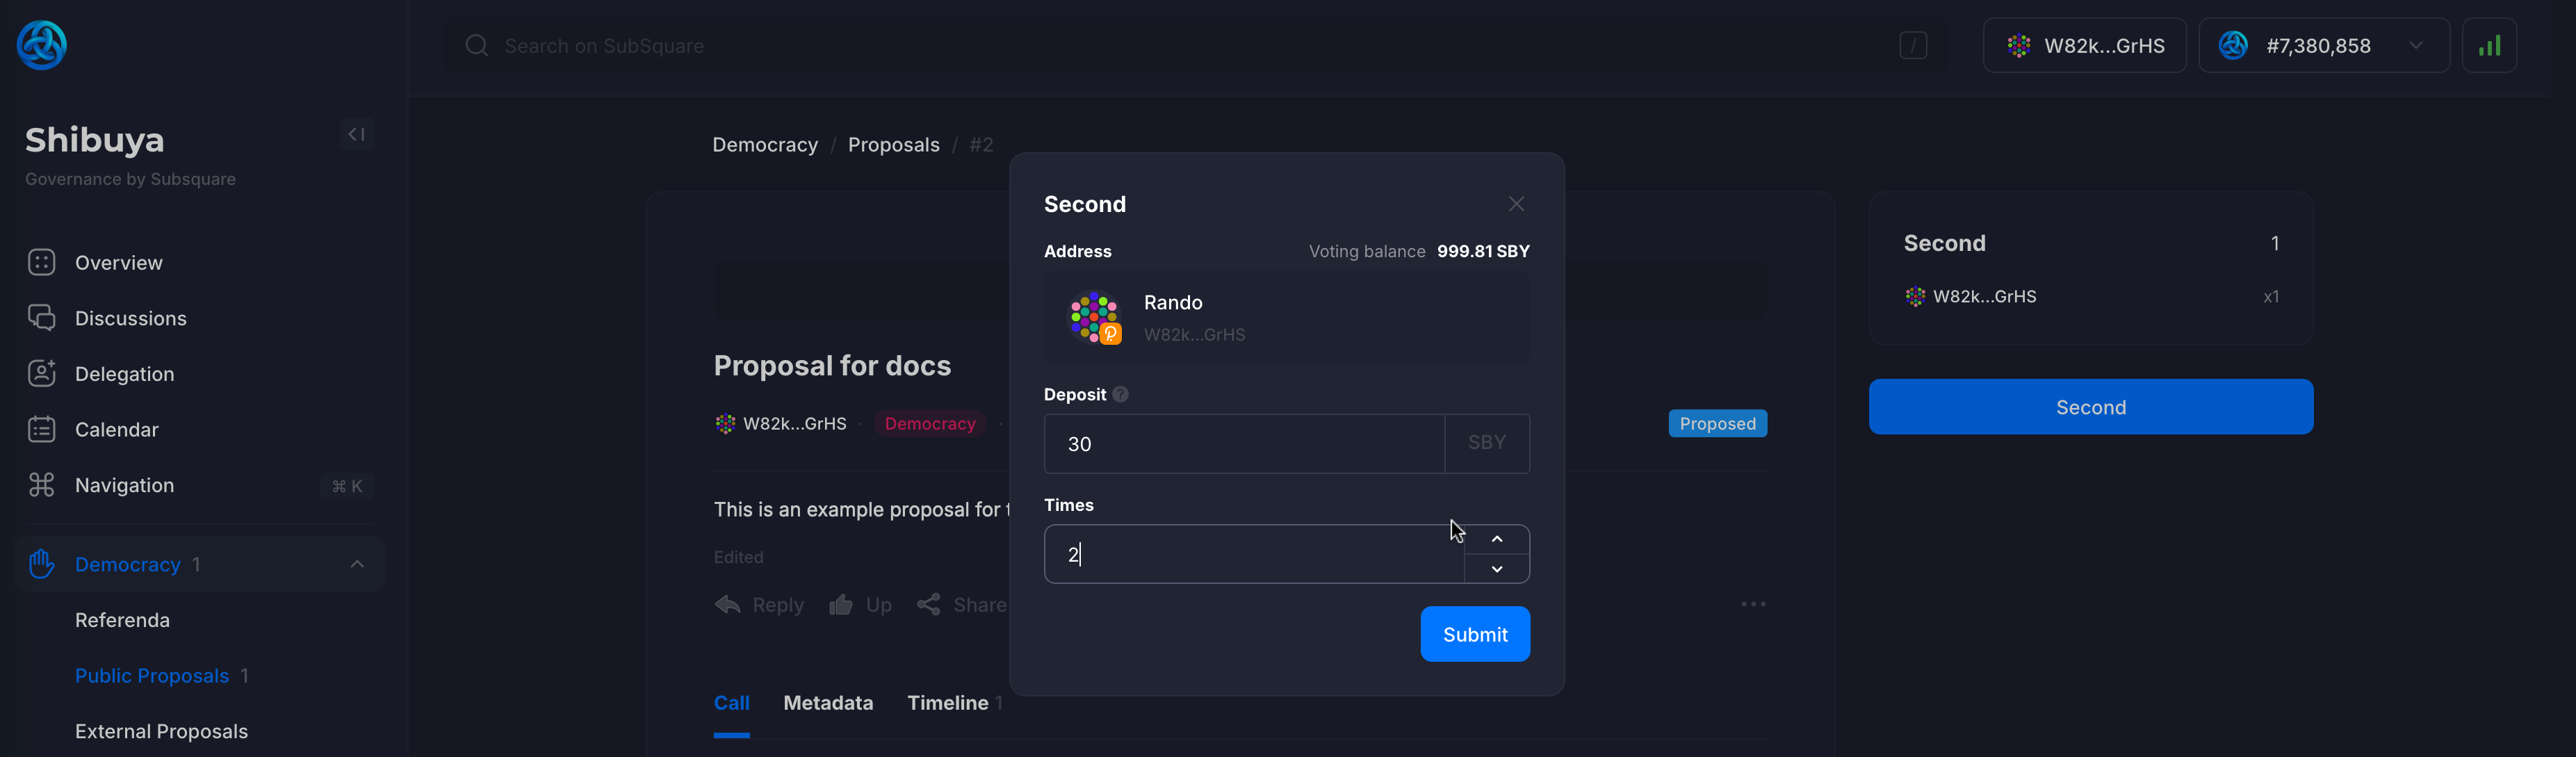
Clicking the Second button to support the proposal, increase its chances of being tabled and upgraded to a referendum. The user has to match the deposit of the proposal, which is displayed on the page. It is possible to second a proposal multiple times.
:::info Seconds
Any user, including the proposer, may support their proposal as many times as they wish. These seconds will be released once the proposal is tabled (upgraded to a referendum).
:::
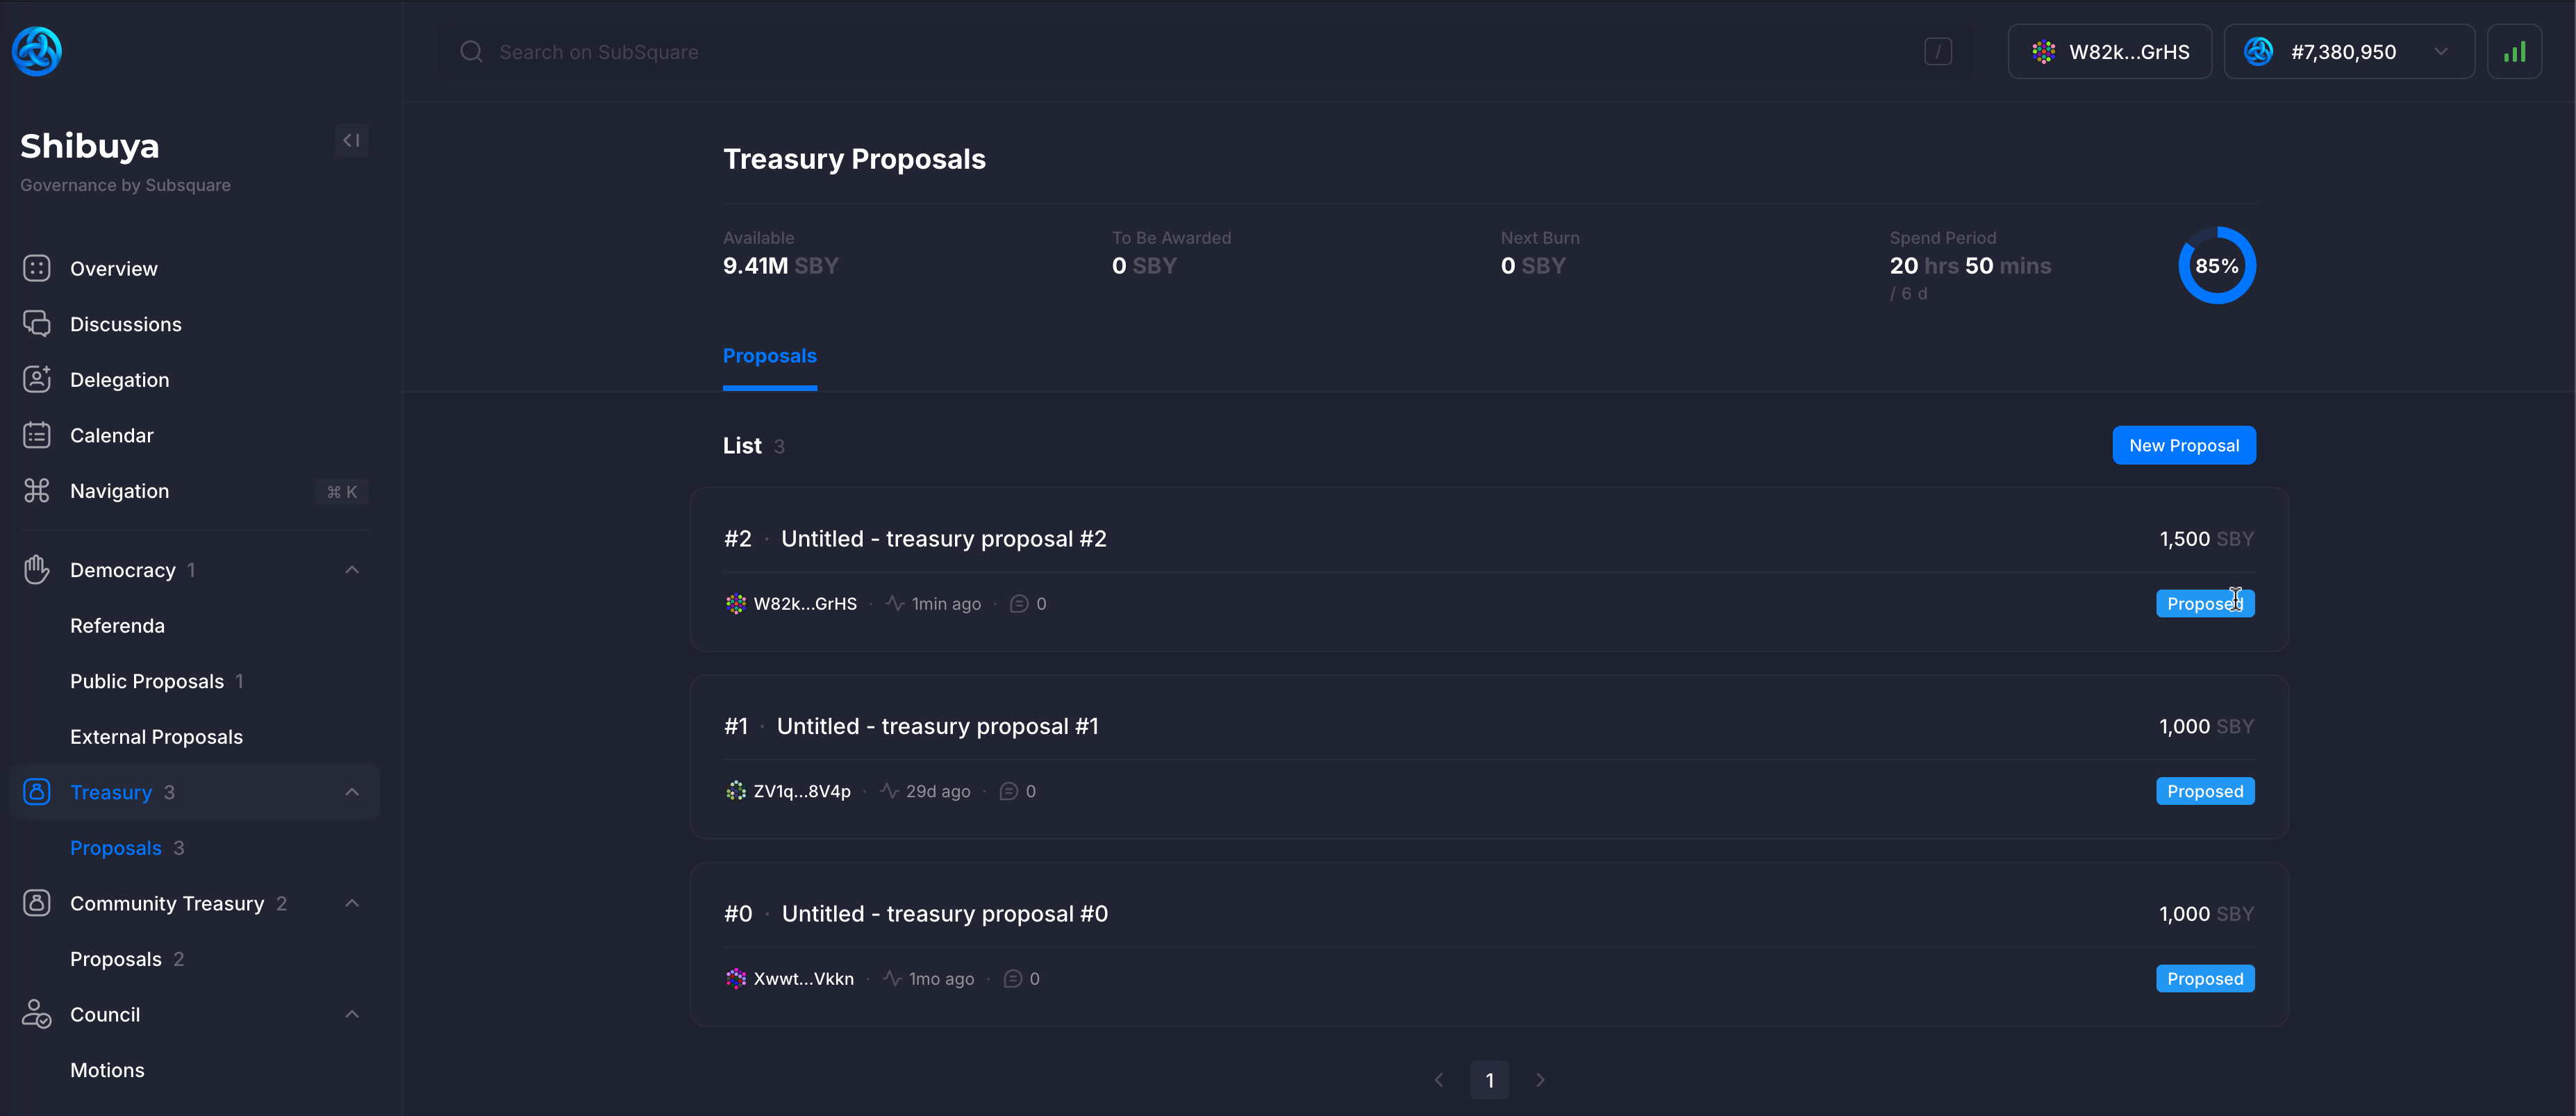
Track #2: Main Treasury
Another way to execute onchain actions without going through public referenda is through the approval of the Main Council. Clicking on the Treasury tab on the sidebar will display the current state of the treasury & spending requests.
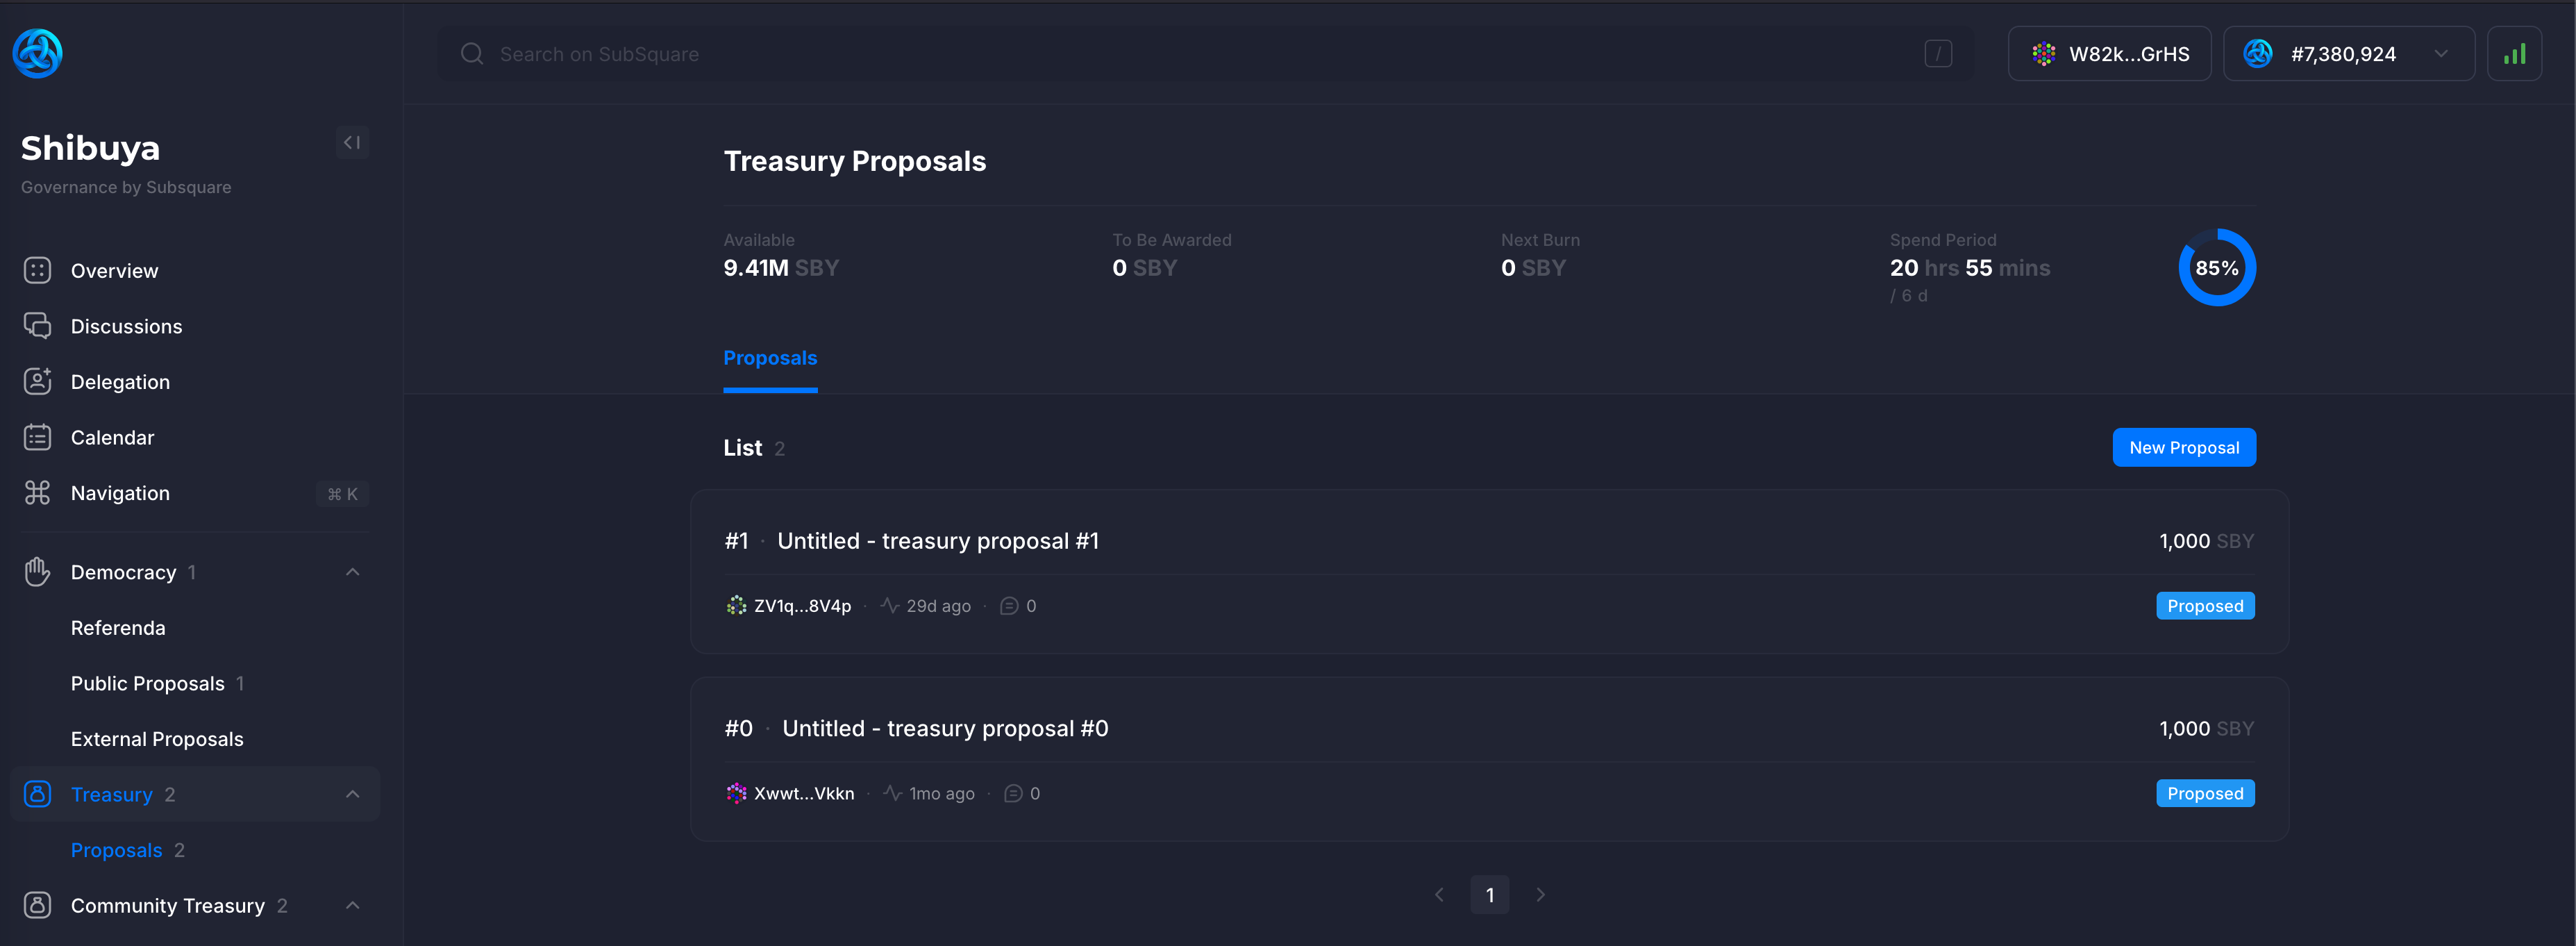
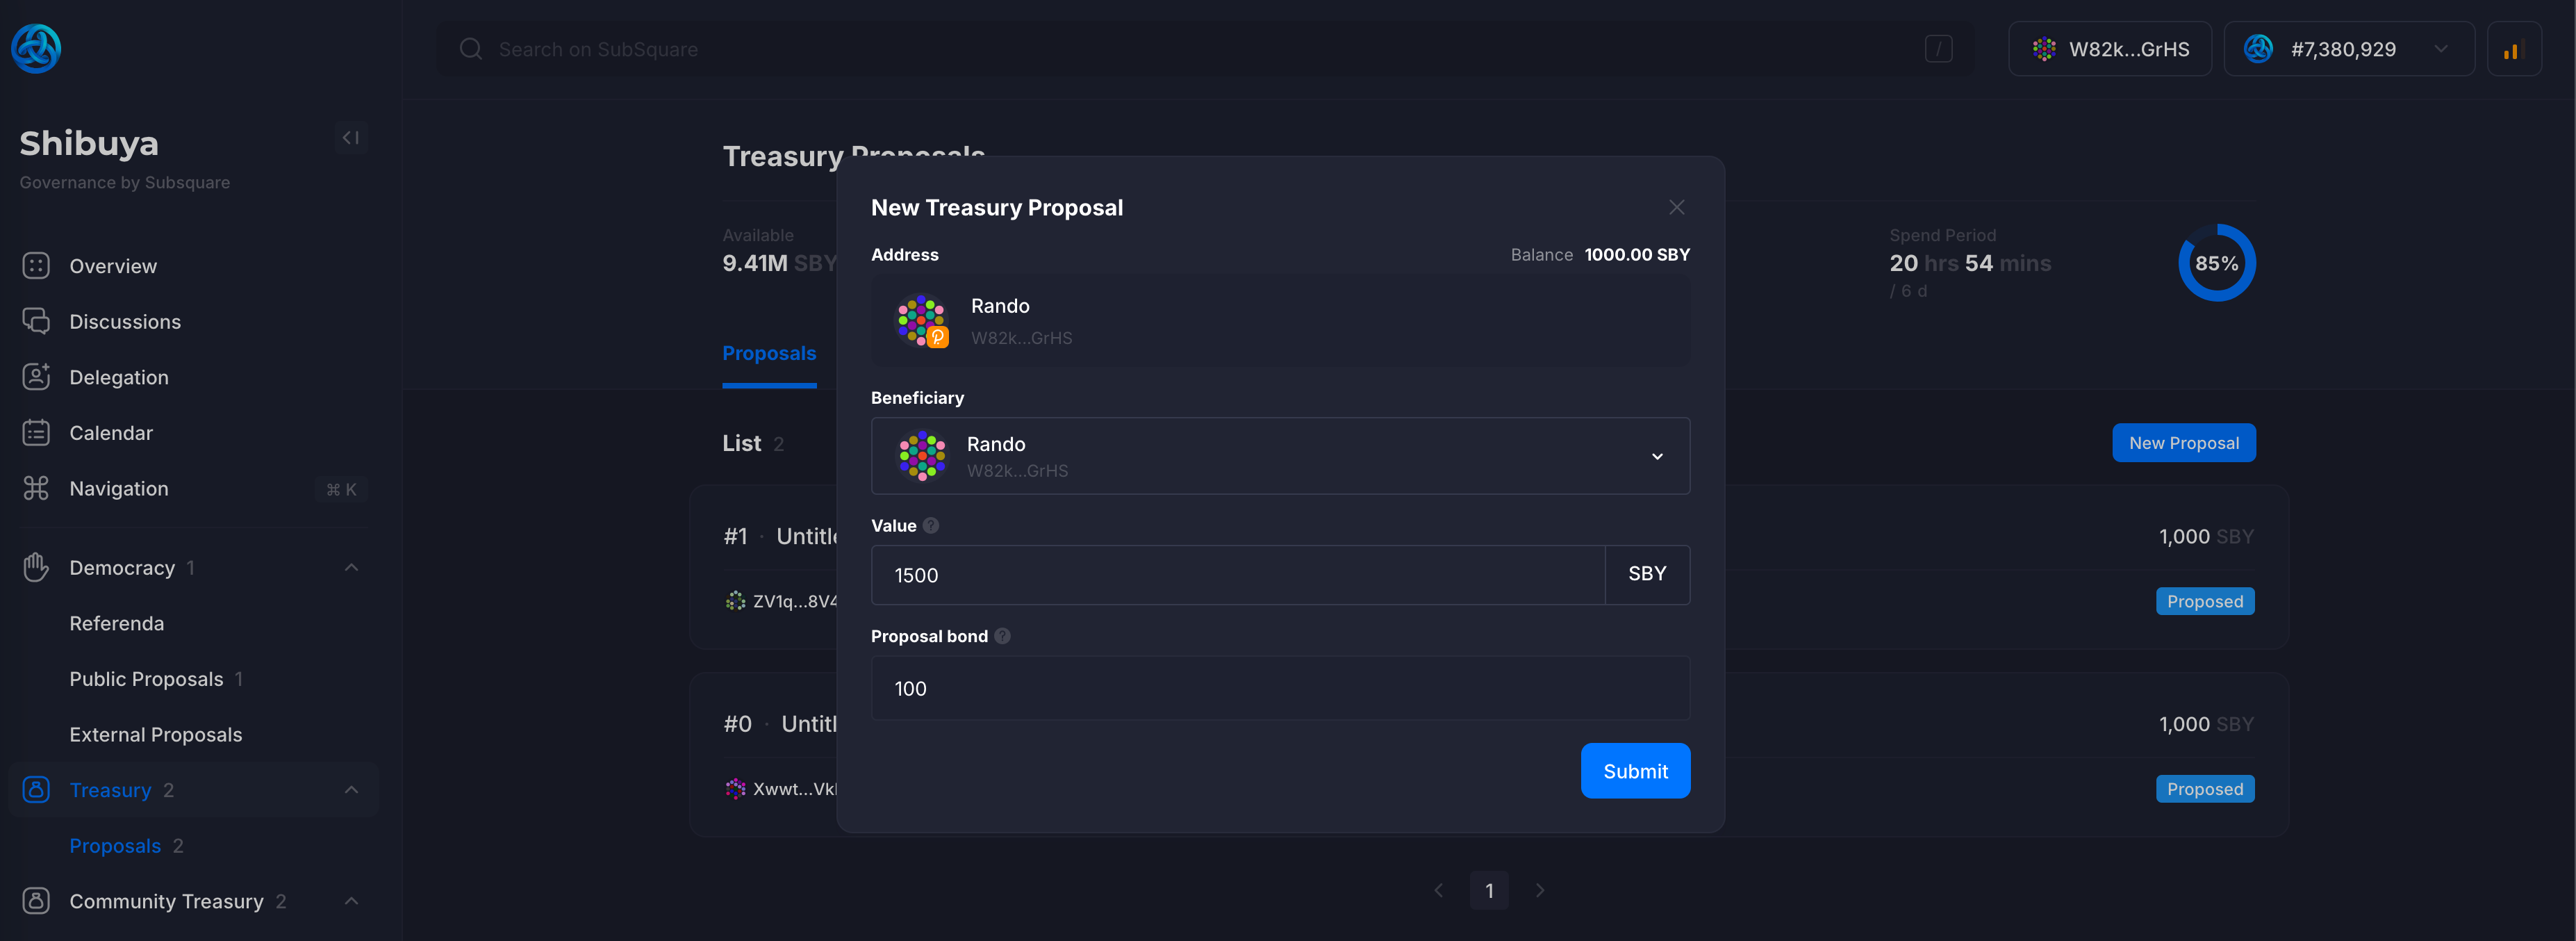
Clicking on the New Proposal button will allow the creation of a new spending proposal.
User needs to pick the payout amount & the beneficiary. The Proposal bond refers to the amount that needs to be deposited in order to create the proposal.
:::info Approve or Rejected
If the proposal is rejected, the bond will be slashed. Otherwise, the bond will be refunded.
:::
After submitting the proposal, it will be displayed on the treasury page. The proposal name & description can be edited.
Track #3: Community Treasury
:::info Community Treasury
The third track for creating onchain proposals is using the Community Treasury, which allows you to request spending, include/exclude dApps from dApp Staking, and execute other actions. To do this, you can reuse the same steps mentioned above.
::: :::tip Community Council
All proposals requesting actions or expenditures from the Community Treasury will be reviewed, approved, or rejected by the Community Council. More details on this below.
:::
3.1.2. Endorsing and Seconding Proposals
The endorsement system in Astar onchain governance allows community members to support proposals through a process called seconding, which serves as both a quality filter and a mechanism for demonstrating community interest before proposals advance to referendum status.
Seconding is a formal endorsement in which supporters match the original proposer’s deposit, creating an economic commitment that ensures genuine backing and prevents irrelevant proposals. The process is cumulative, allowing multiple members to second the same proposal, with deposits held until it reaches a referendum or is canceled.
Economic Implications of Proposal Support
When users choose to second a proposal, they commit the same deposit amount as the original proposer, creating shared economic risk among supporters. This deposit structure aligns incentives between proposers and supporters, ensuring all participants have meaningful stake in the proposal's quality and potential success.
The deposit matching requirement serves multiple functions within the governance ecosystem. It prevents coordinated attacks where malicious actors could inflate support metrics without economic consequence, while simultaneously creating a natural threshold where proposals must demonstrate sufficient community conviction to advance through the governance pipeline.
Deposit Recovery and Risk Management
Seconding deposits follow the same recovery schedule as the original proposal’s deposit and are automatically refunded if the proposal advances to a referendum. This makes seconding a low-risk way to back legitimate initiatives while preserving an economic deterrent against poor quality proposals. However, if a proposal is canceled for malicious content or technical faults, all deposits, including those from seconders, may be slashed, incentivizing thorough due diligence before offering support.
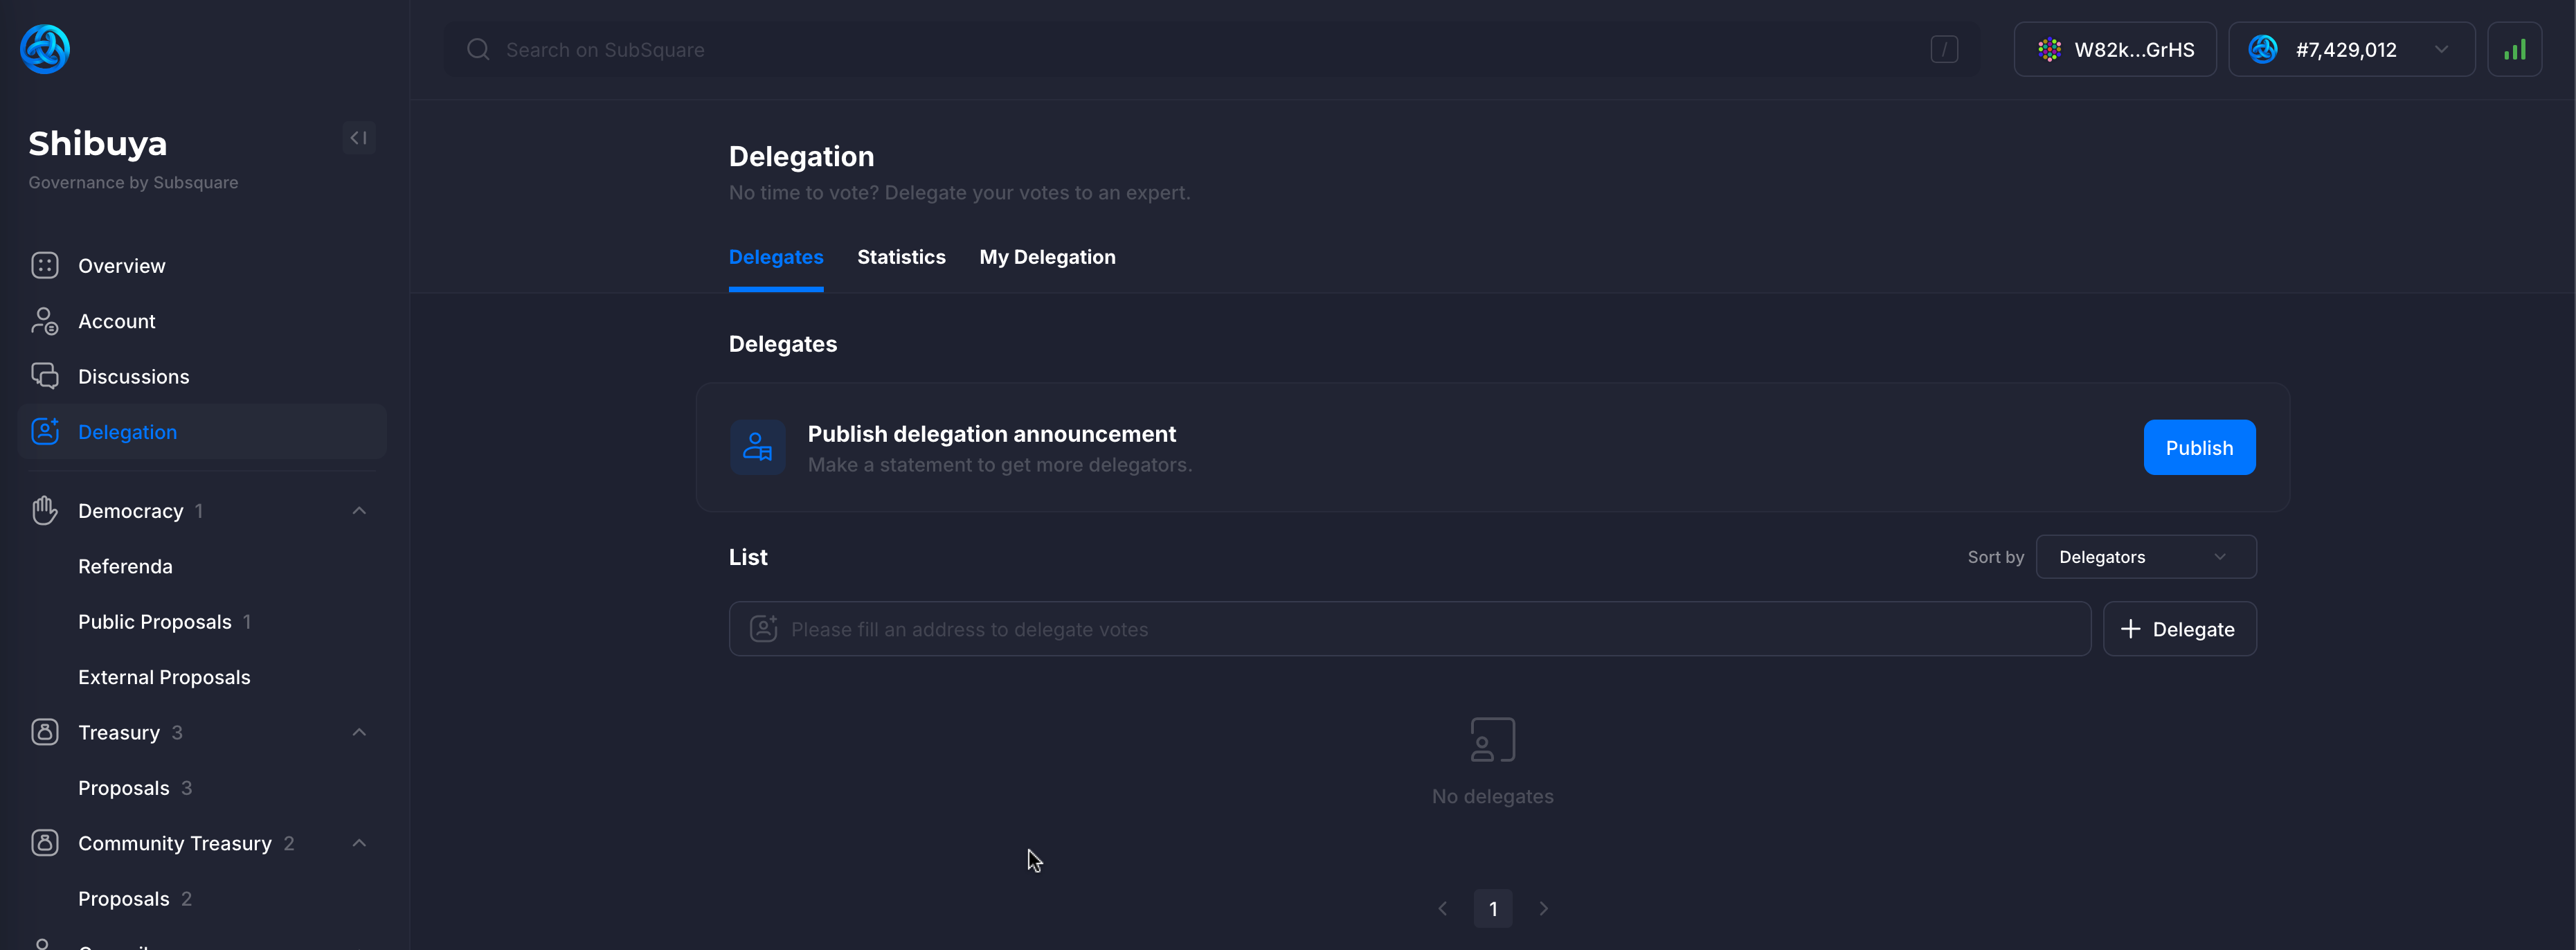
3.1.3. Vote Delegation
Any ASTR token holder can delegate their tokens so that their voting power can be used in governance proposals. It’s important to highlight that when you delegate your tokens, they never leave your wallet. Once delegated, you can revoke the delegation at any time.
Now, let's understand how to delegate your tokens using the Subsquare interface.
Steps to delegate
Click on the Delegation tab on the sidebar to access the vote delegation page. This is an overview of delegation related actions and statistics.
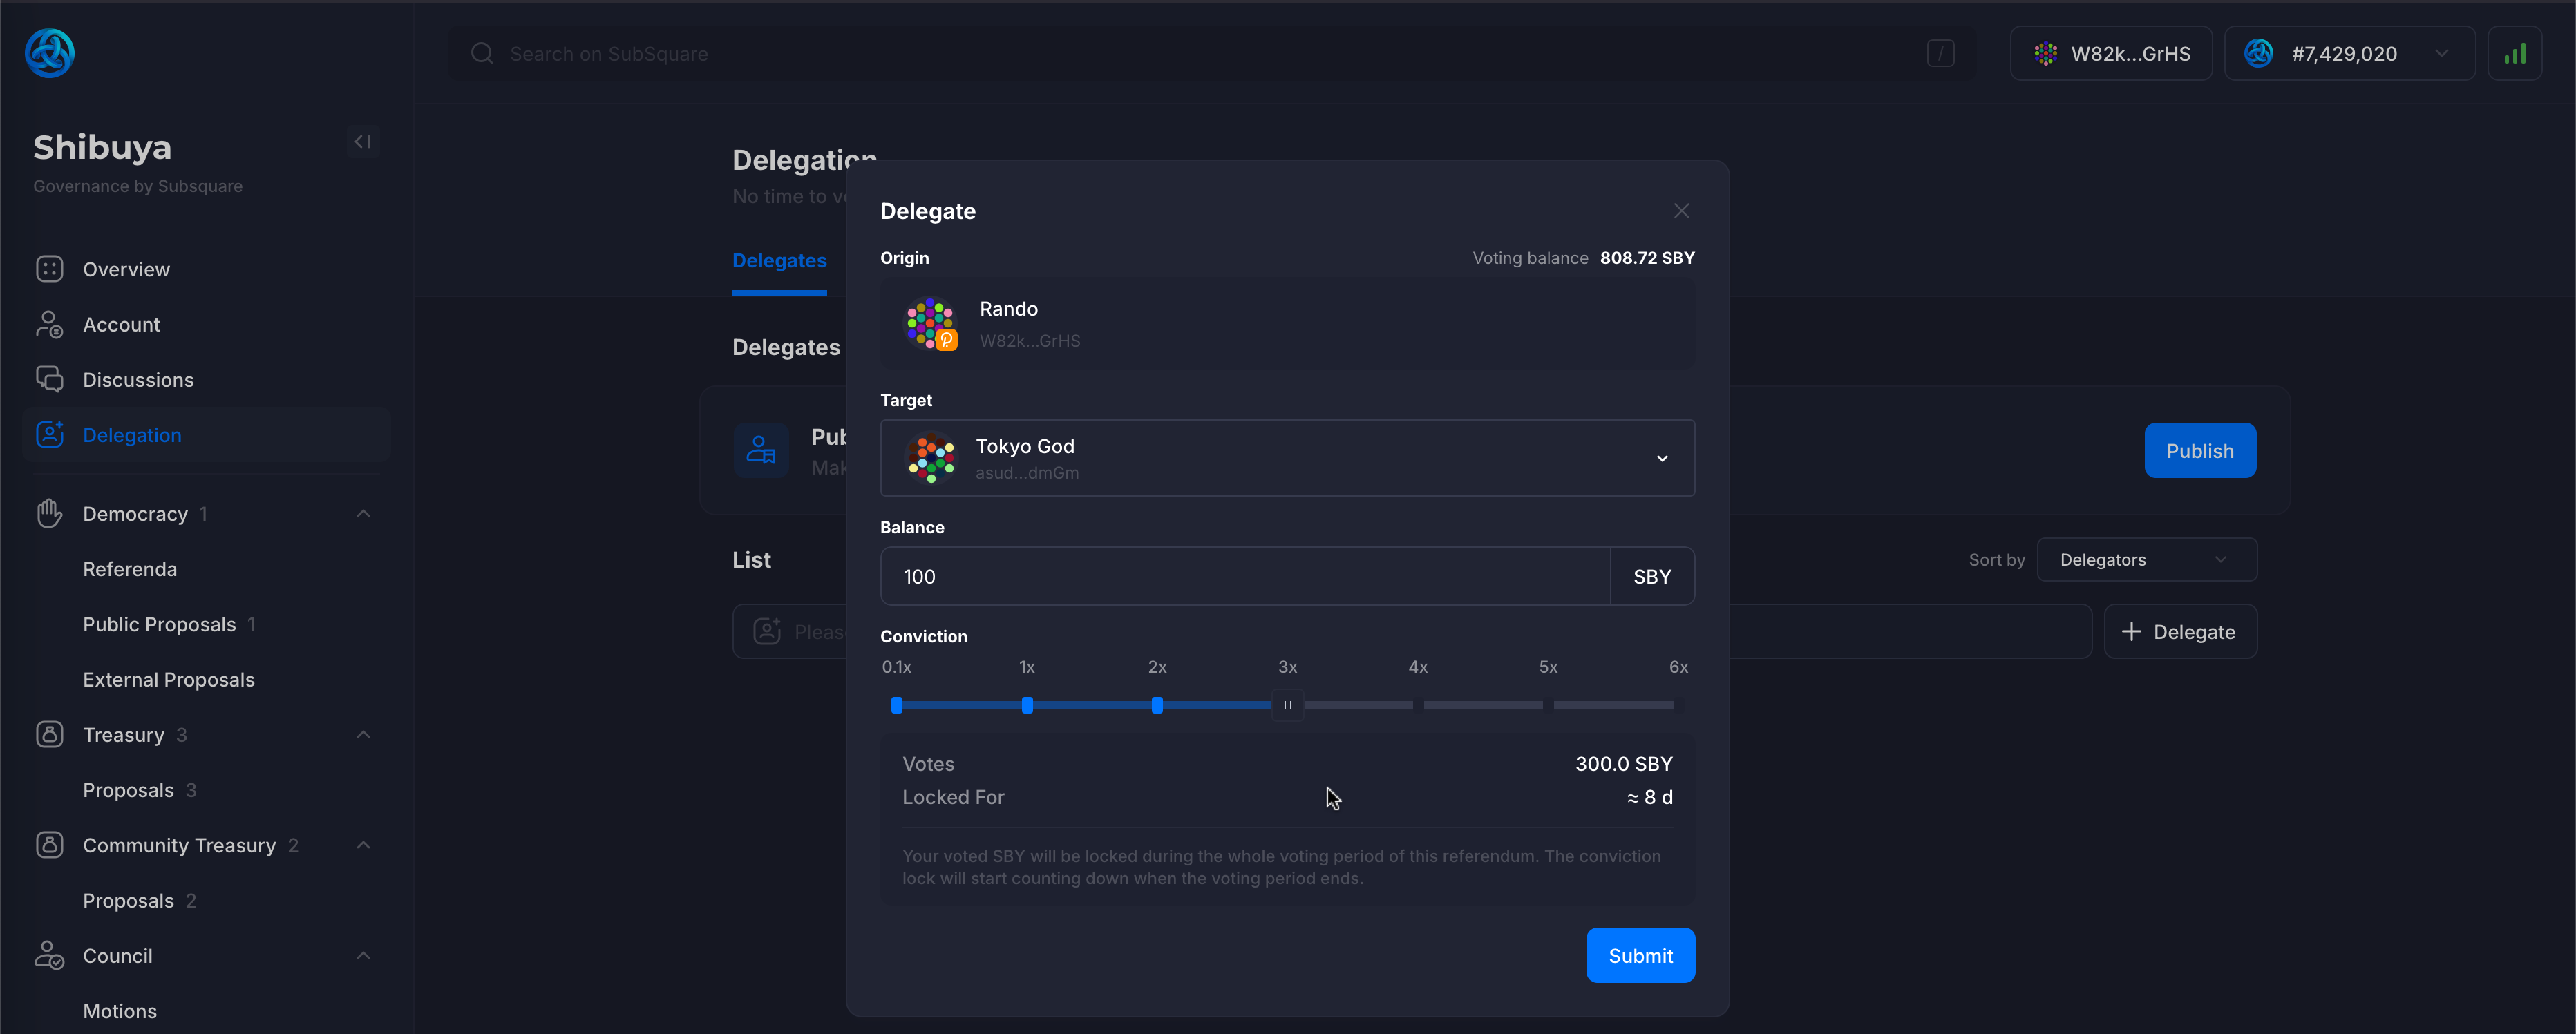
Clicking on the + Delegate button allows you to delegate votes to another account
The Target is the account to which the votes are being delegated to. The Balance is the amount of native currency we're delegating. This is the amount that will be locked.
:::info Delegating Votes
The action of delegating voting power DOES NOT transfer the ownership of the tokens. They are merely locked for normal use, but remain in the ownership of the delegator.
:::
The Conviction setting determines how much your voting power is amplified in exchange for a longer token lock period.
Once the delegation has been submitted, it will be displayed on the delegation page. Clicking on the Details label will display more information about the delegation.
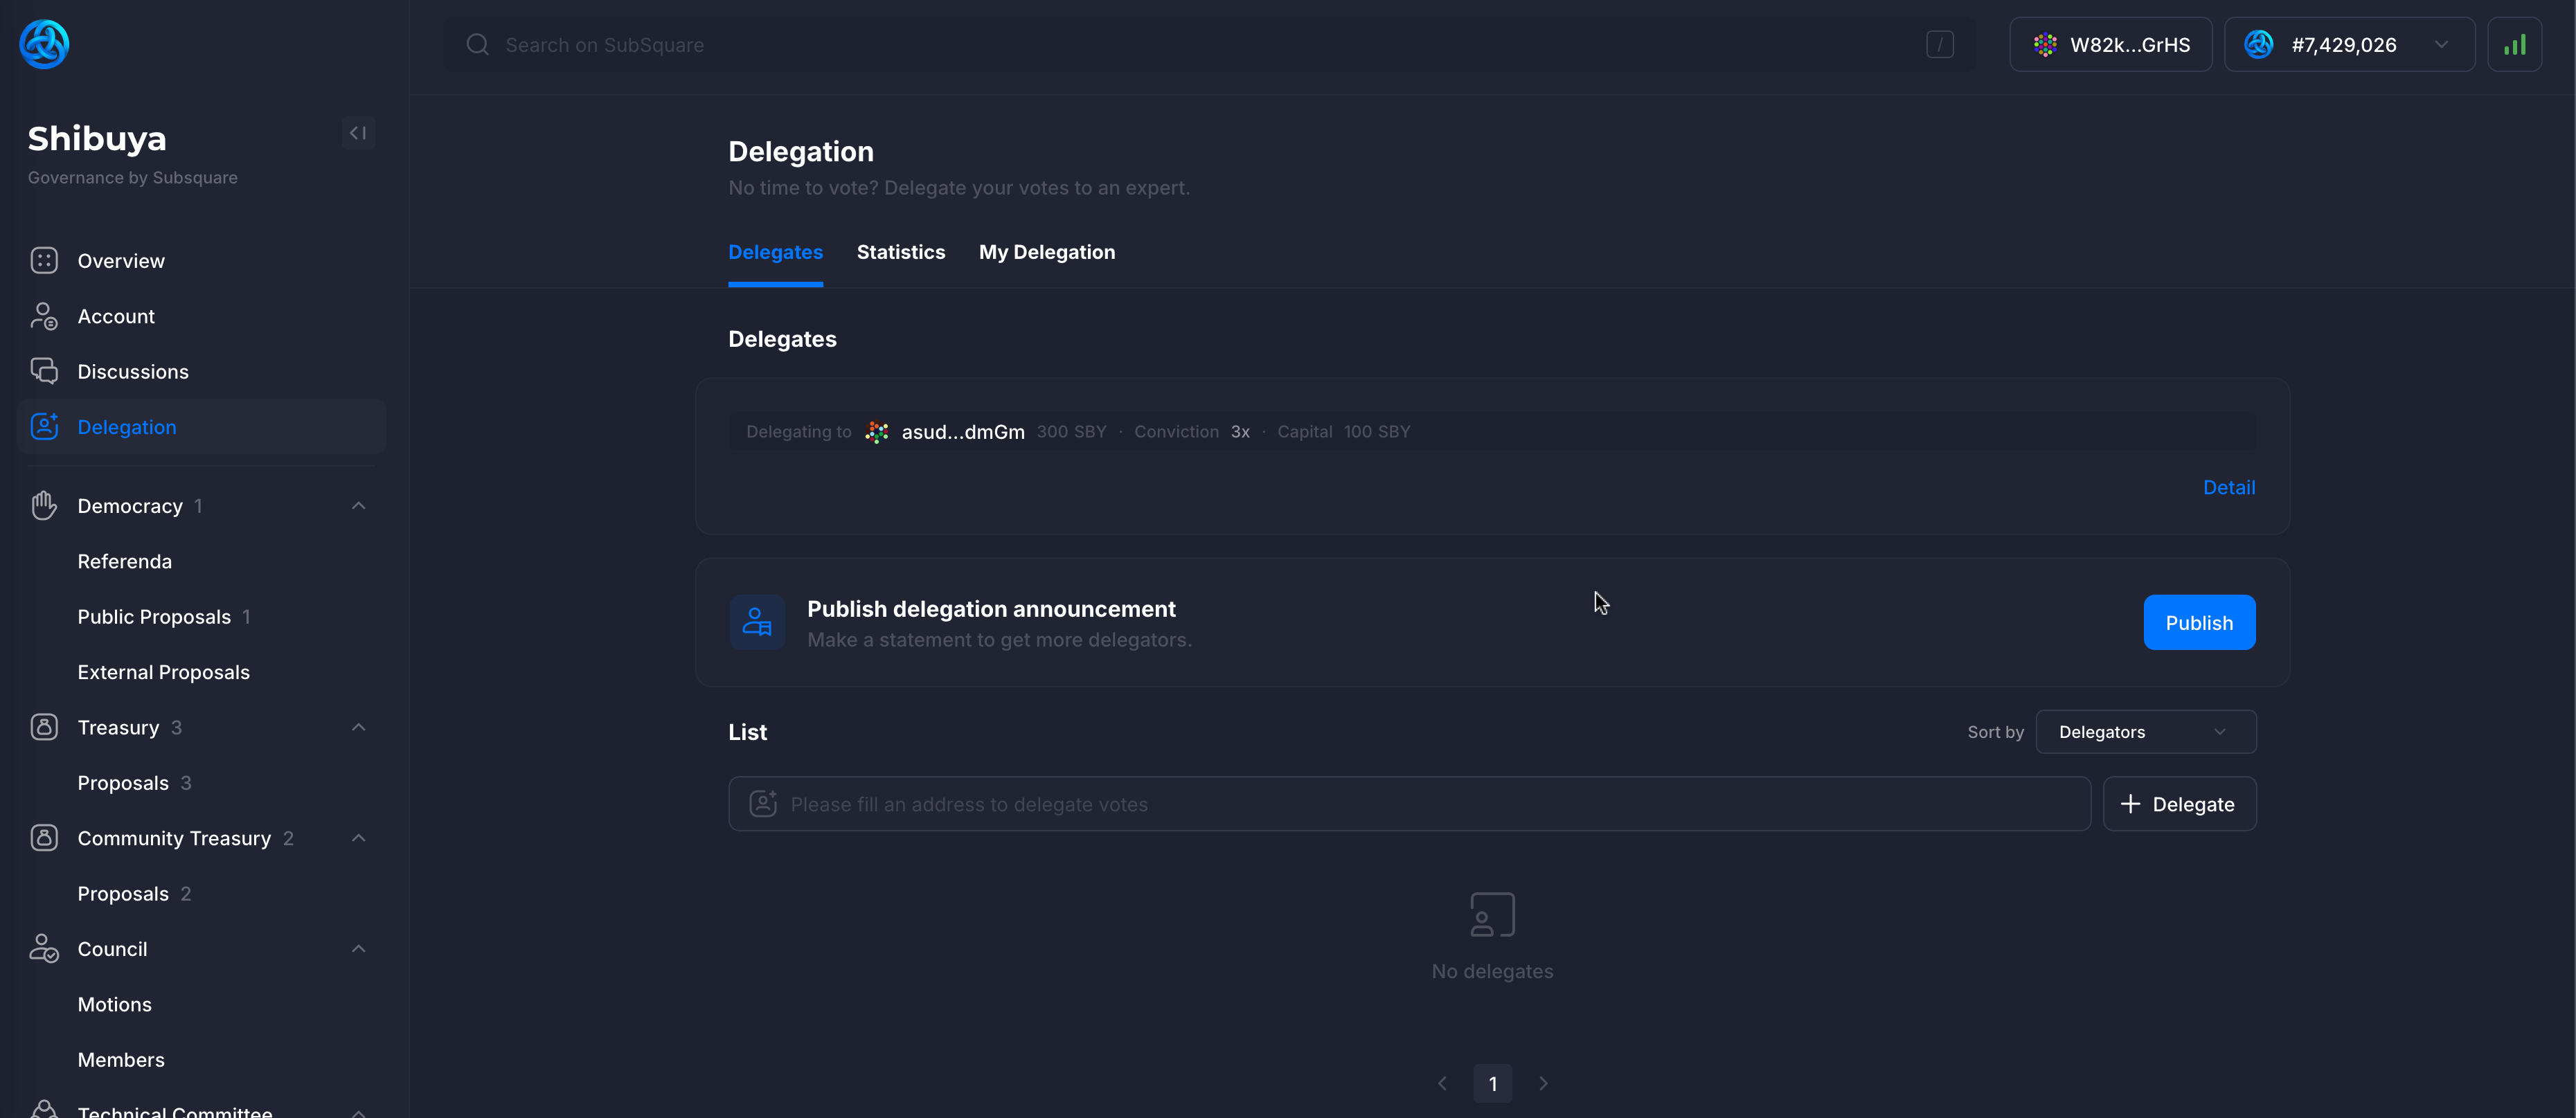
The amount and conviction are displayed. Clicking on the X button allows to undelegate the votes, which will begin the unlocking period for the tokens.
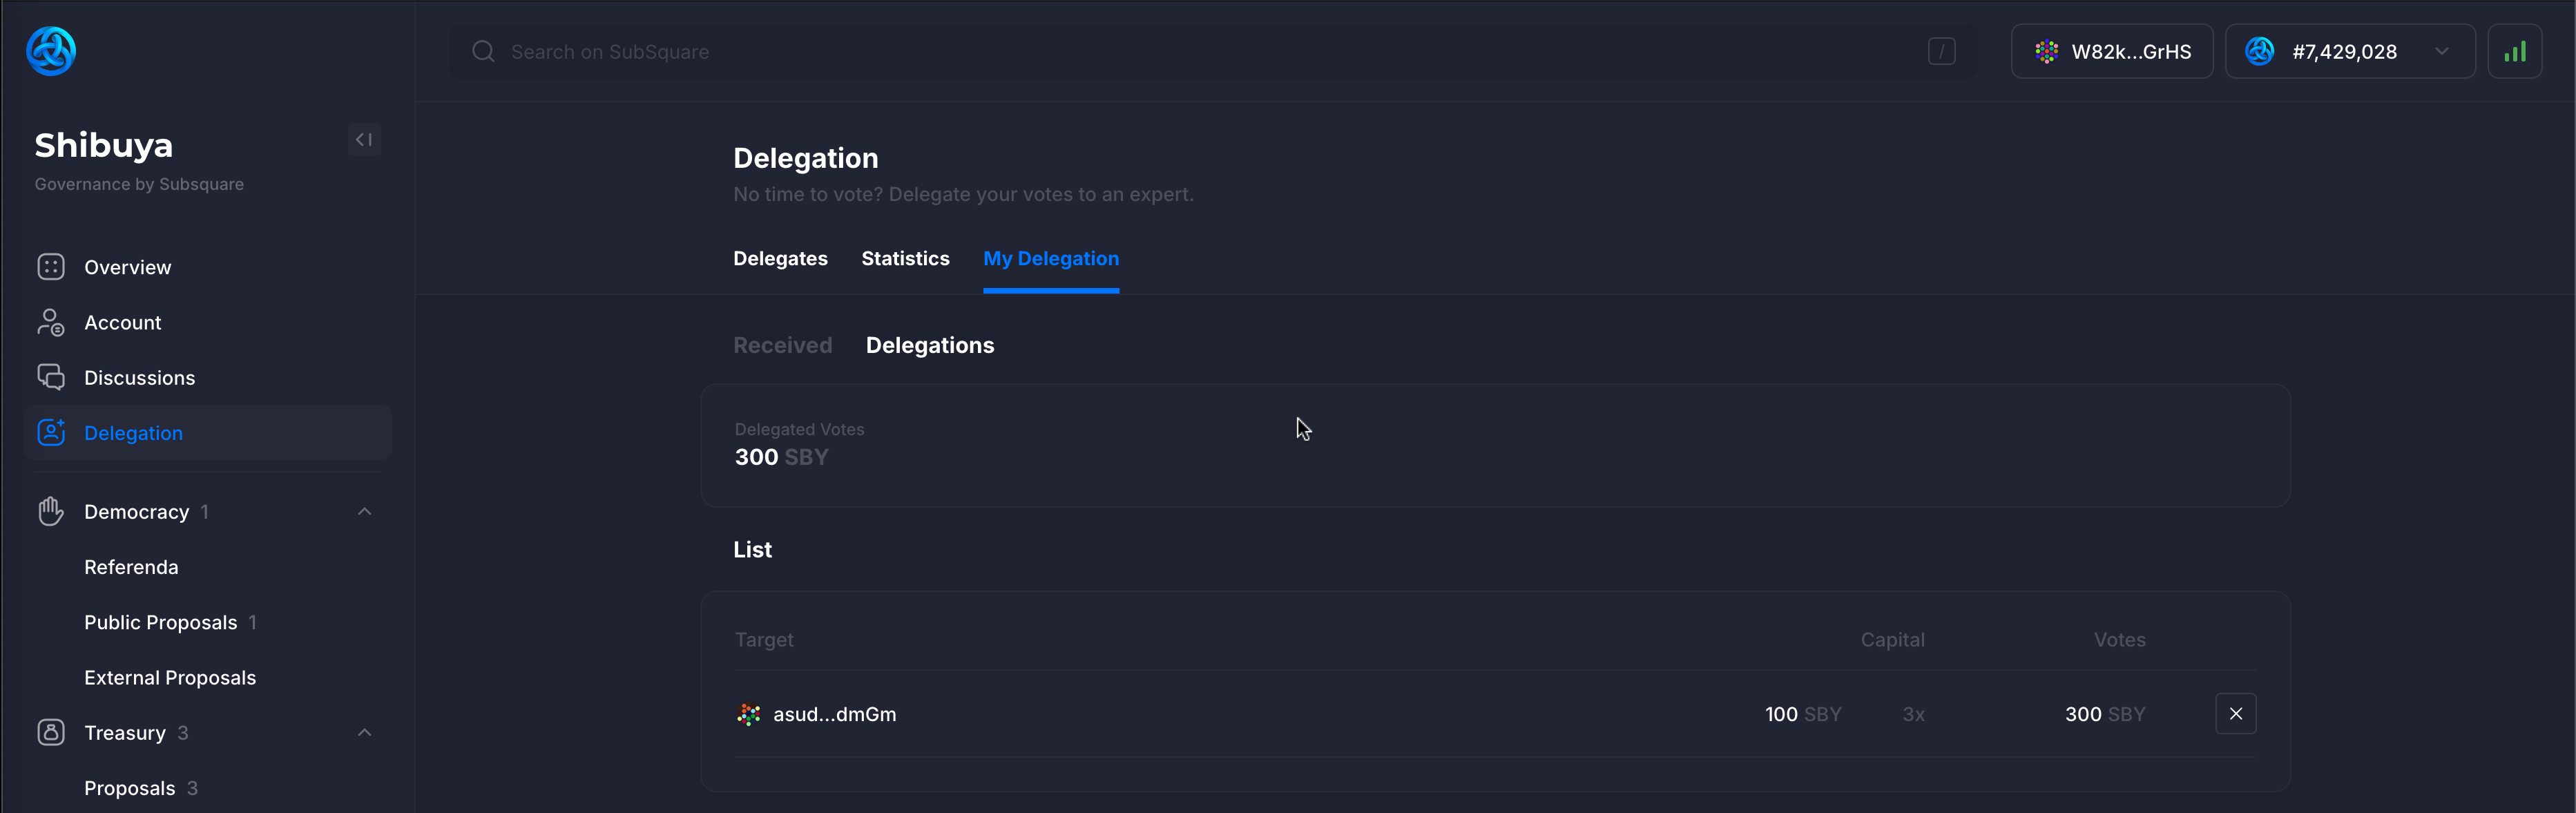
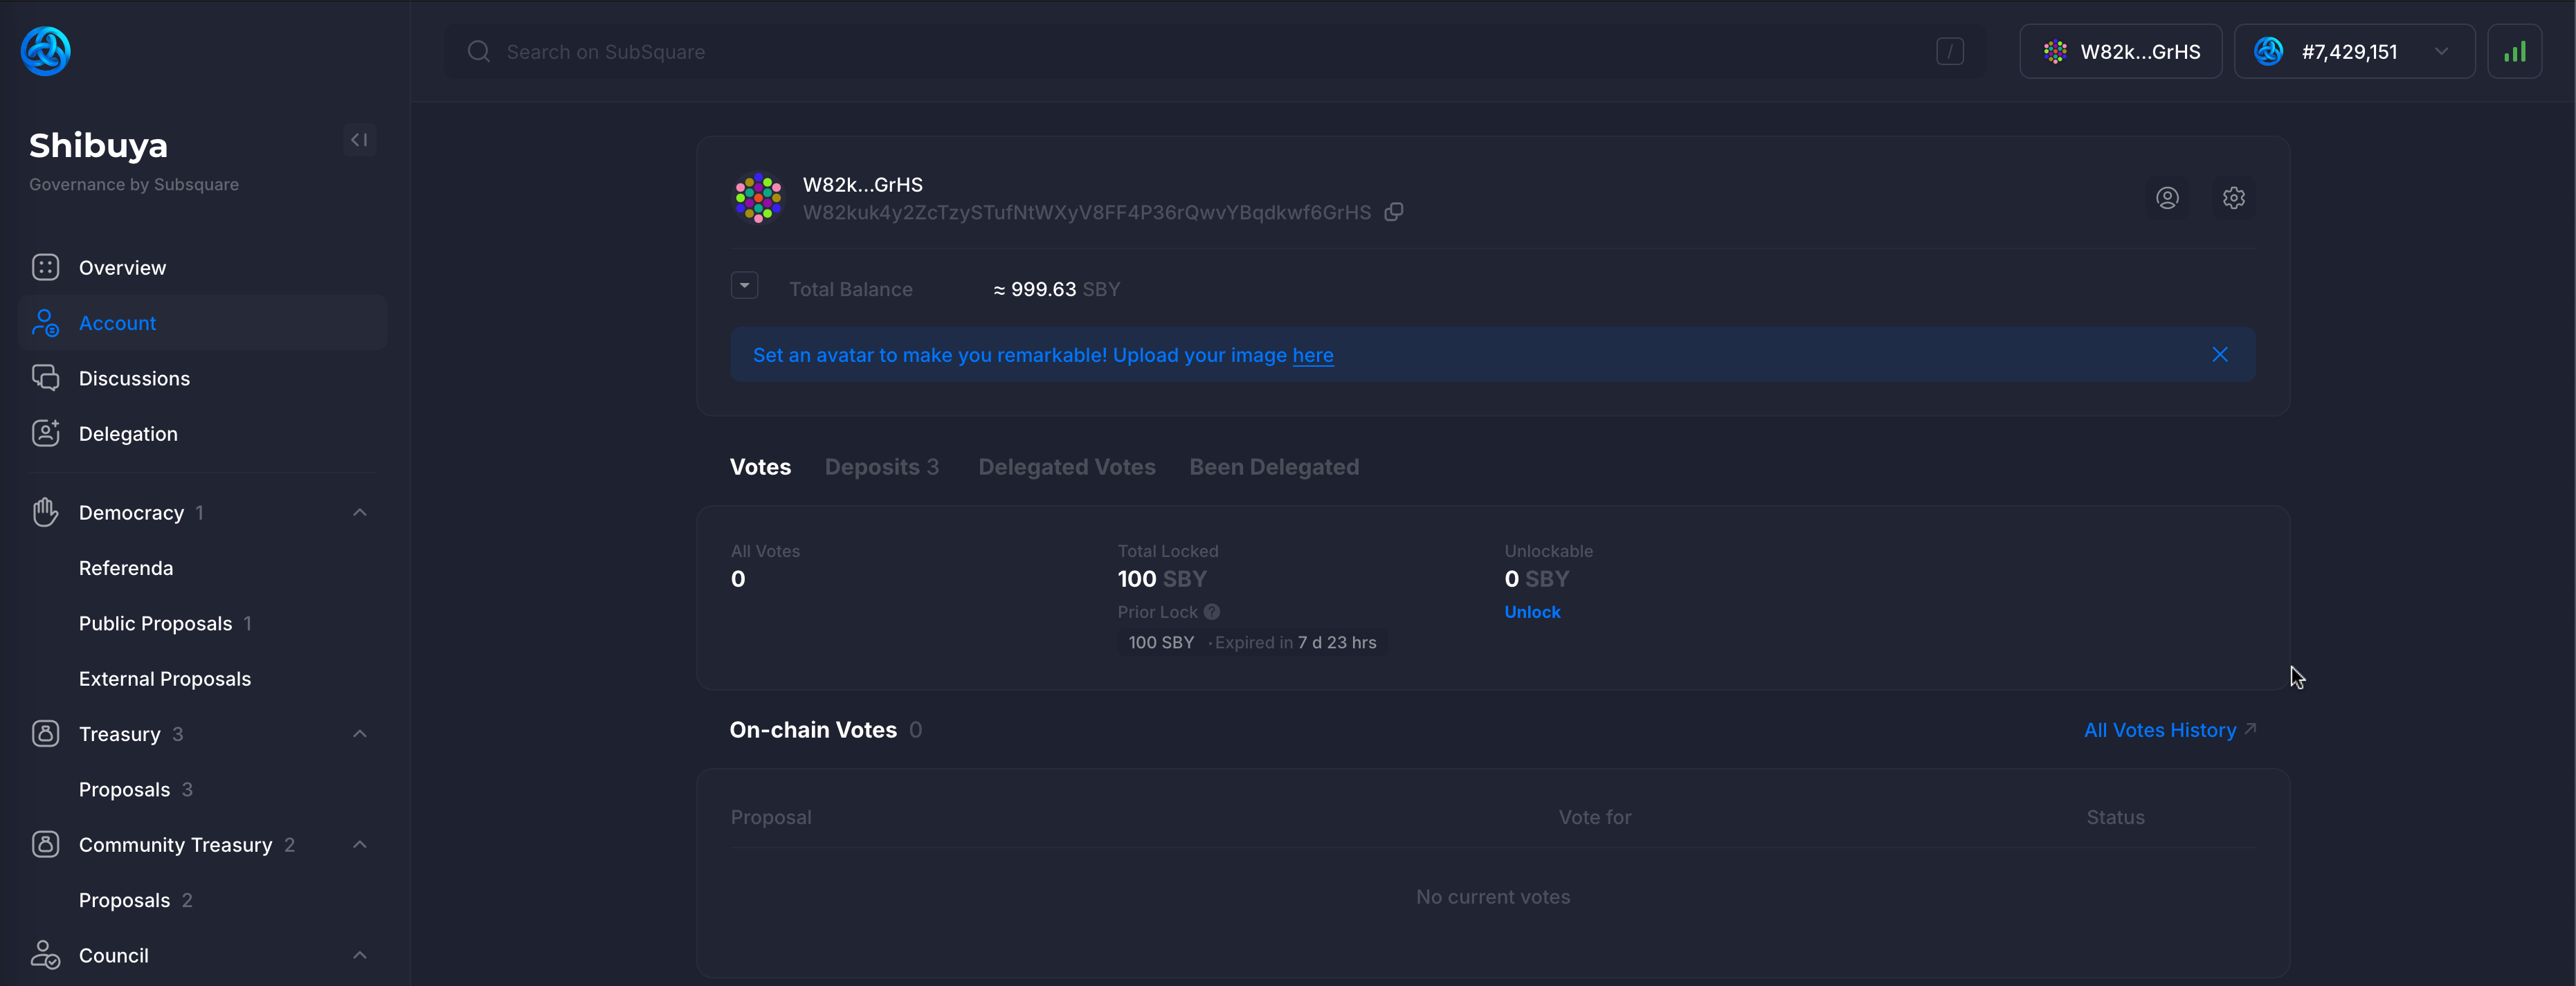
Clicking on the Account tab on the sidebar will display the account details. The 100 SBY locked in previous steps with conviction set to 3 is displayed, equaling a total of 8 days of unlocking period.
3.1.4. Voting
Any ASTR token holder can vote on active proposals within the Astar onchain governance. Tokens in both the Transferable and Locked states can be used to participate in governance processes, meaning that tokens staked in Astar dApp Staking can also be used for voting.
With that said, let’s understand how the voting process works on Astar Subsquare.
Steps to vote
Clicking on the Referenda tab on the sidebar, under the Democracy tab, will display all of the referenda, including the ongoing ones, failed ones & executed ones.
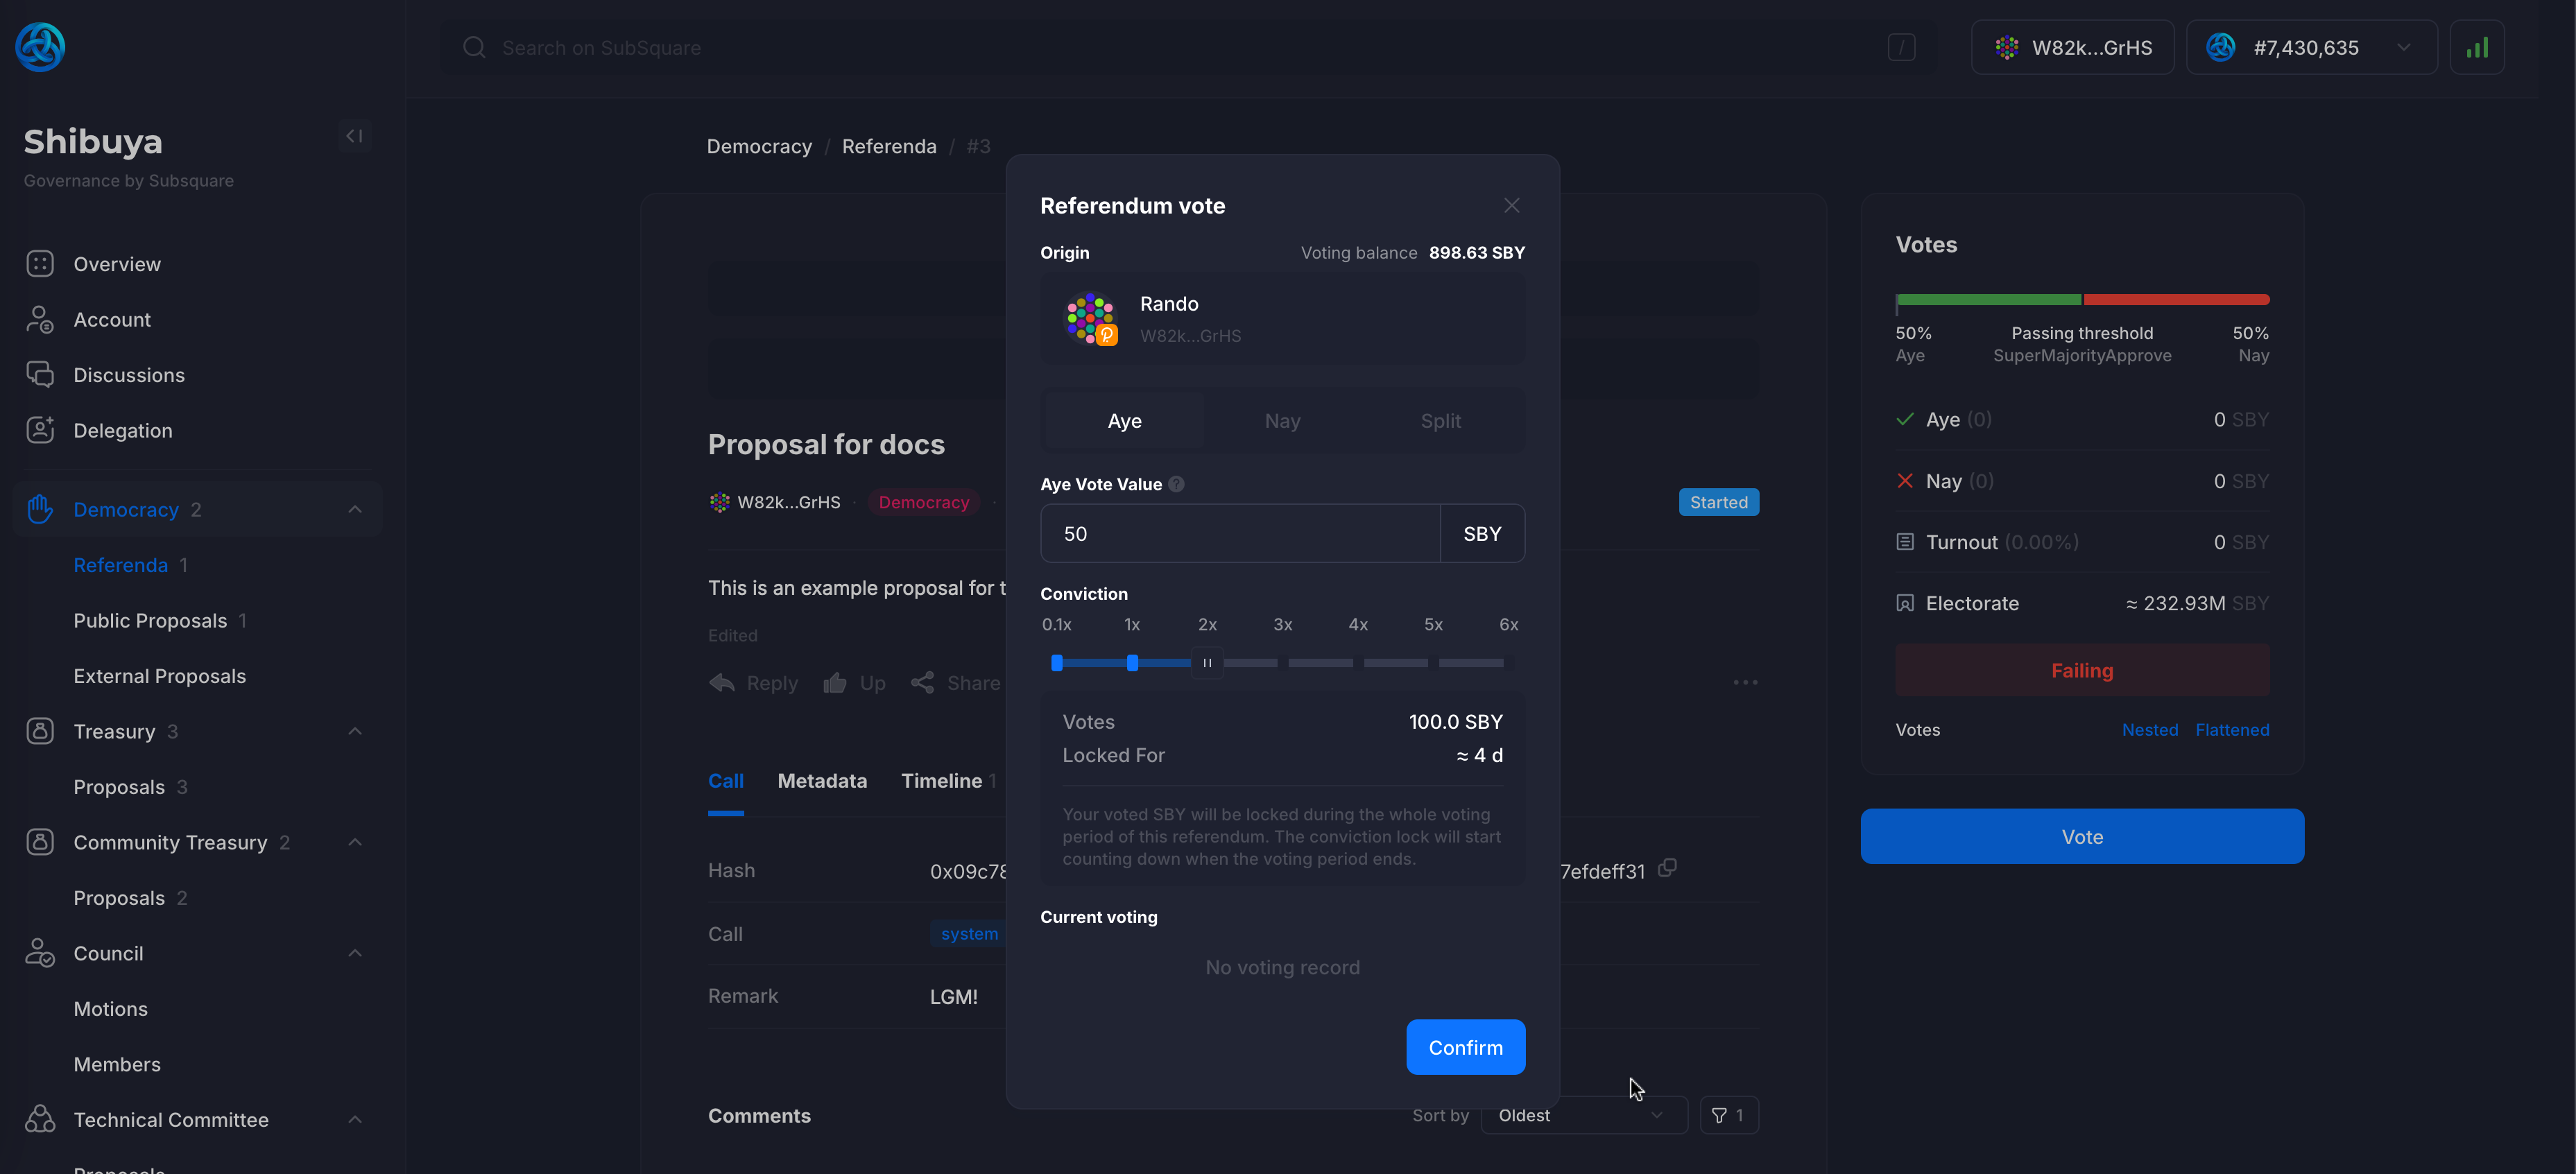
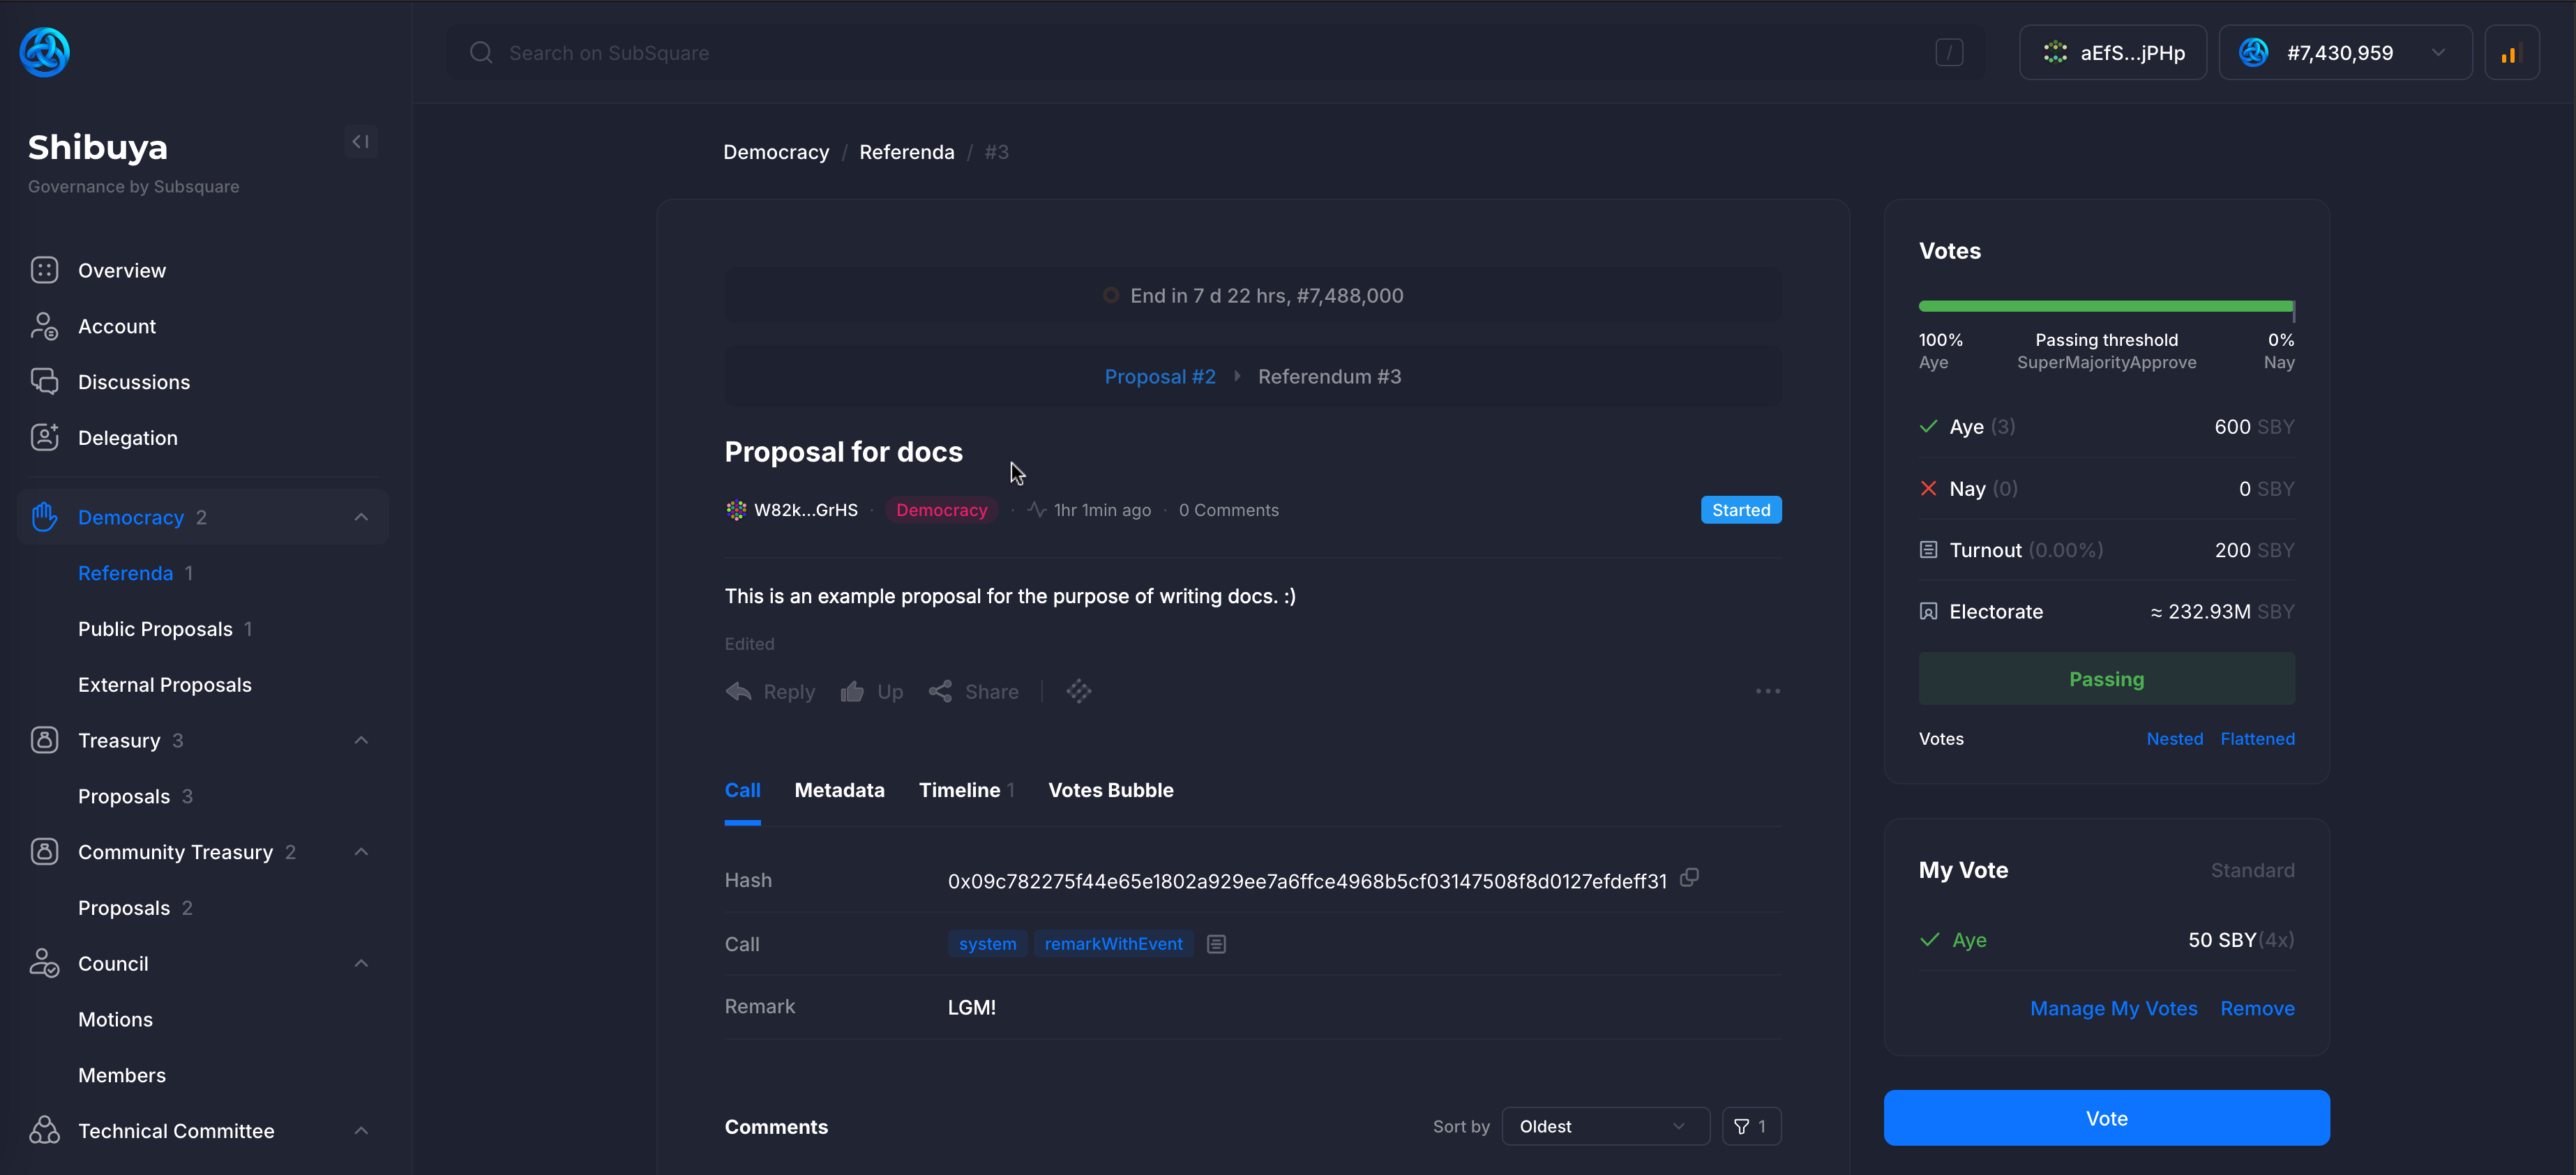
For the sake of this example, the referendum named "Proposal for docs" will be used.
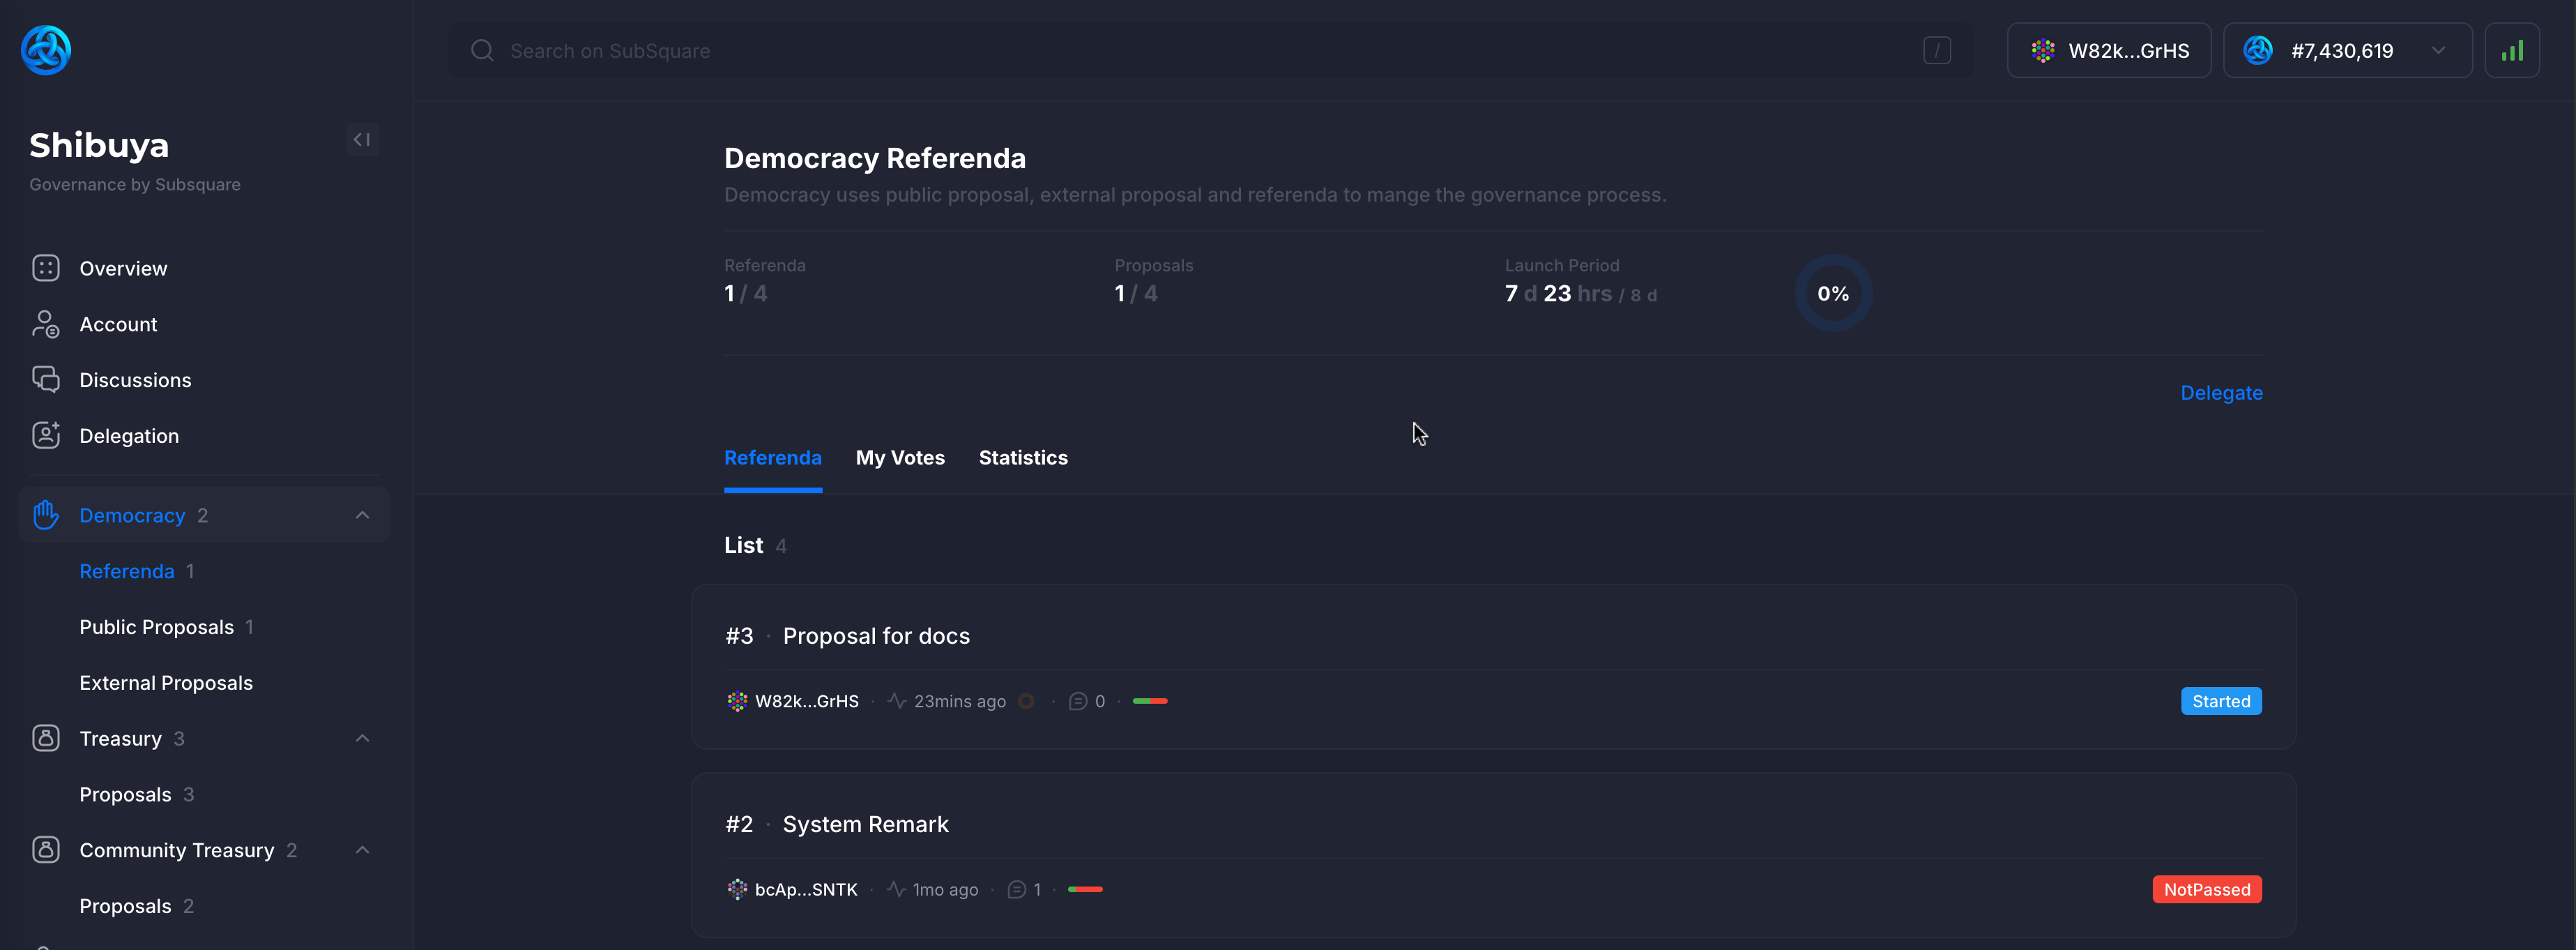
Clicking on it will display more details about the referendum as can be seen below.
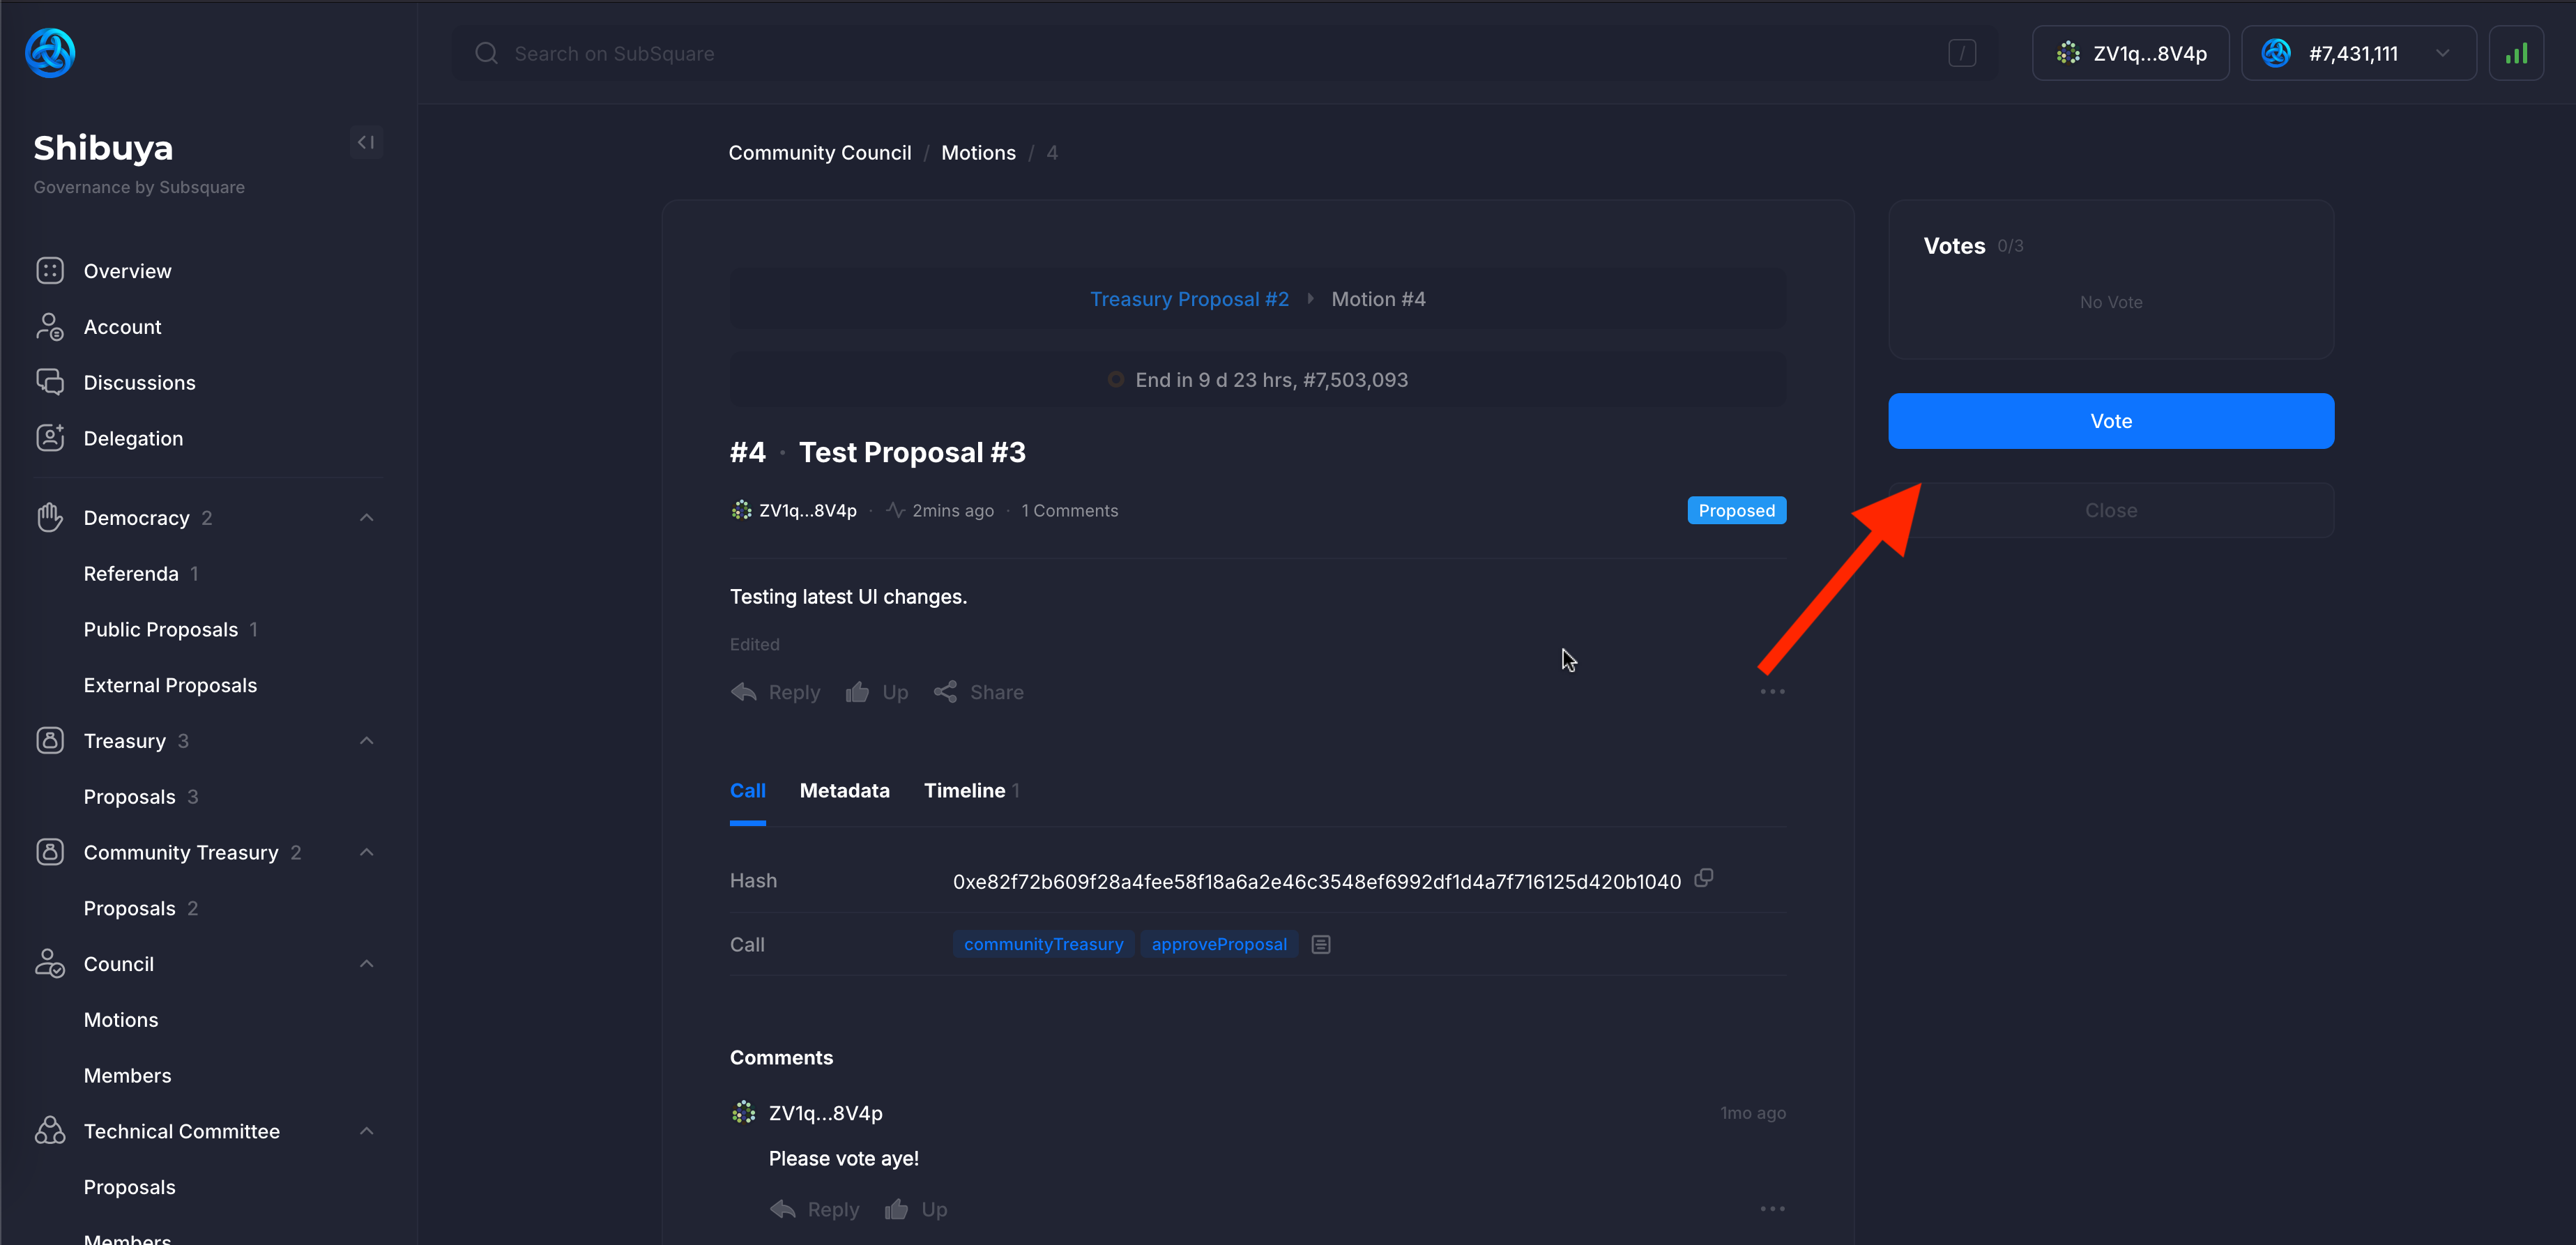
The user can decide to vote by clicking on the Vote button.
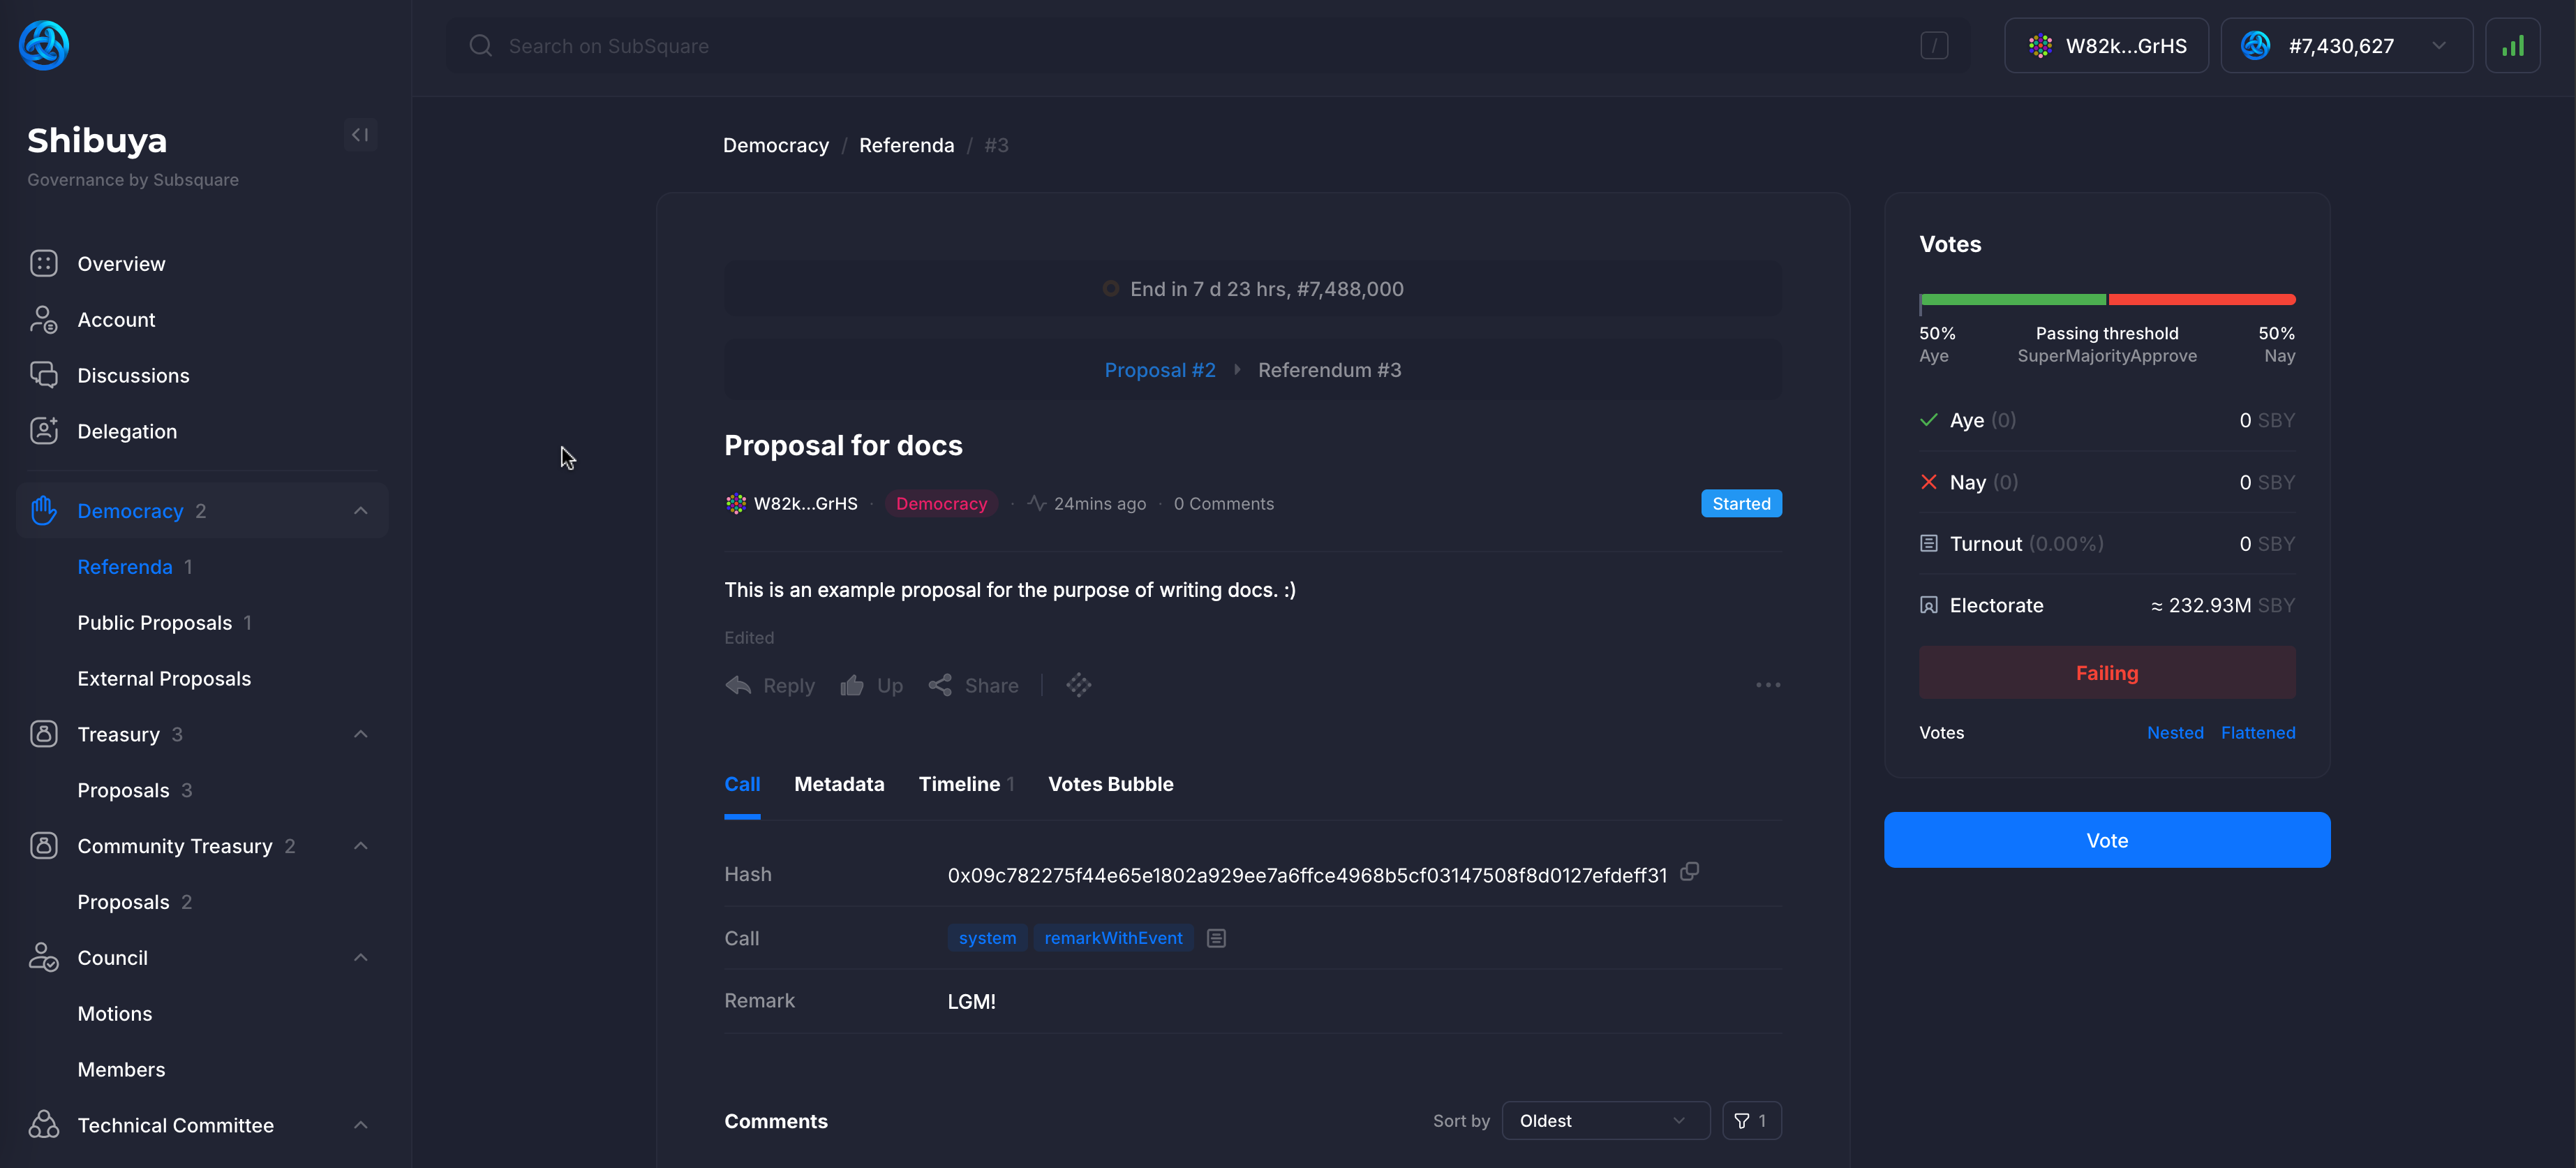
Vote can be Aye or Nay, or can even be split between the two options if the user desires.
The token amount to be used for voting needs to be specified, this is the amount that will be locked for the duration of the referendum and more if the referendum passes in the favor of the users vote. E.g. voting aye for a referendum, and having it fail will result in the tokens being immediately unlockable, without any waiting period.
Conviction can be set to amplify (or diminish) the voting power, at the expense of a longer (or shorter) unlocking period.
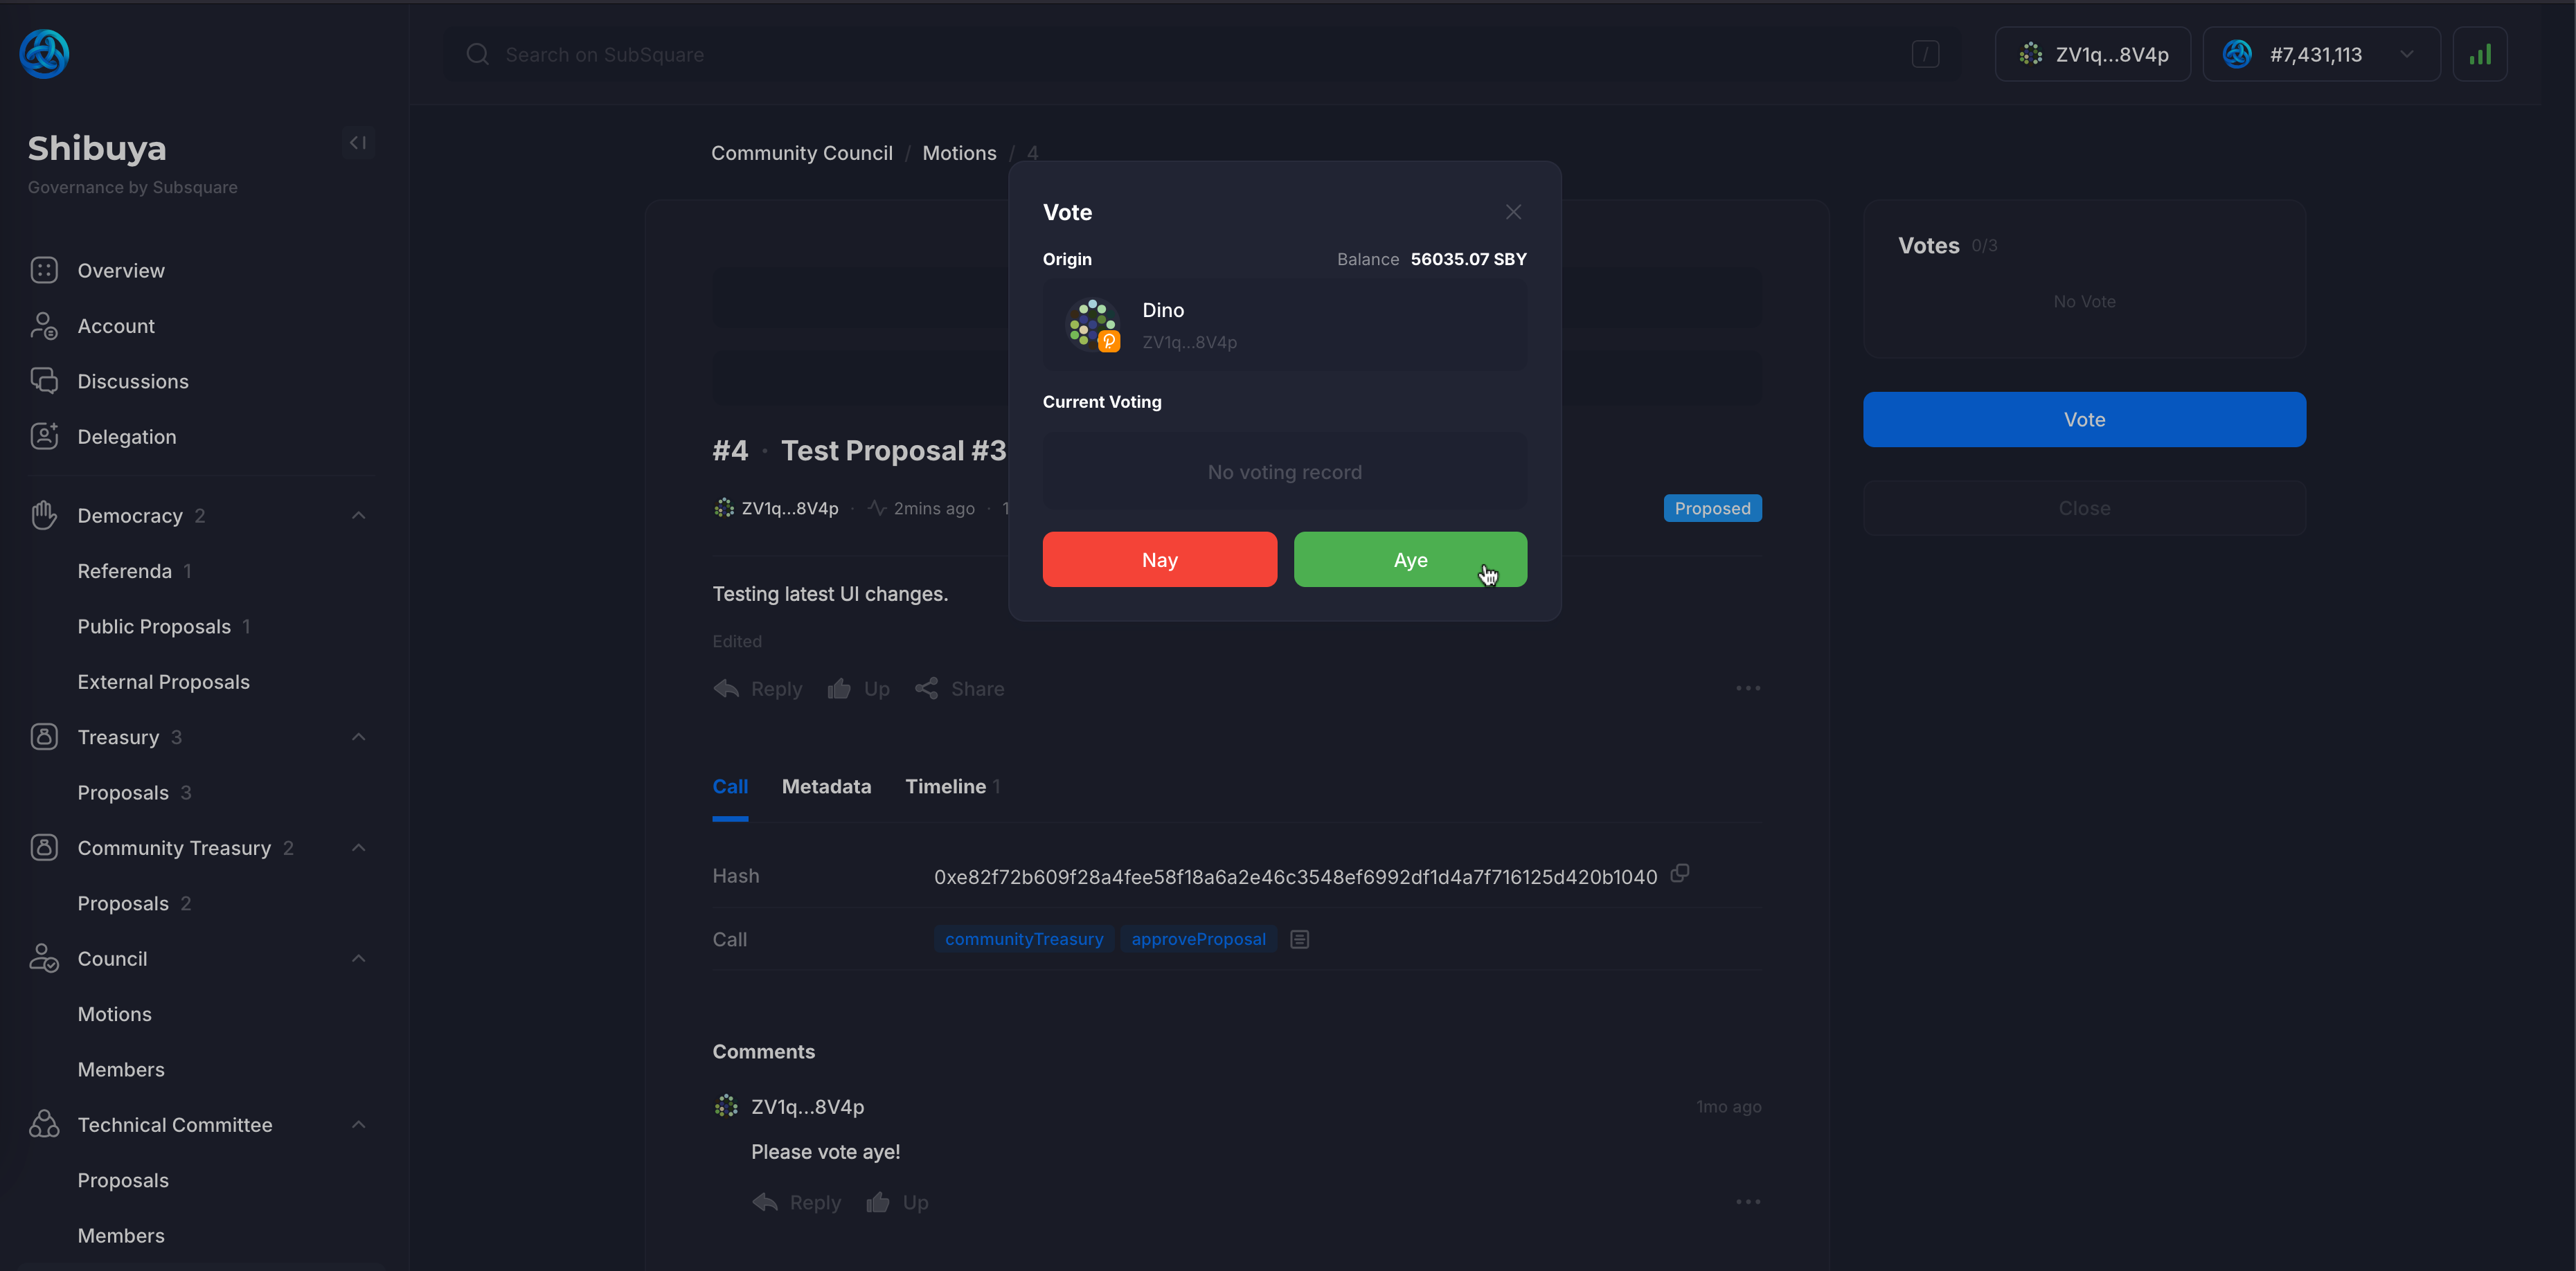
After the transaction is confirmed and finalized, the vote will be displayed on the referendum page. Since only one user has voted (us), the total sum of the aye votes is equal to the amount we've voted with.
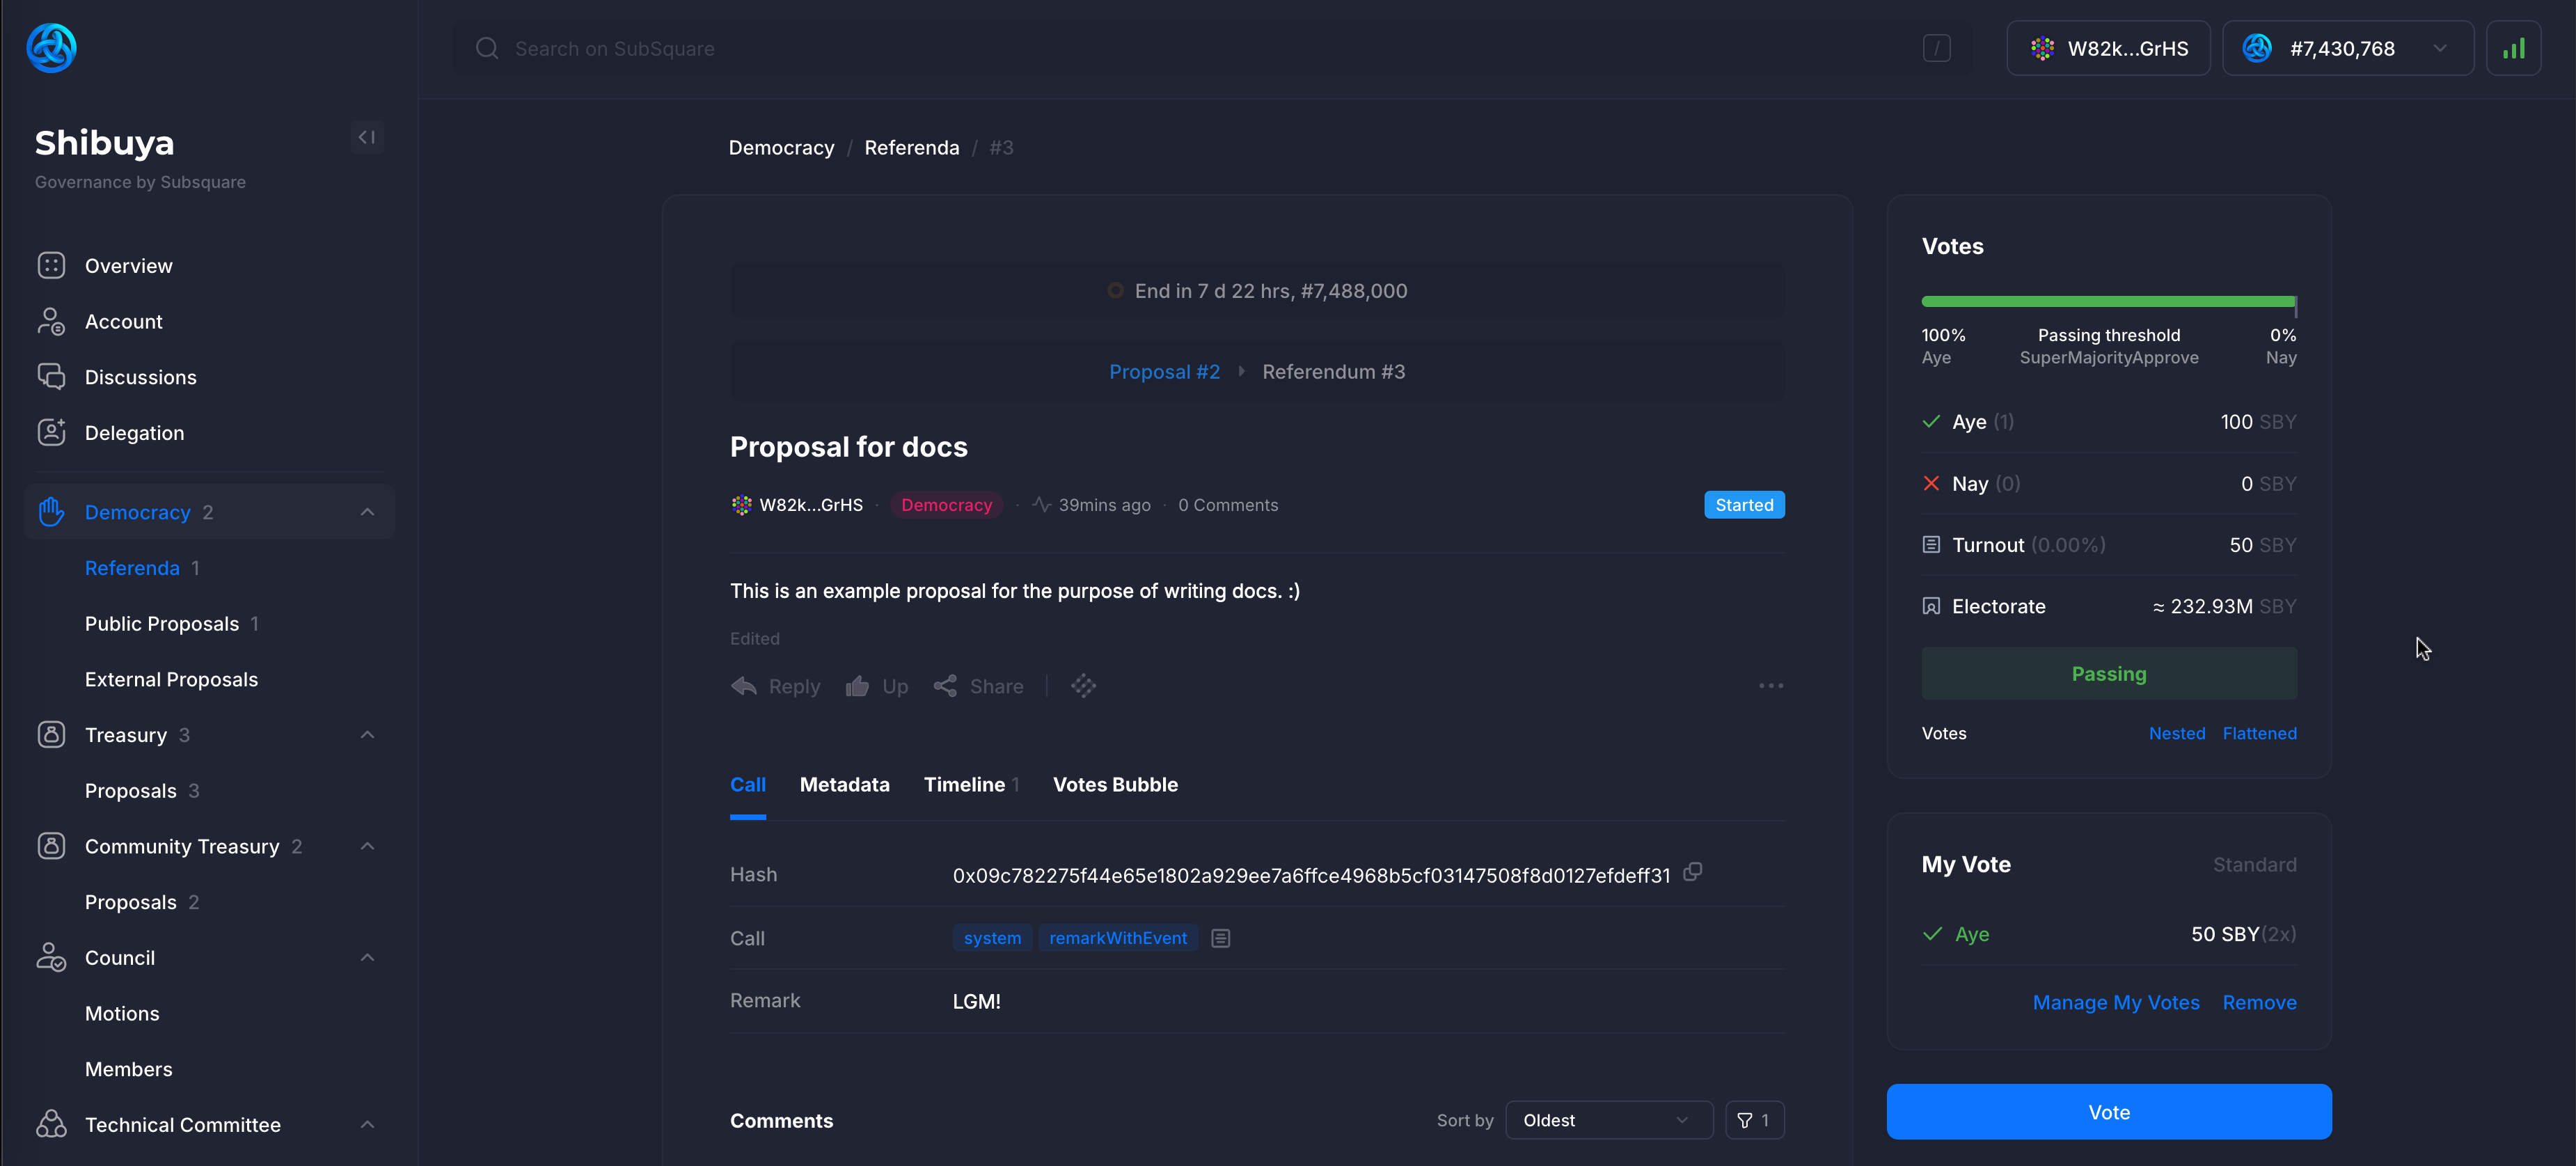
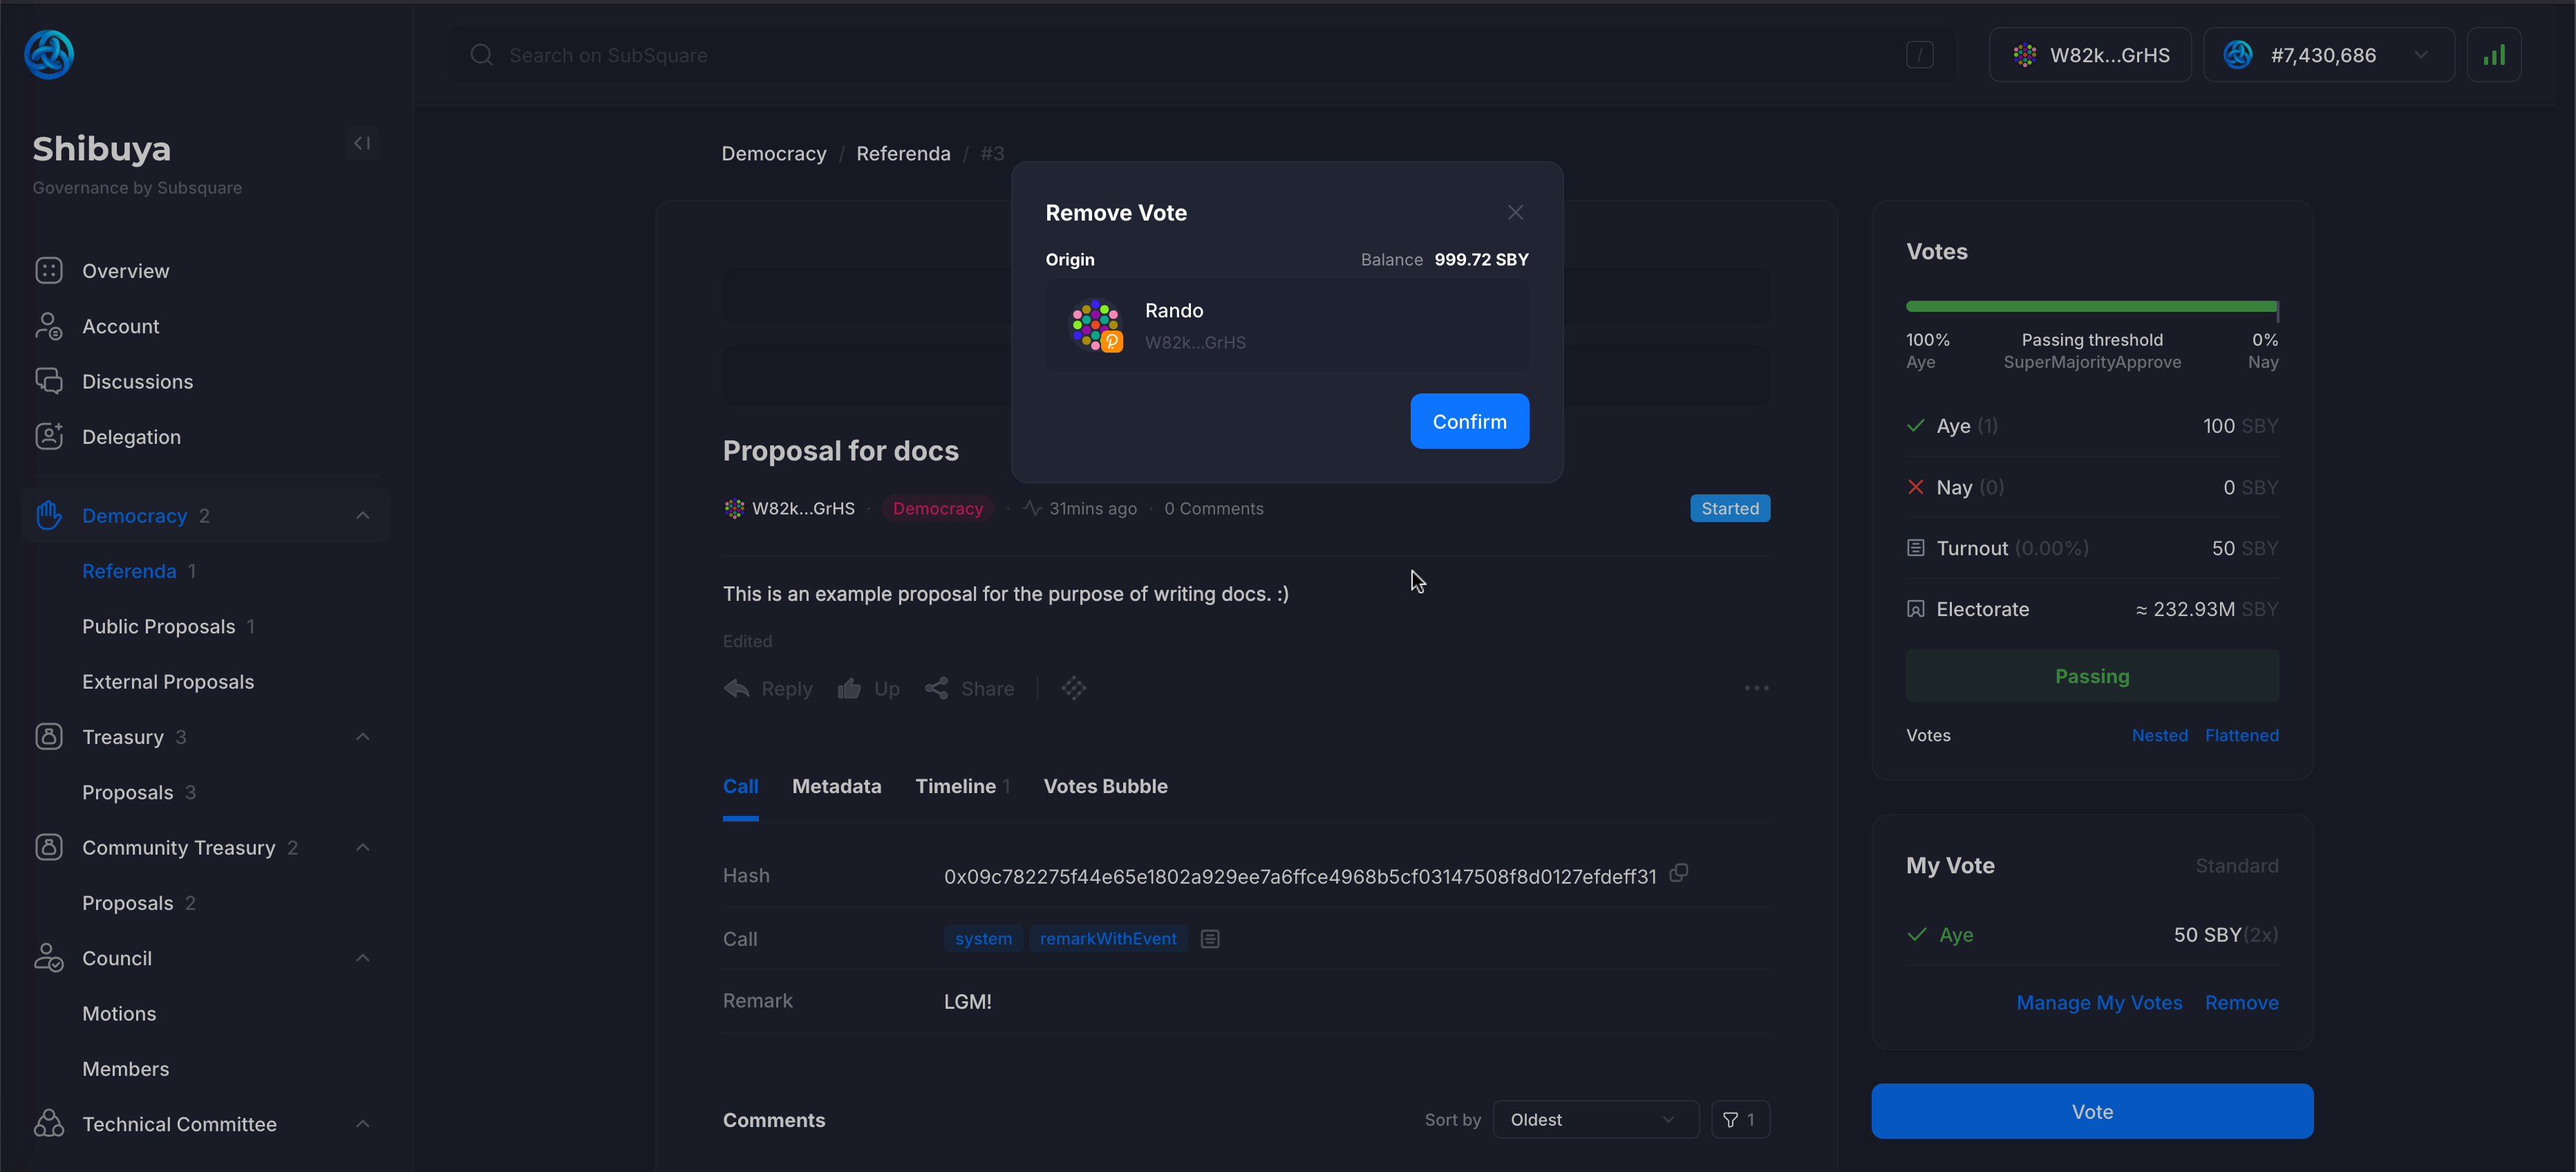
In case a user changes their mind, the vote can be removed by clicking on the Remove Vote button. This won't trigger any unlocking period and the user is free to cast their vote again.
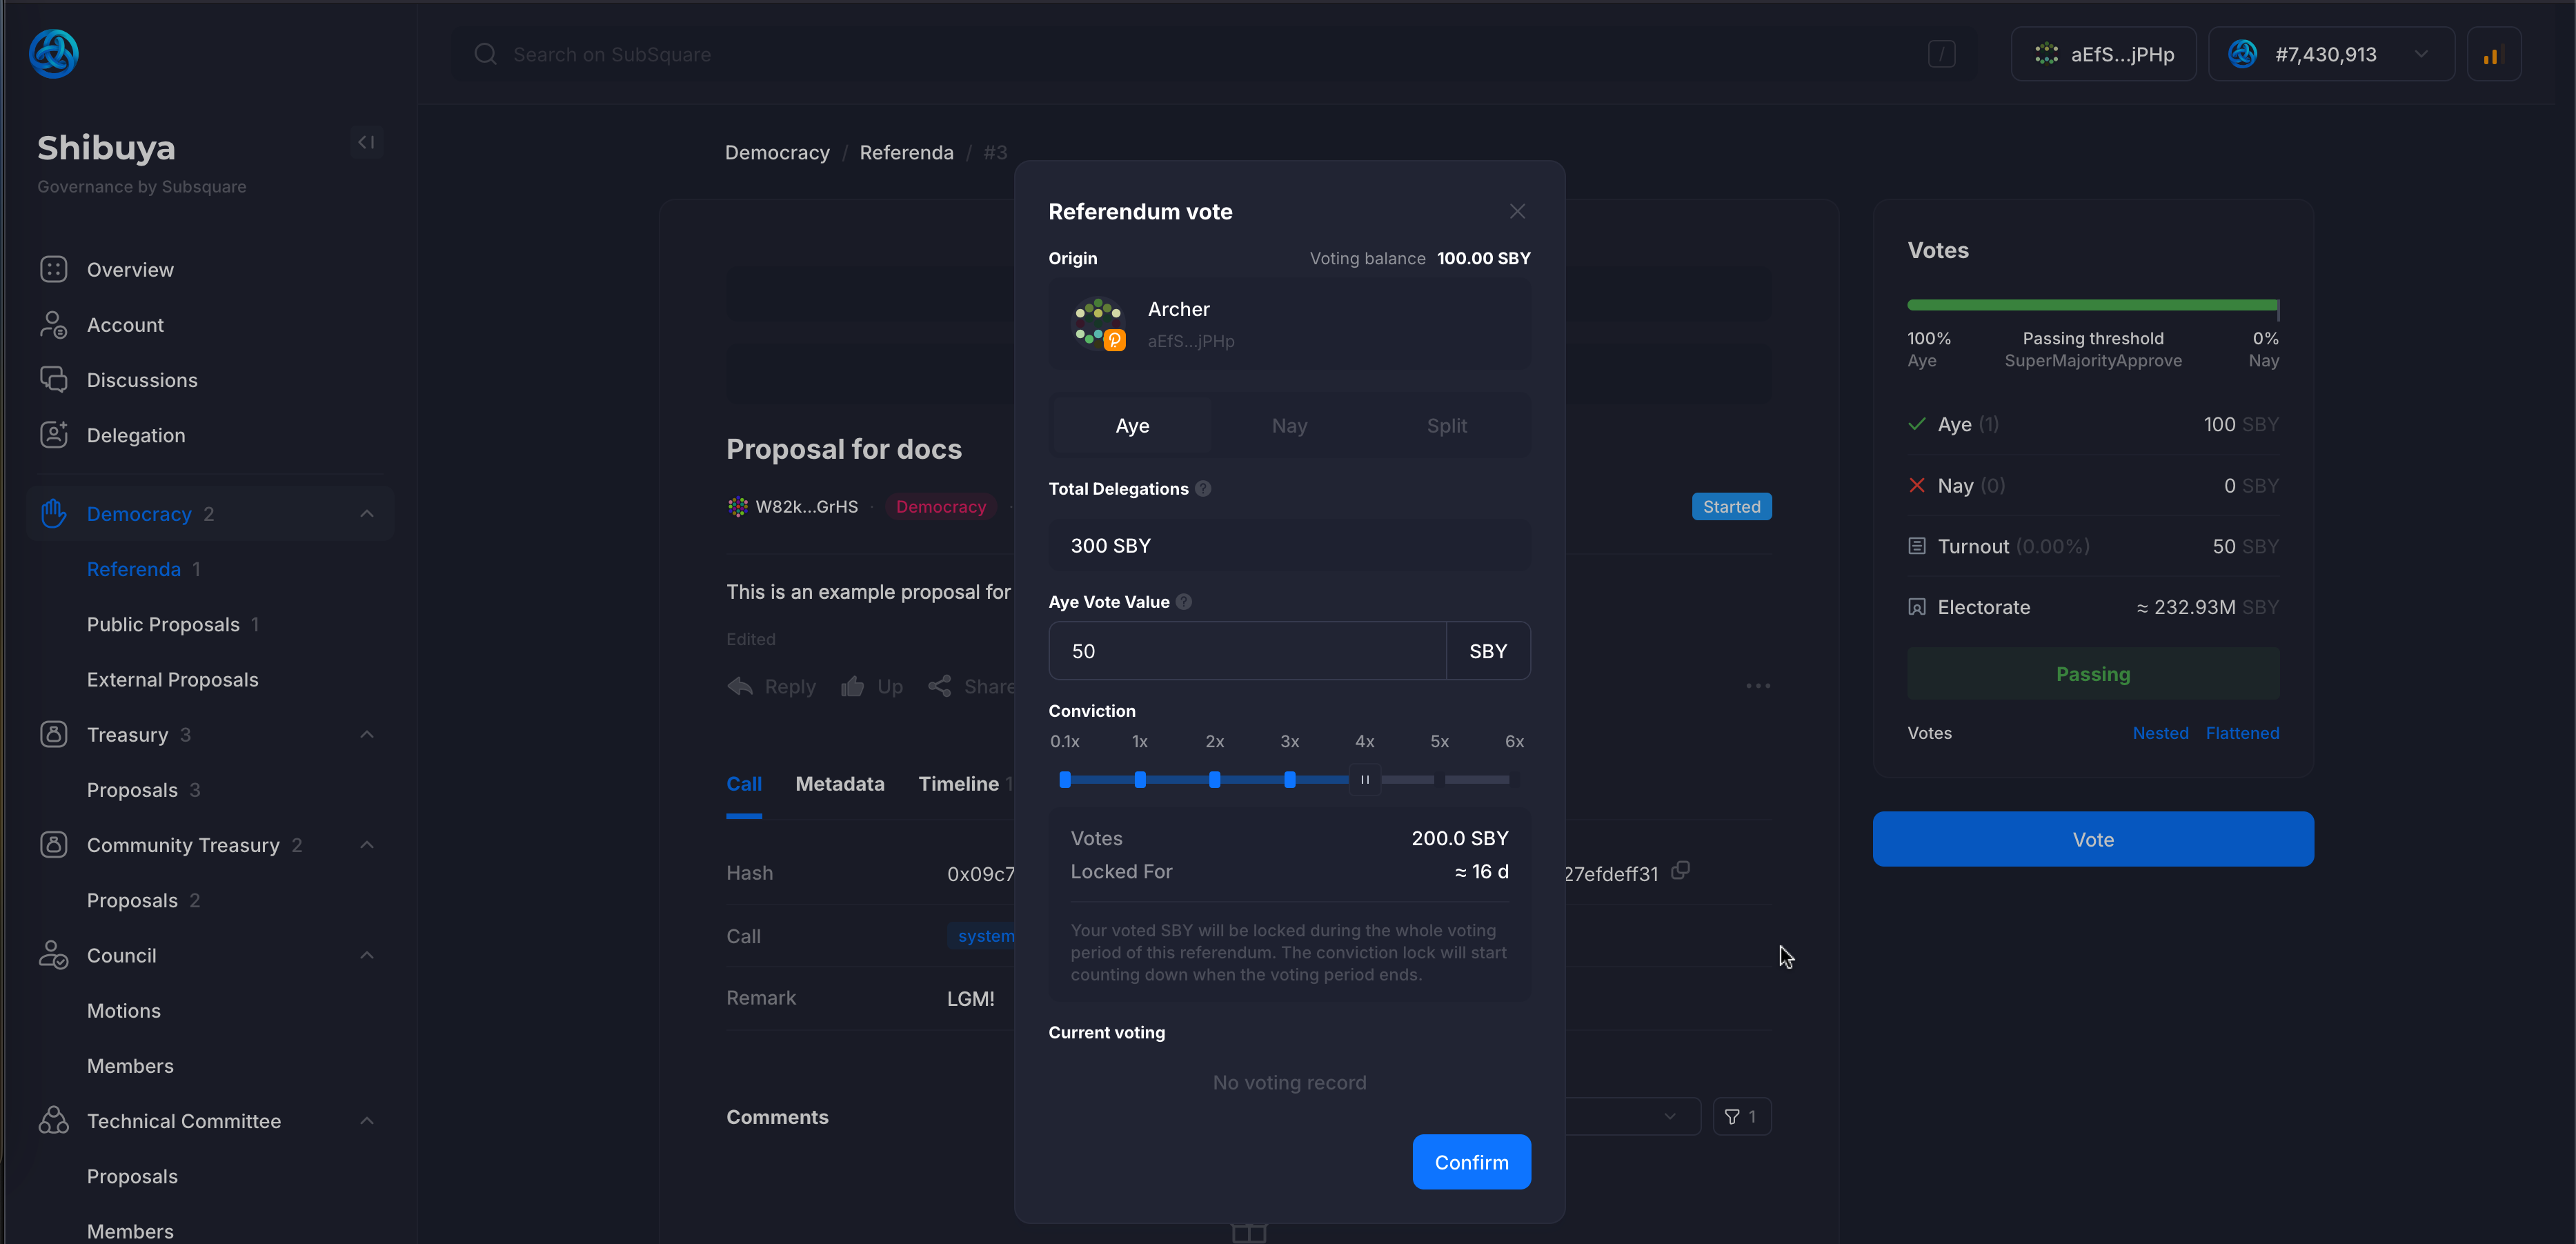
:::tip Example Case
This is an example of an account that is voting but has some votes delegated to it. In this particular situation, the account has:
- 100 SBY free balance
- 300 SBY worth of voting power delegated to it.
Although not visible on this image, the account who delegated the votes did it with 100 SBY and conviction set to 3.
The account votes with 50 SBY, conviction set to 4. This means that the total amount of votes for this account will be: 50 SBY x 4 + 300 SBY = 500 SBY.
:::
The new total turnout is 200 SBY, 50 SBY from the first aye vote, another 50 SBY from the second aye vote, and 100 SBY from the delegated vote.
The total votes toward aye is 600 SBY in total, 100 SBY from the first aye vote, and another 500 SBY from the second aye vote.
3.2. Community Council
The Astar Community Council is a governance body composed of six members representing different stakeholder groups within the ecosystem:
- 2 Core Team Members selected by the Astar Foundation
- 2 Ecosystem Agents elected internally by the Agent group
- 2 Community Representatives chosen through a public nomination and voting process
This 2-2-2 composition ensures balanced representation, bringing together diverse perspectives, expertise, and community interests. While this structure provides a strong foundation for early governance, it is subject to change through community-driven decisions as the ecosystem evolves.
Responsibilities
The Community Council is entrusted with managing key ecosystem functions, including:
- Community Treasury Management: Overseeing the allocation of funds to support ecosystem growth.
- dApp Staking Oversight: Evaluating applications, listing and delisting dApps, and setting operational guidelines.
- ACC Strategic Staking Program (SSP): Managing strategic ASTR staking allocations from the Community Treasury aligned with Astar’s ecosystem goals.
- Ecosystem Agent Tips: Assessing and authorizing agent compensation requests.
- Governance Participation: Acting as stewards of decentralized governance processes.
:::tip Community Council Actions
The Council also holds specific onchain permissions to perform actions such as:
- Registering/Unregistering dApps in the dApp Staking Protocol
- Registration requires a 2/3 majority
- Unregistration requires a 4/5 majority
- Managing dApp Staking on behalf of the Community Treasury (SSP)
- Requires a 2/3 majority
- Approving or Rejecting Treasury Spending Proposals
- Requires a 2/3 majority :::
Through these responsibilities, the Community Council plays a critical role in maintaining the integrity, transparency, and sustainability of the Astar ecosystem.
:::info Community Council Information
If you'd like to get more involved with the Community Council, check out our Forum post.
:::
Now let’s take a closer look at how the Community Council operates.
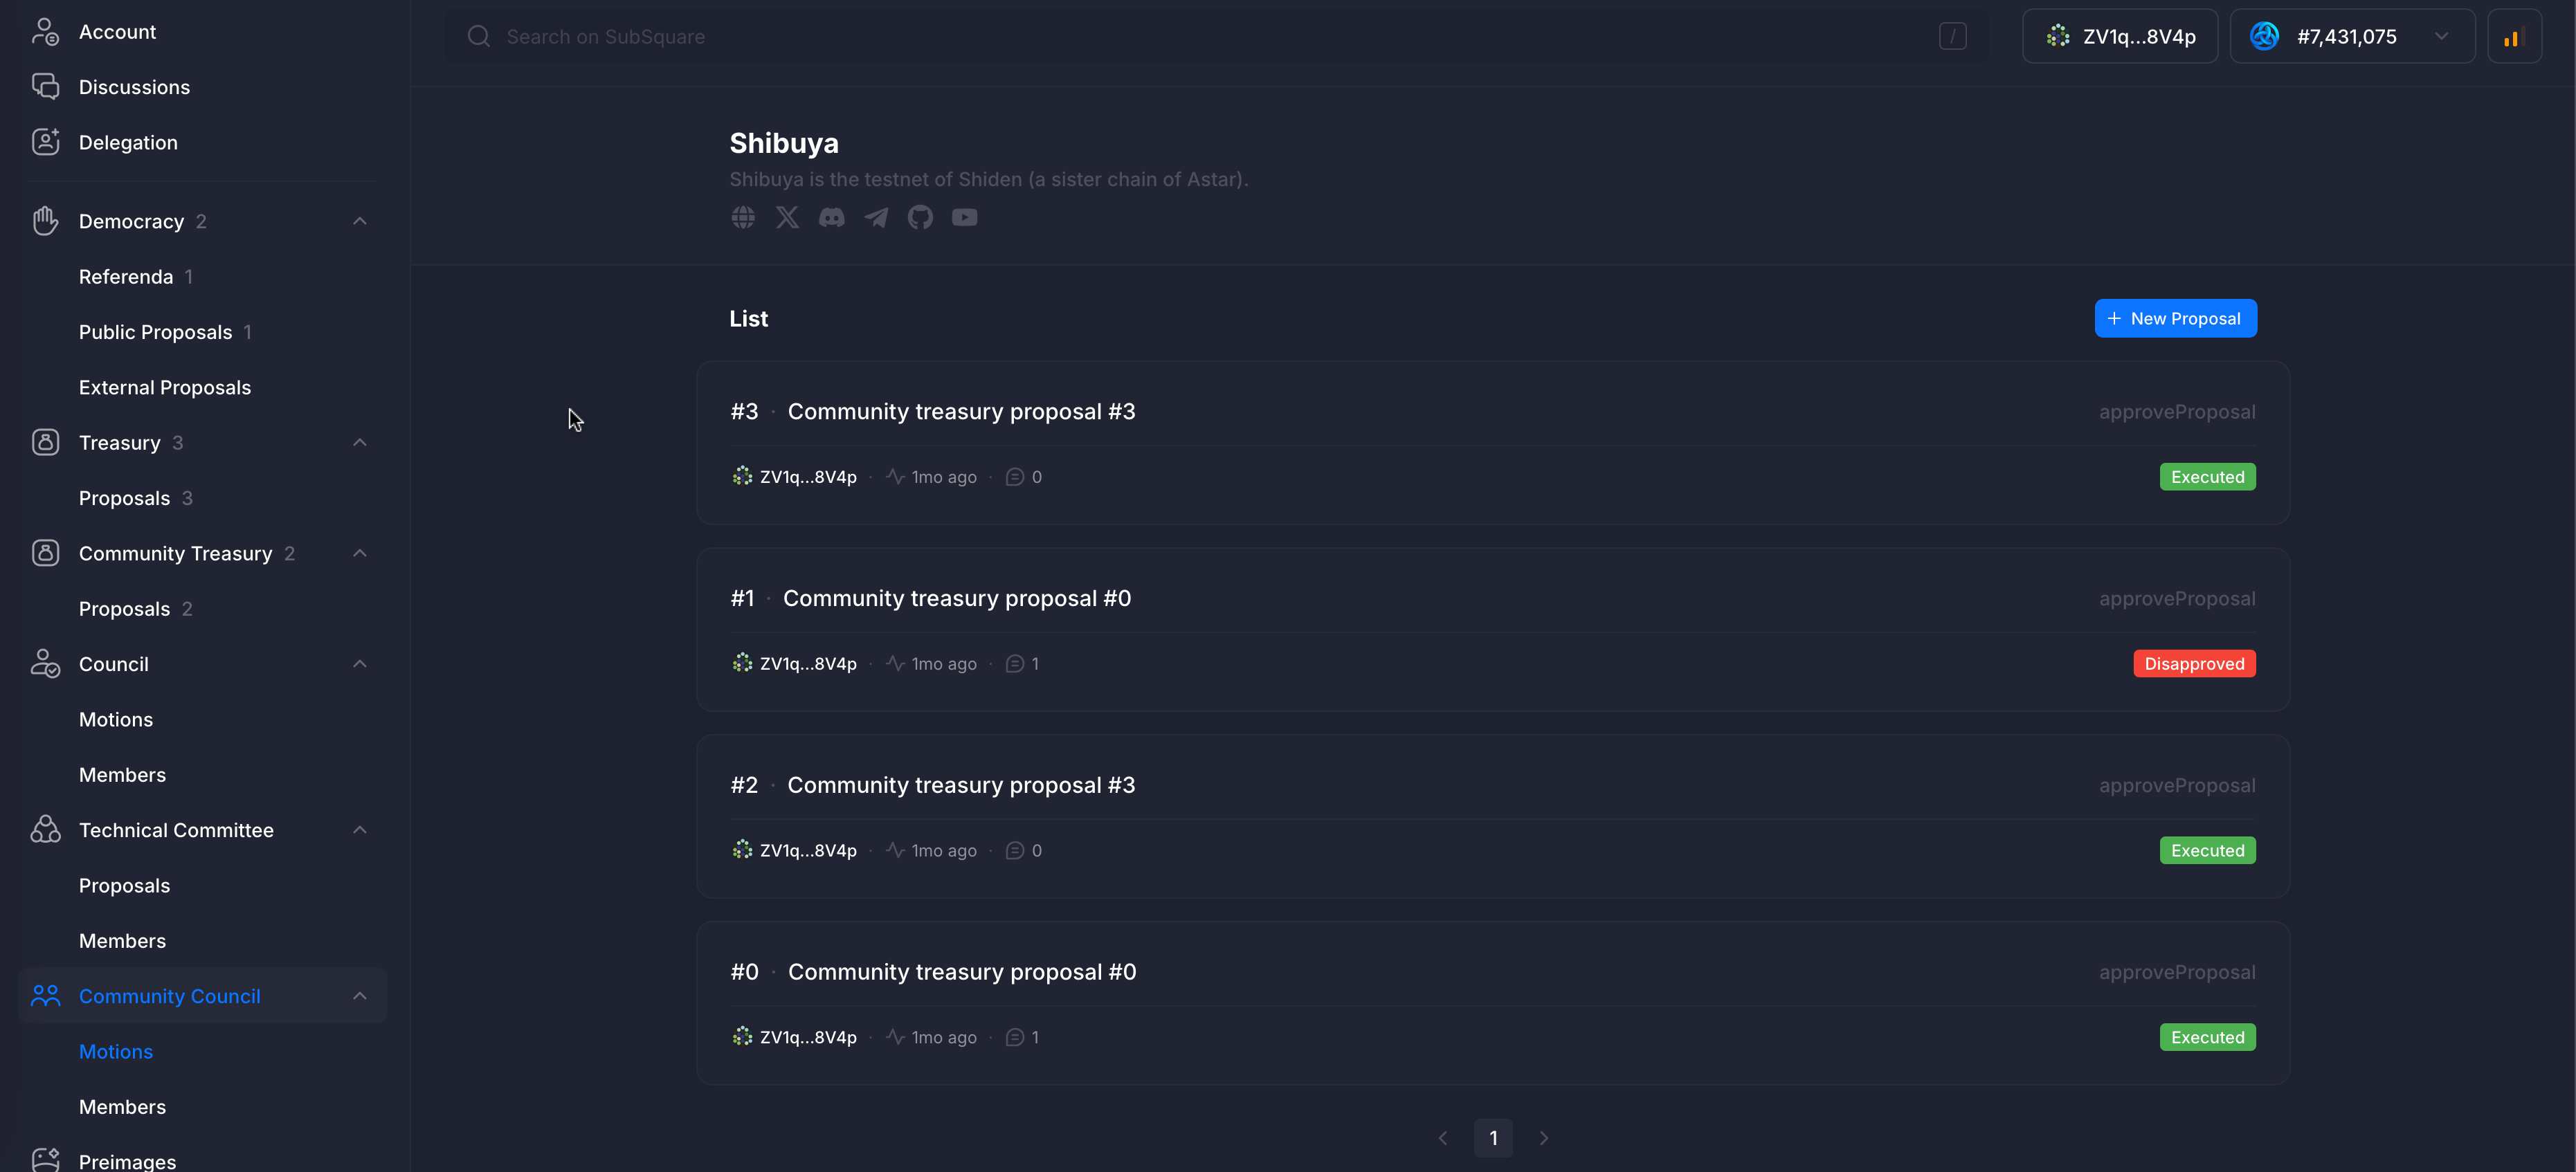
3.2.1. Community Treasury Spending Proposal
The Community Council is responsible for reviewing and voting on proposals that request funding from the Community Treasury. These proposals are approved or refused via motions created by the Community Council, and which can be viewed under the Motions tab in the Community Council section of the sidebar.
With that in mind, let’s go through the steps the Council must follow to approve or reject a proposal.
Steps to Approve or Reject a Treasury Spending Proposal
Step 1: Create a Motion
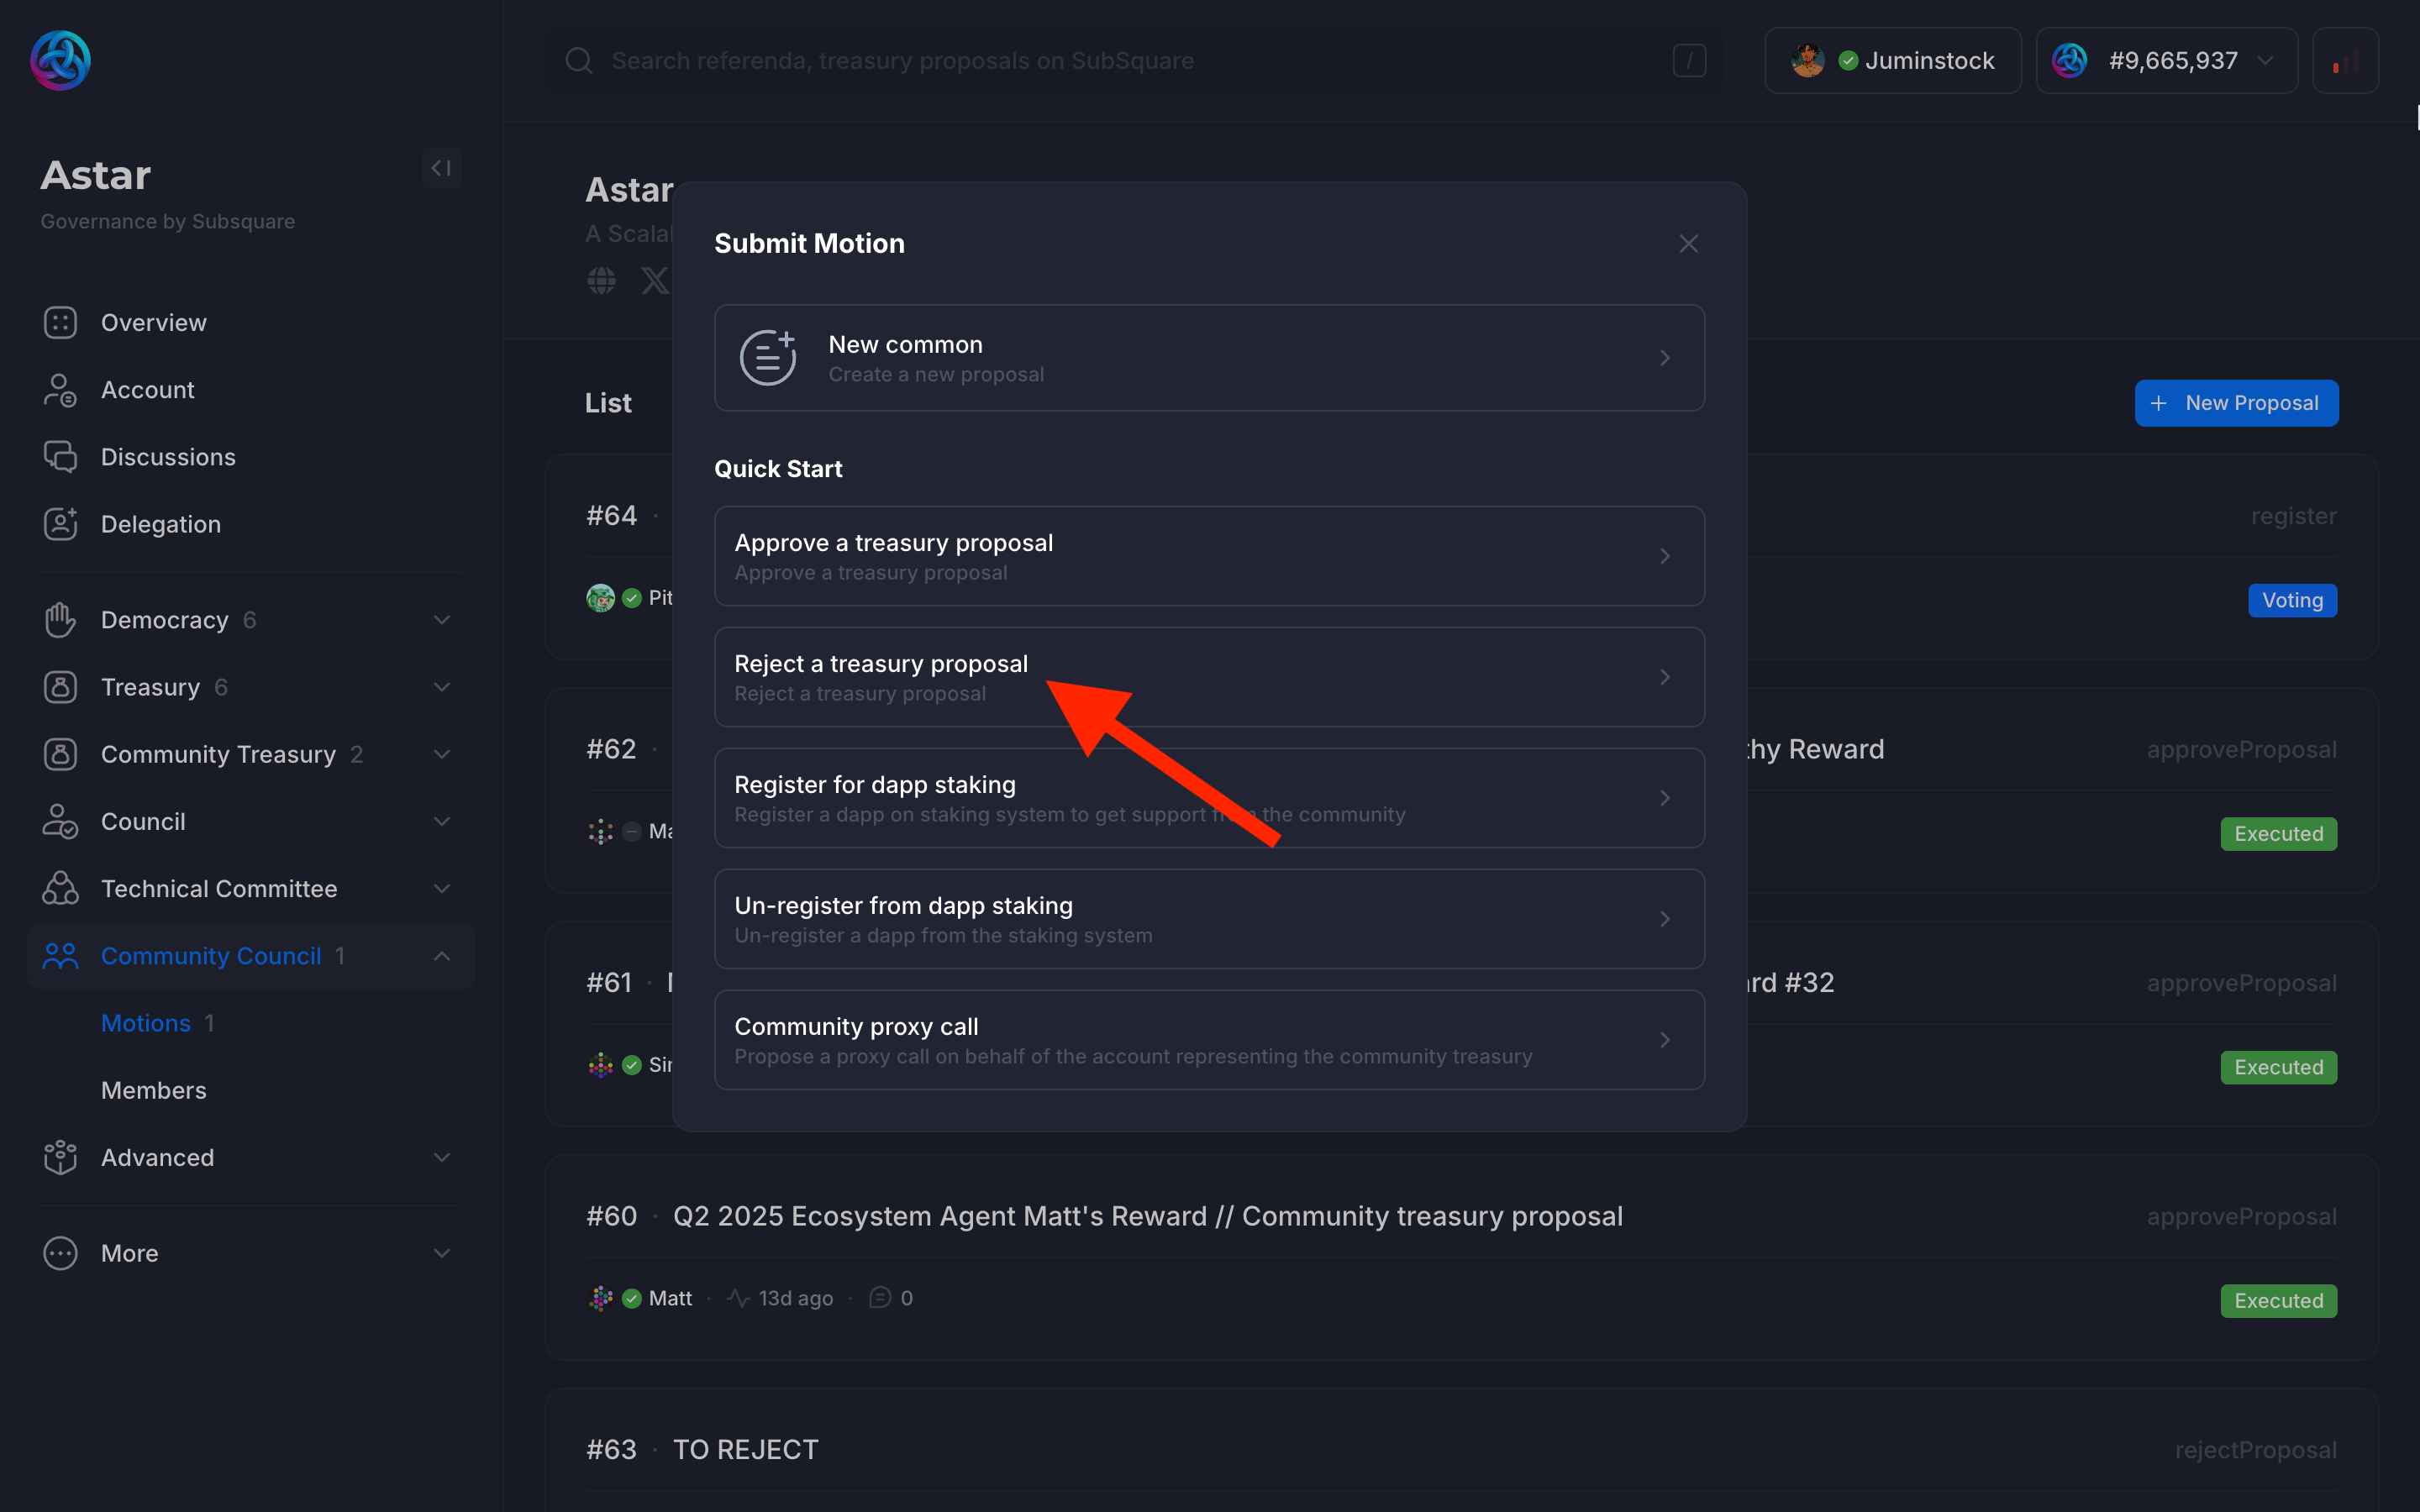
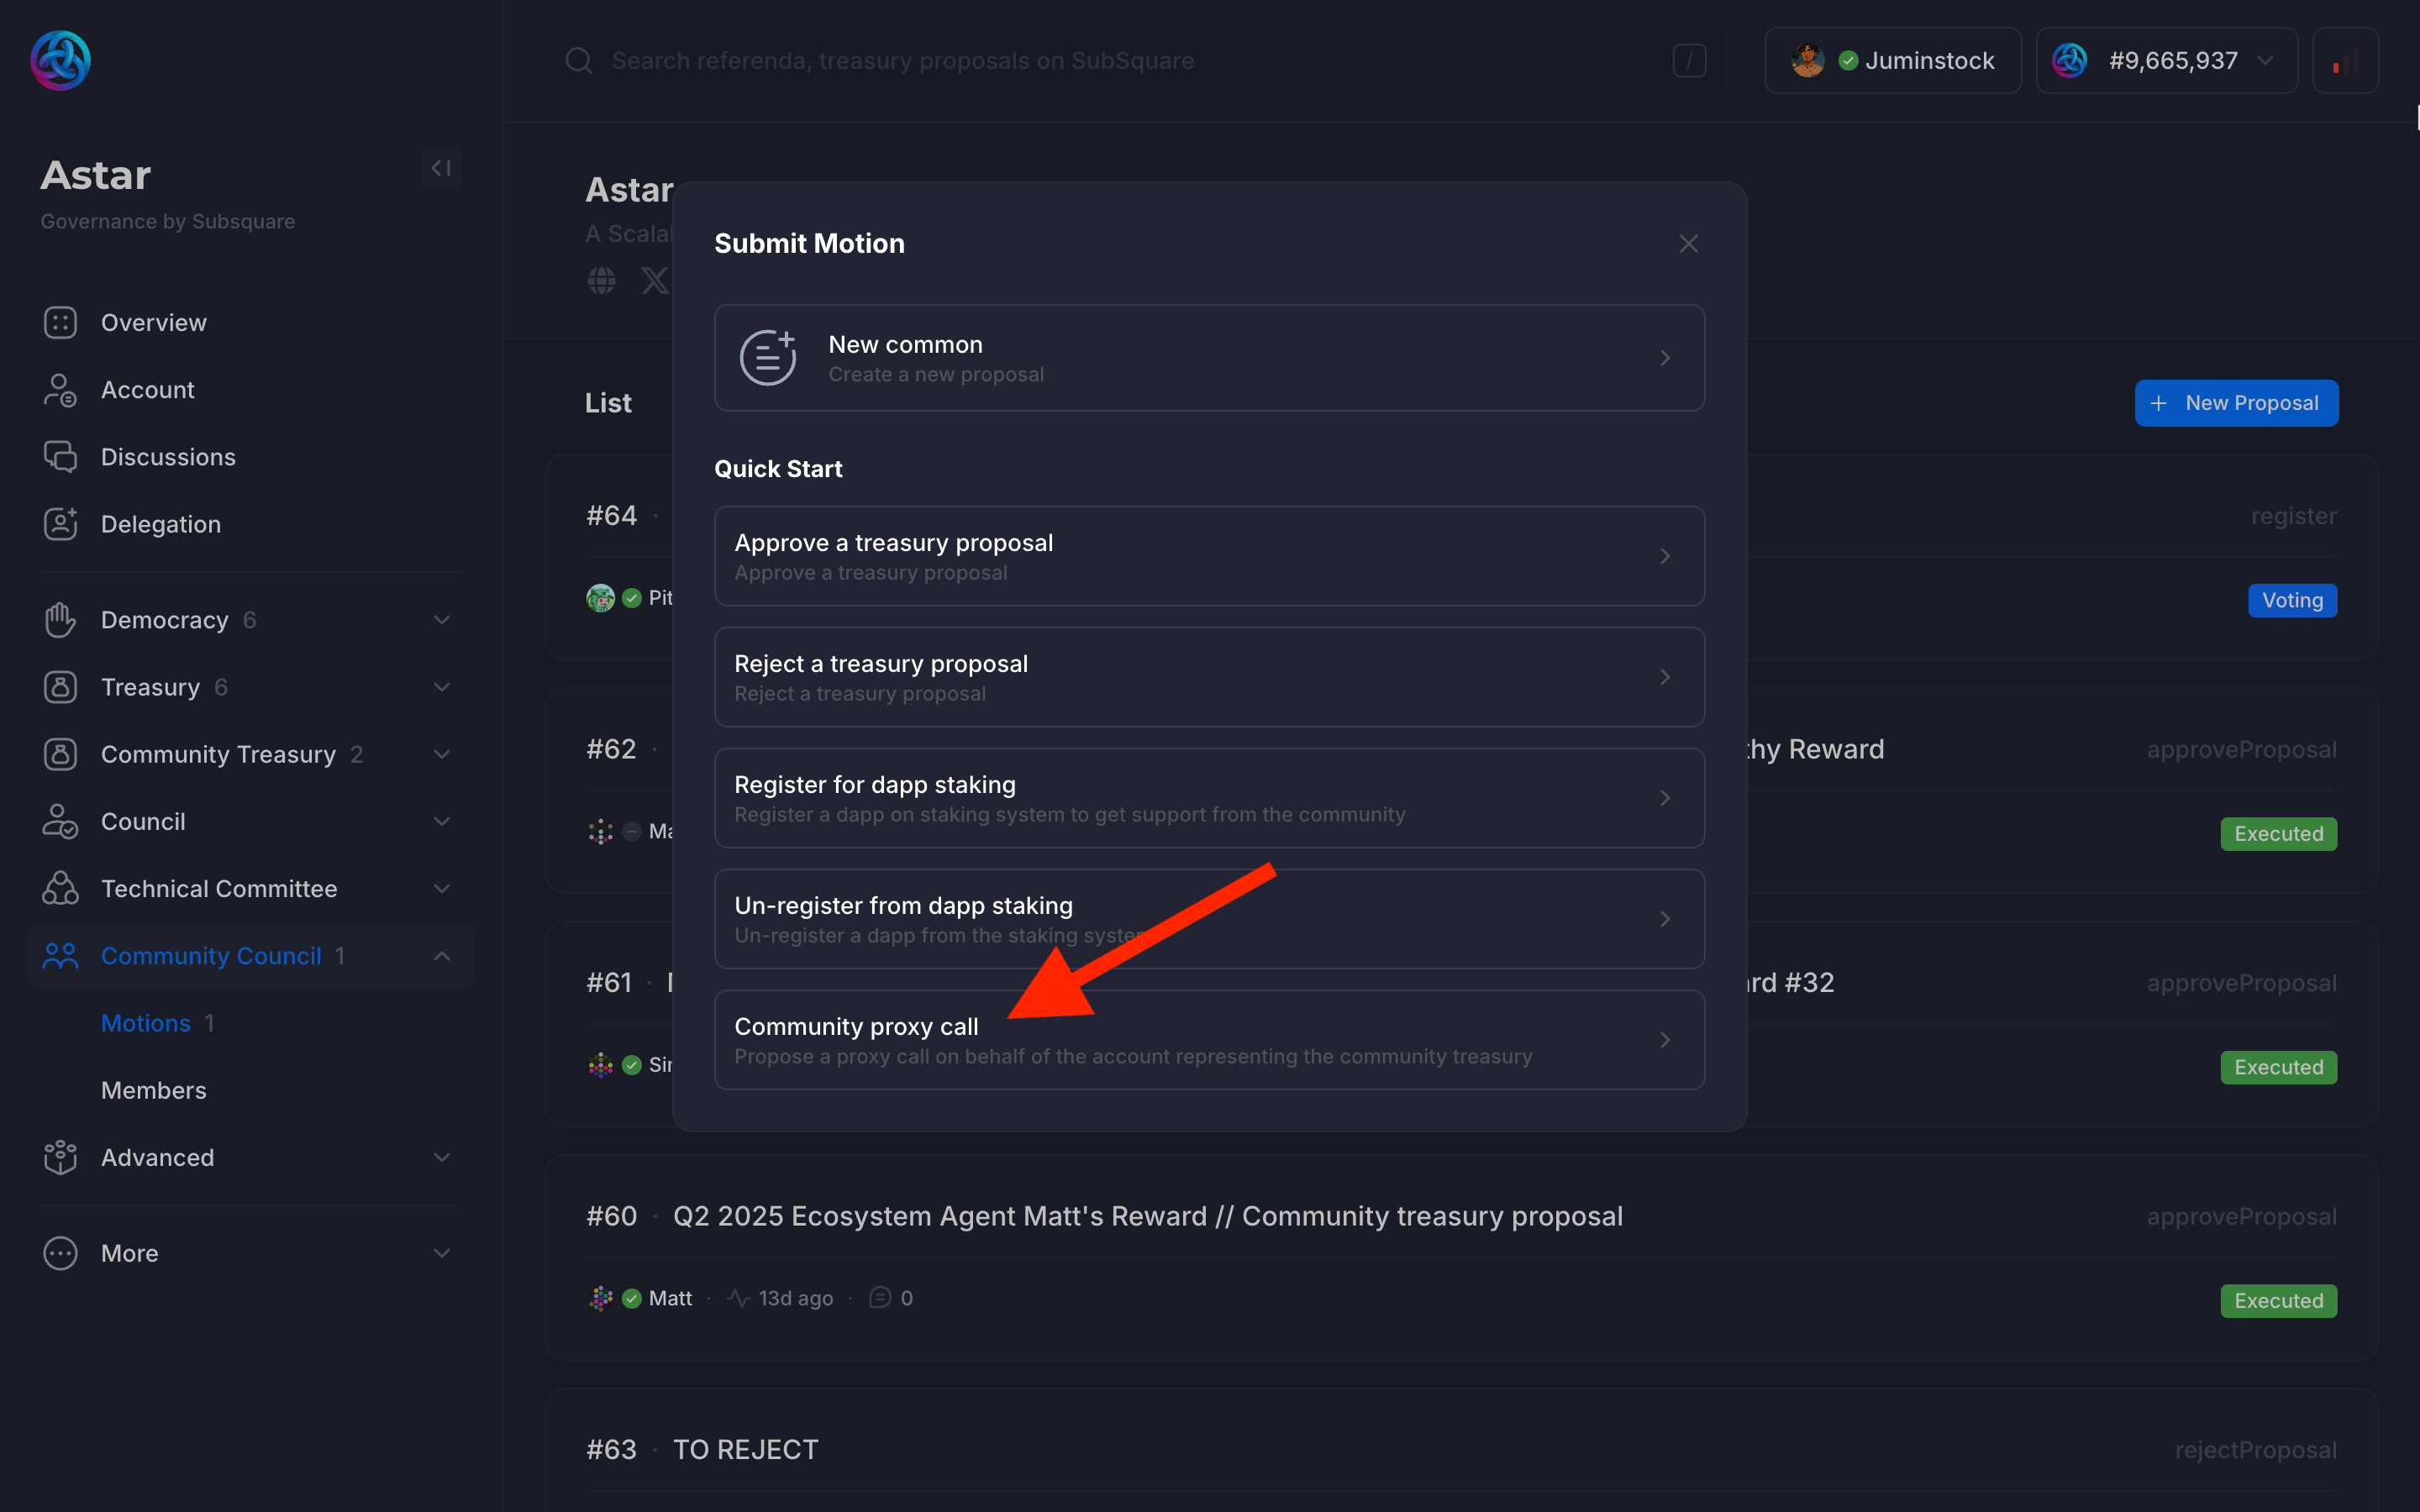
Clicking on the Motions tab under the Community Council sidebar tab will open a view of the Community Council motions.
Clicking on the + New Proposal button will prompt the Council to create a new motion.
For this example, we will select the first option from the Quick Start: Approve a treasury proposal.
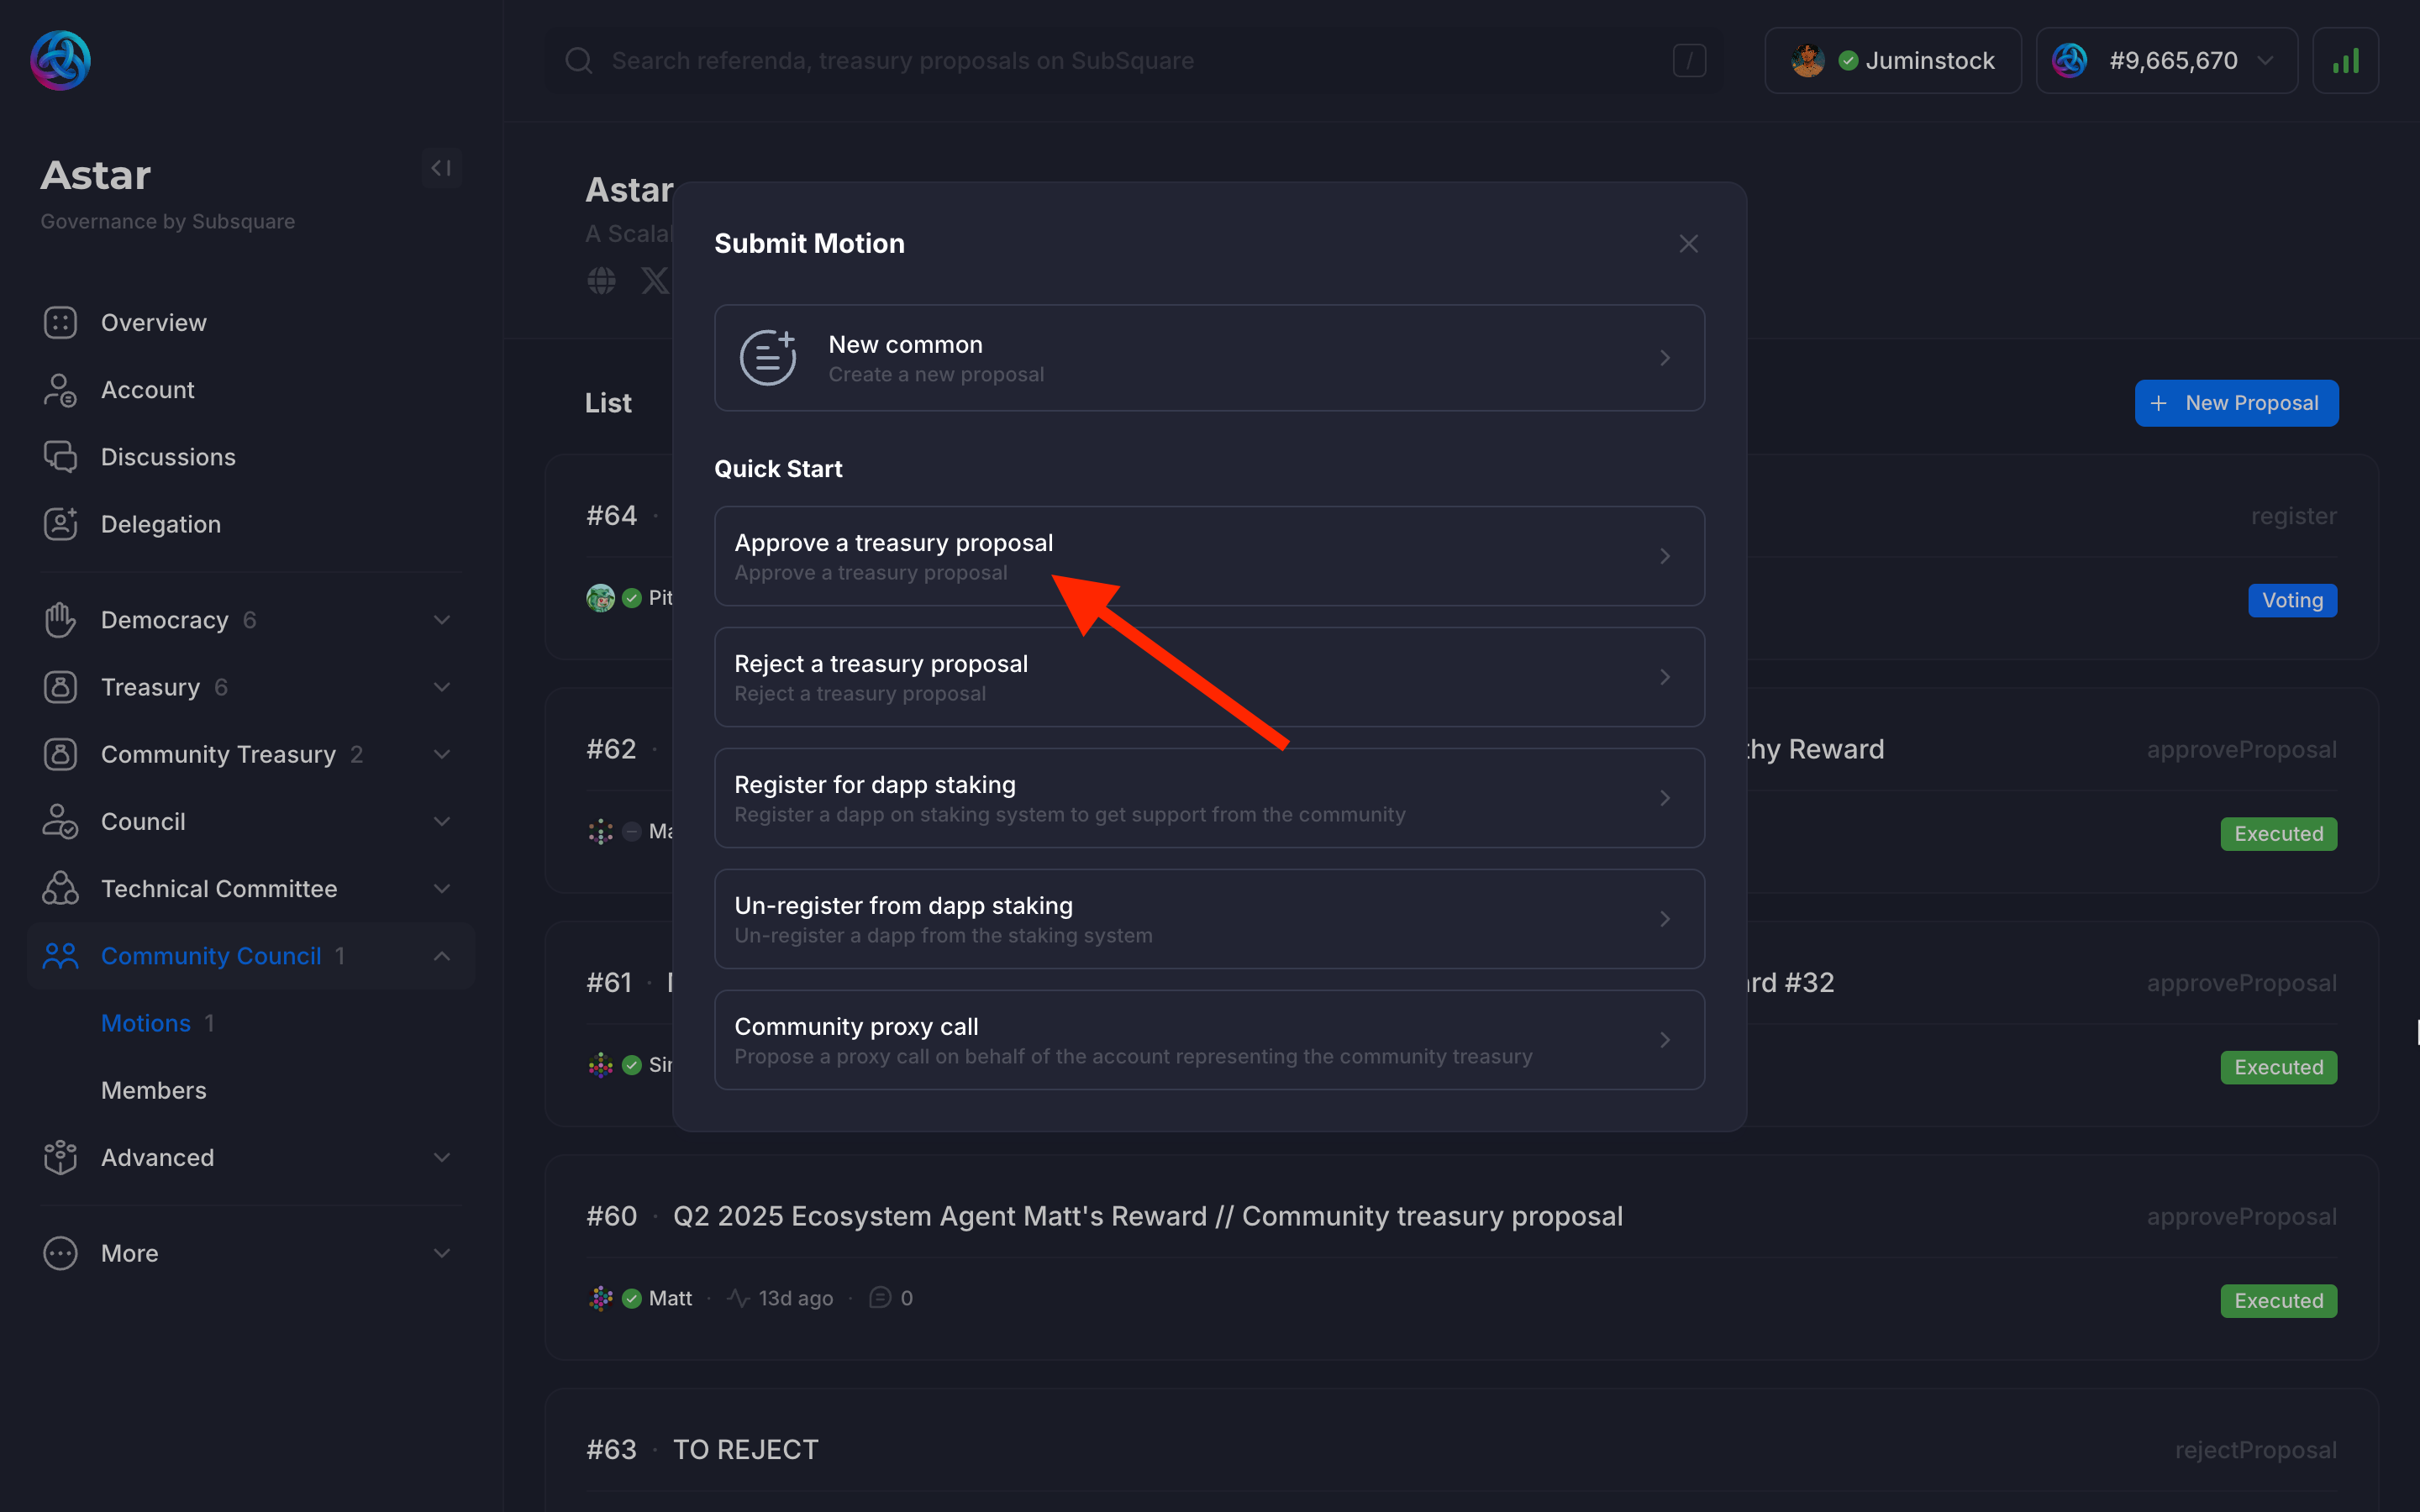
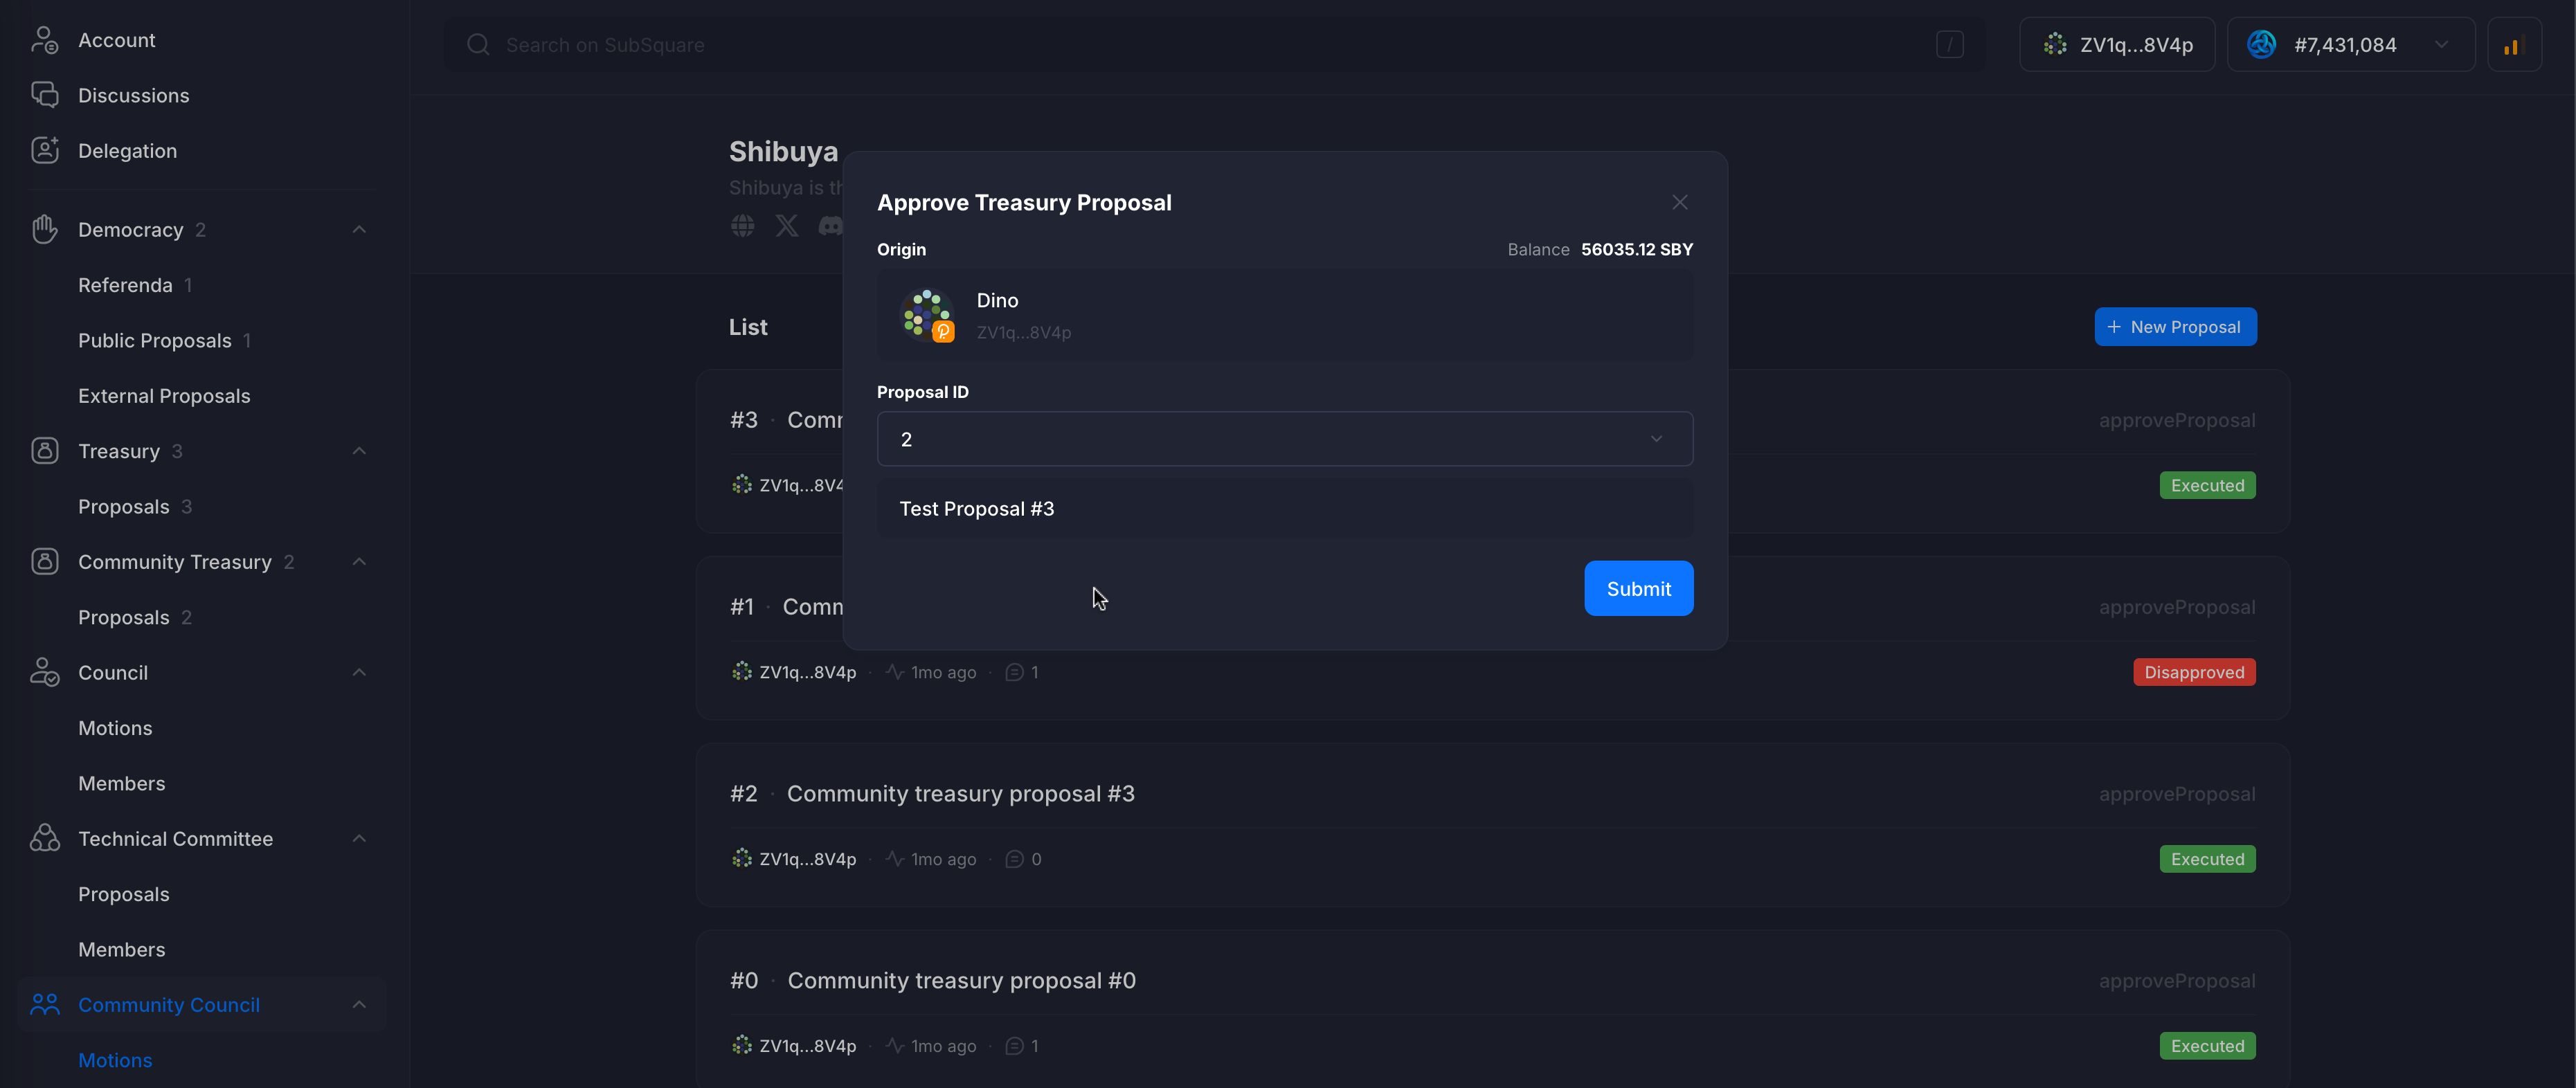
The proposal Id (can be checked under the Community Treasury tab) is required to create a new motion. Selecting an Id will display the proposal name, which also links to the proposal details.
:::warning Important
Community council members should ensure they're proposing and voting on the correct proposal.
:::
Step 2: Voting Process
Once the proposal creation is submitted, it will be displayed on the Motions page.
Clicking on it will display more details, and allow for a vote to be cast.
In this case, one of the council members votes Aye.
:::tip Remove Vote
If a Council member wishes to remove their vote, they may do so as long as the proposal has not yet been Executed. The vote can be changed as many times as desired.
::: :::info Reject a Proposal
The process to Reject a proposal is exactly the same, simply selecting Reject a treasury proposal when creating the motion during the step 1.
:::
3.2.2. Staking from the Community Treasury (SSP)
One of the main responsibilities of the Community Council is to stake in dApps under the ACC Strategic Staking Program (SSP). Conversely, the Council is also responsible for unstaking from dApps that have completed their cycle or failed to deliver the expected performance.
With that in mind, let’s walk through the Staking/Unstaking process the Community Council must follow.
Step 1: Create a Motion
Clicking on the Motions tab under the Community Council sidebar tab will open a view of the Community Council motions.
Clicking on the + New Proposal button will prompt the Council to create a new motion.
For this example, we will select the last option from the Quick Start: Community proxy call.
Stake in a dApp from the dApp Staking program
This is more complex since it requires the Council to understand the basics of dApp staking backend. The proposal call needs to be manually crafted and submitted to the blockchain.
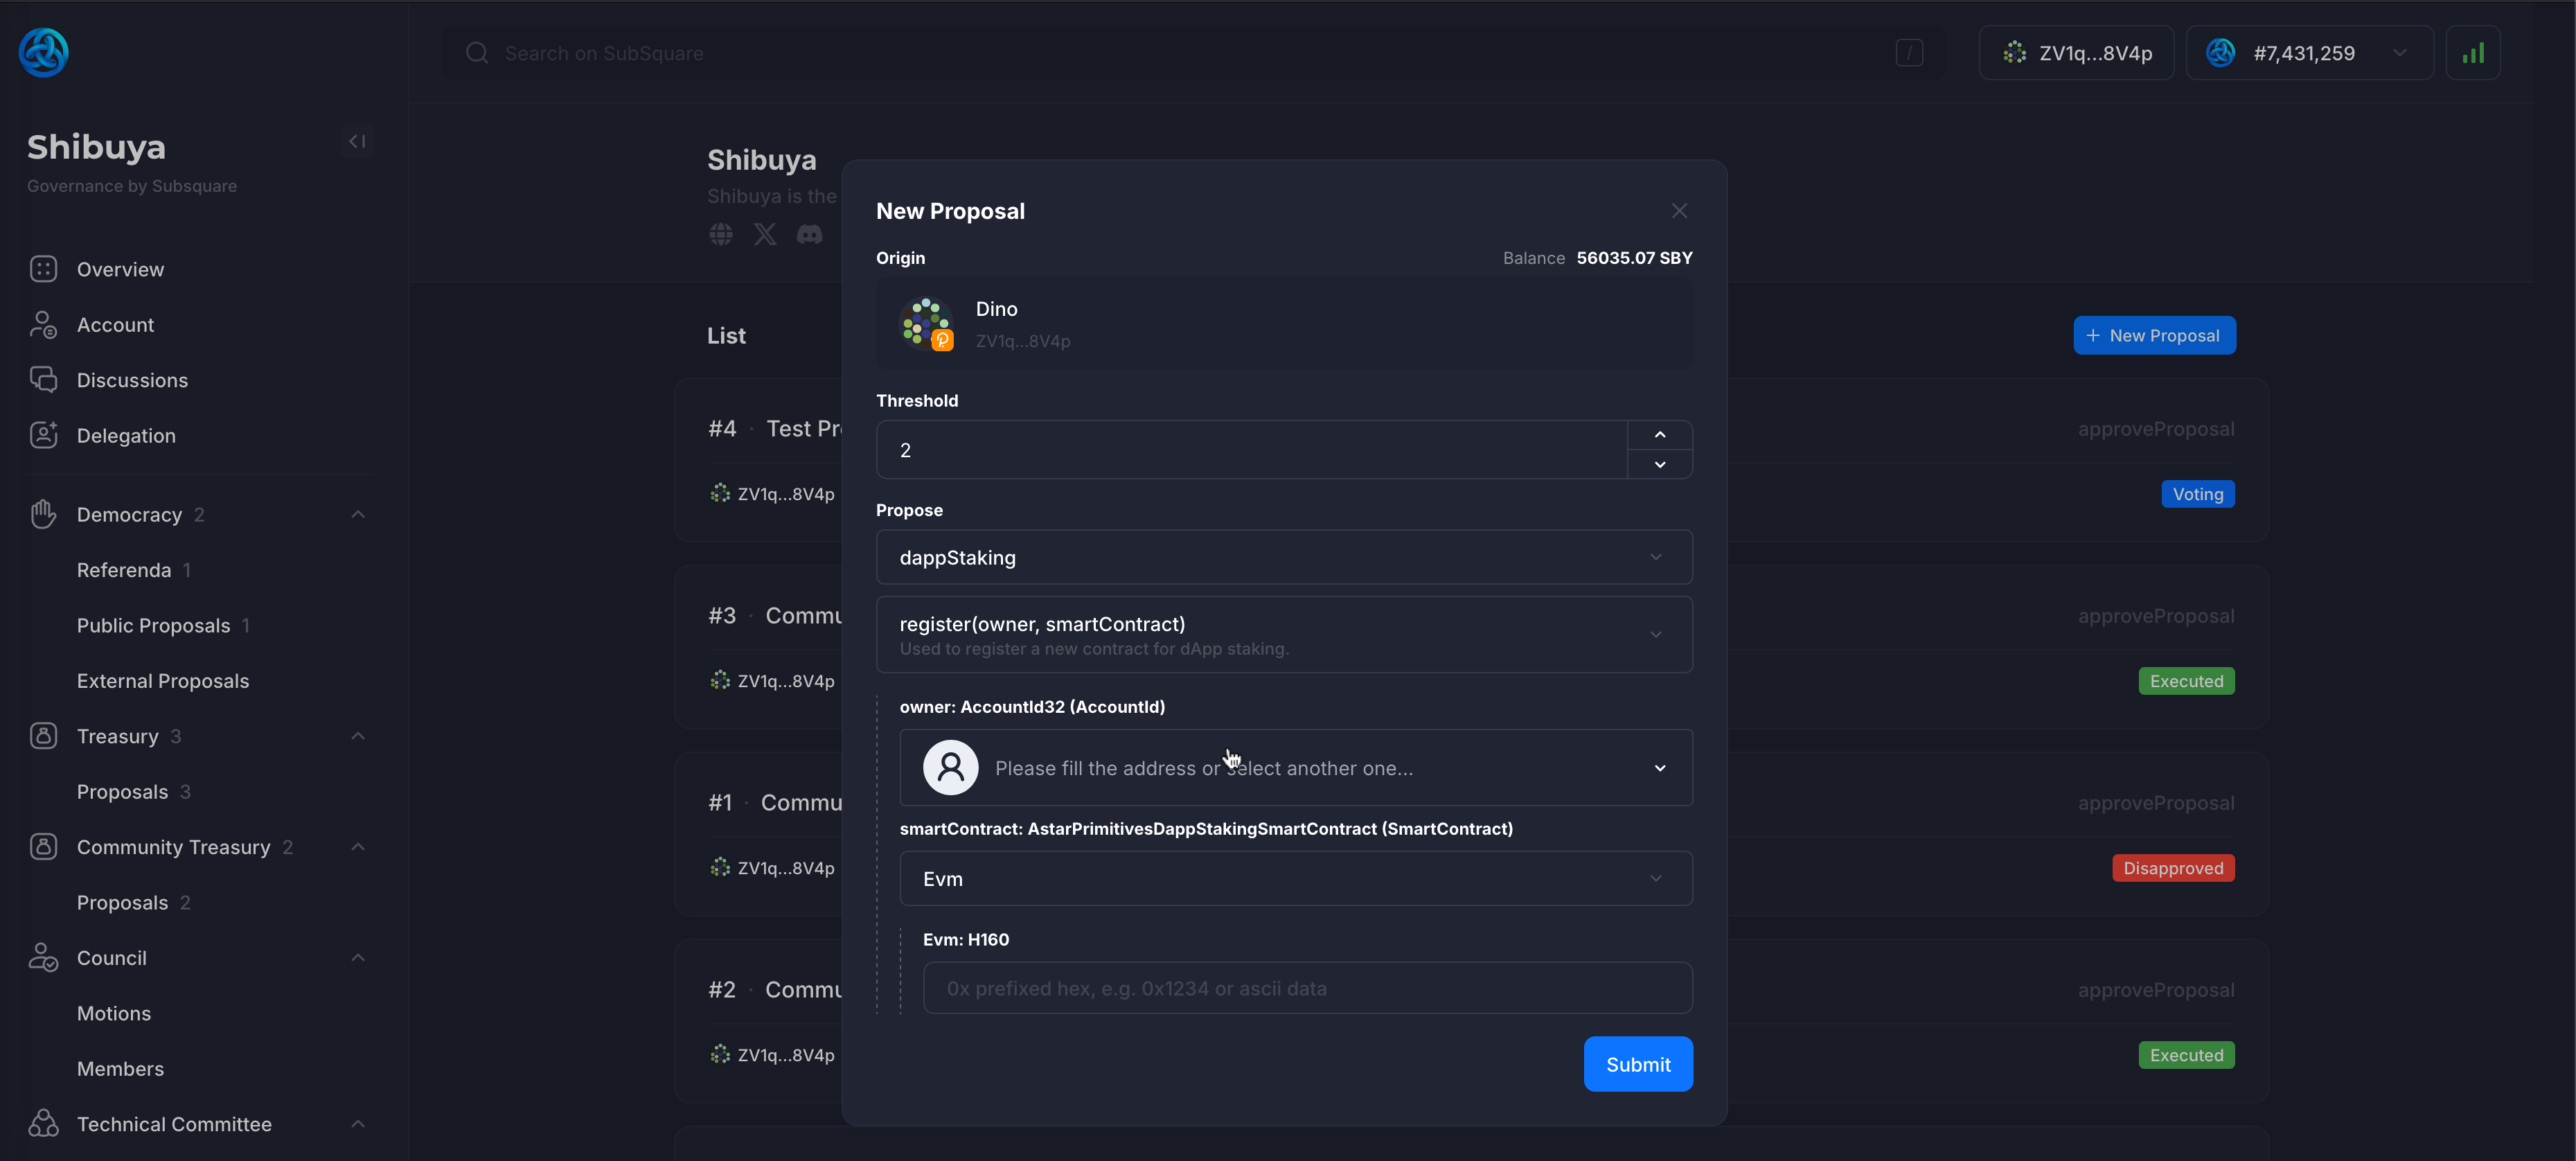
Step 2: Set the Threshold
The first thing to select is the threshold. This can be calculated by taking the expected vote threshold (e.g. 50% or 2/3 of the quorum) and comparing it to the total number of members in the council.
For this particular case, the threshold is set to 2/3 of the council members and we have 3 council members so we set it to 2.
Step 3: Call Builder
The next is the call builder. When utilizing the community treasury, the call needs to start with collectiveProxy → executeCall.
After that, the dApp staking call needs to be built.
:::tip Batch Calls
It's possible, and encouraged, to use the batch calls to simplify the voting process.
::: Finally, enter the EVM address of the dApp’s smart contract + the amount and that’s it! Click on Submit.

3.2.3. Registering a New dApp
When a dApp wishes to be listed in the Astar dApp Staking program, it can submit a listing request through the Community Council. Council members can review the proposal in detail and either approve or reject the request.
Given that the Community Council has the authority to do so, let’s walk through the step-by-step process to complete it.
Step 1: Create a Motion
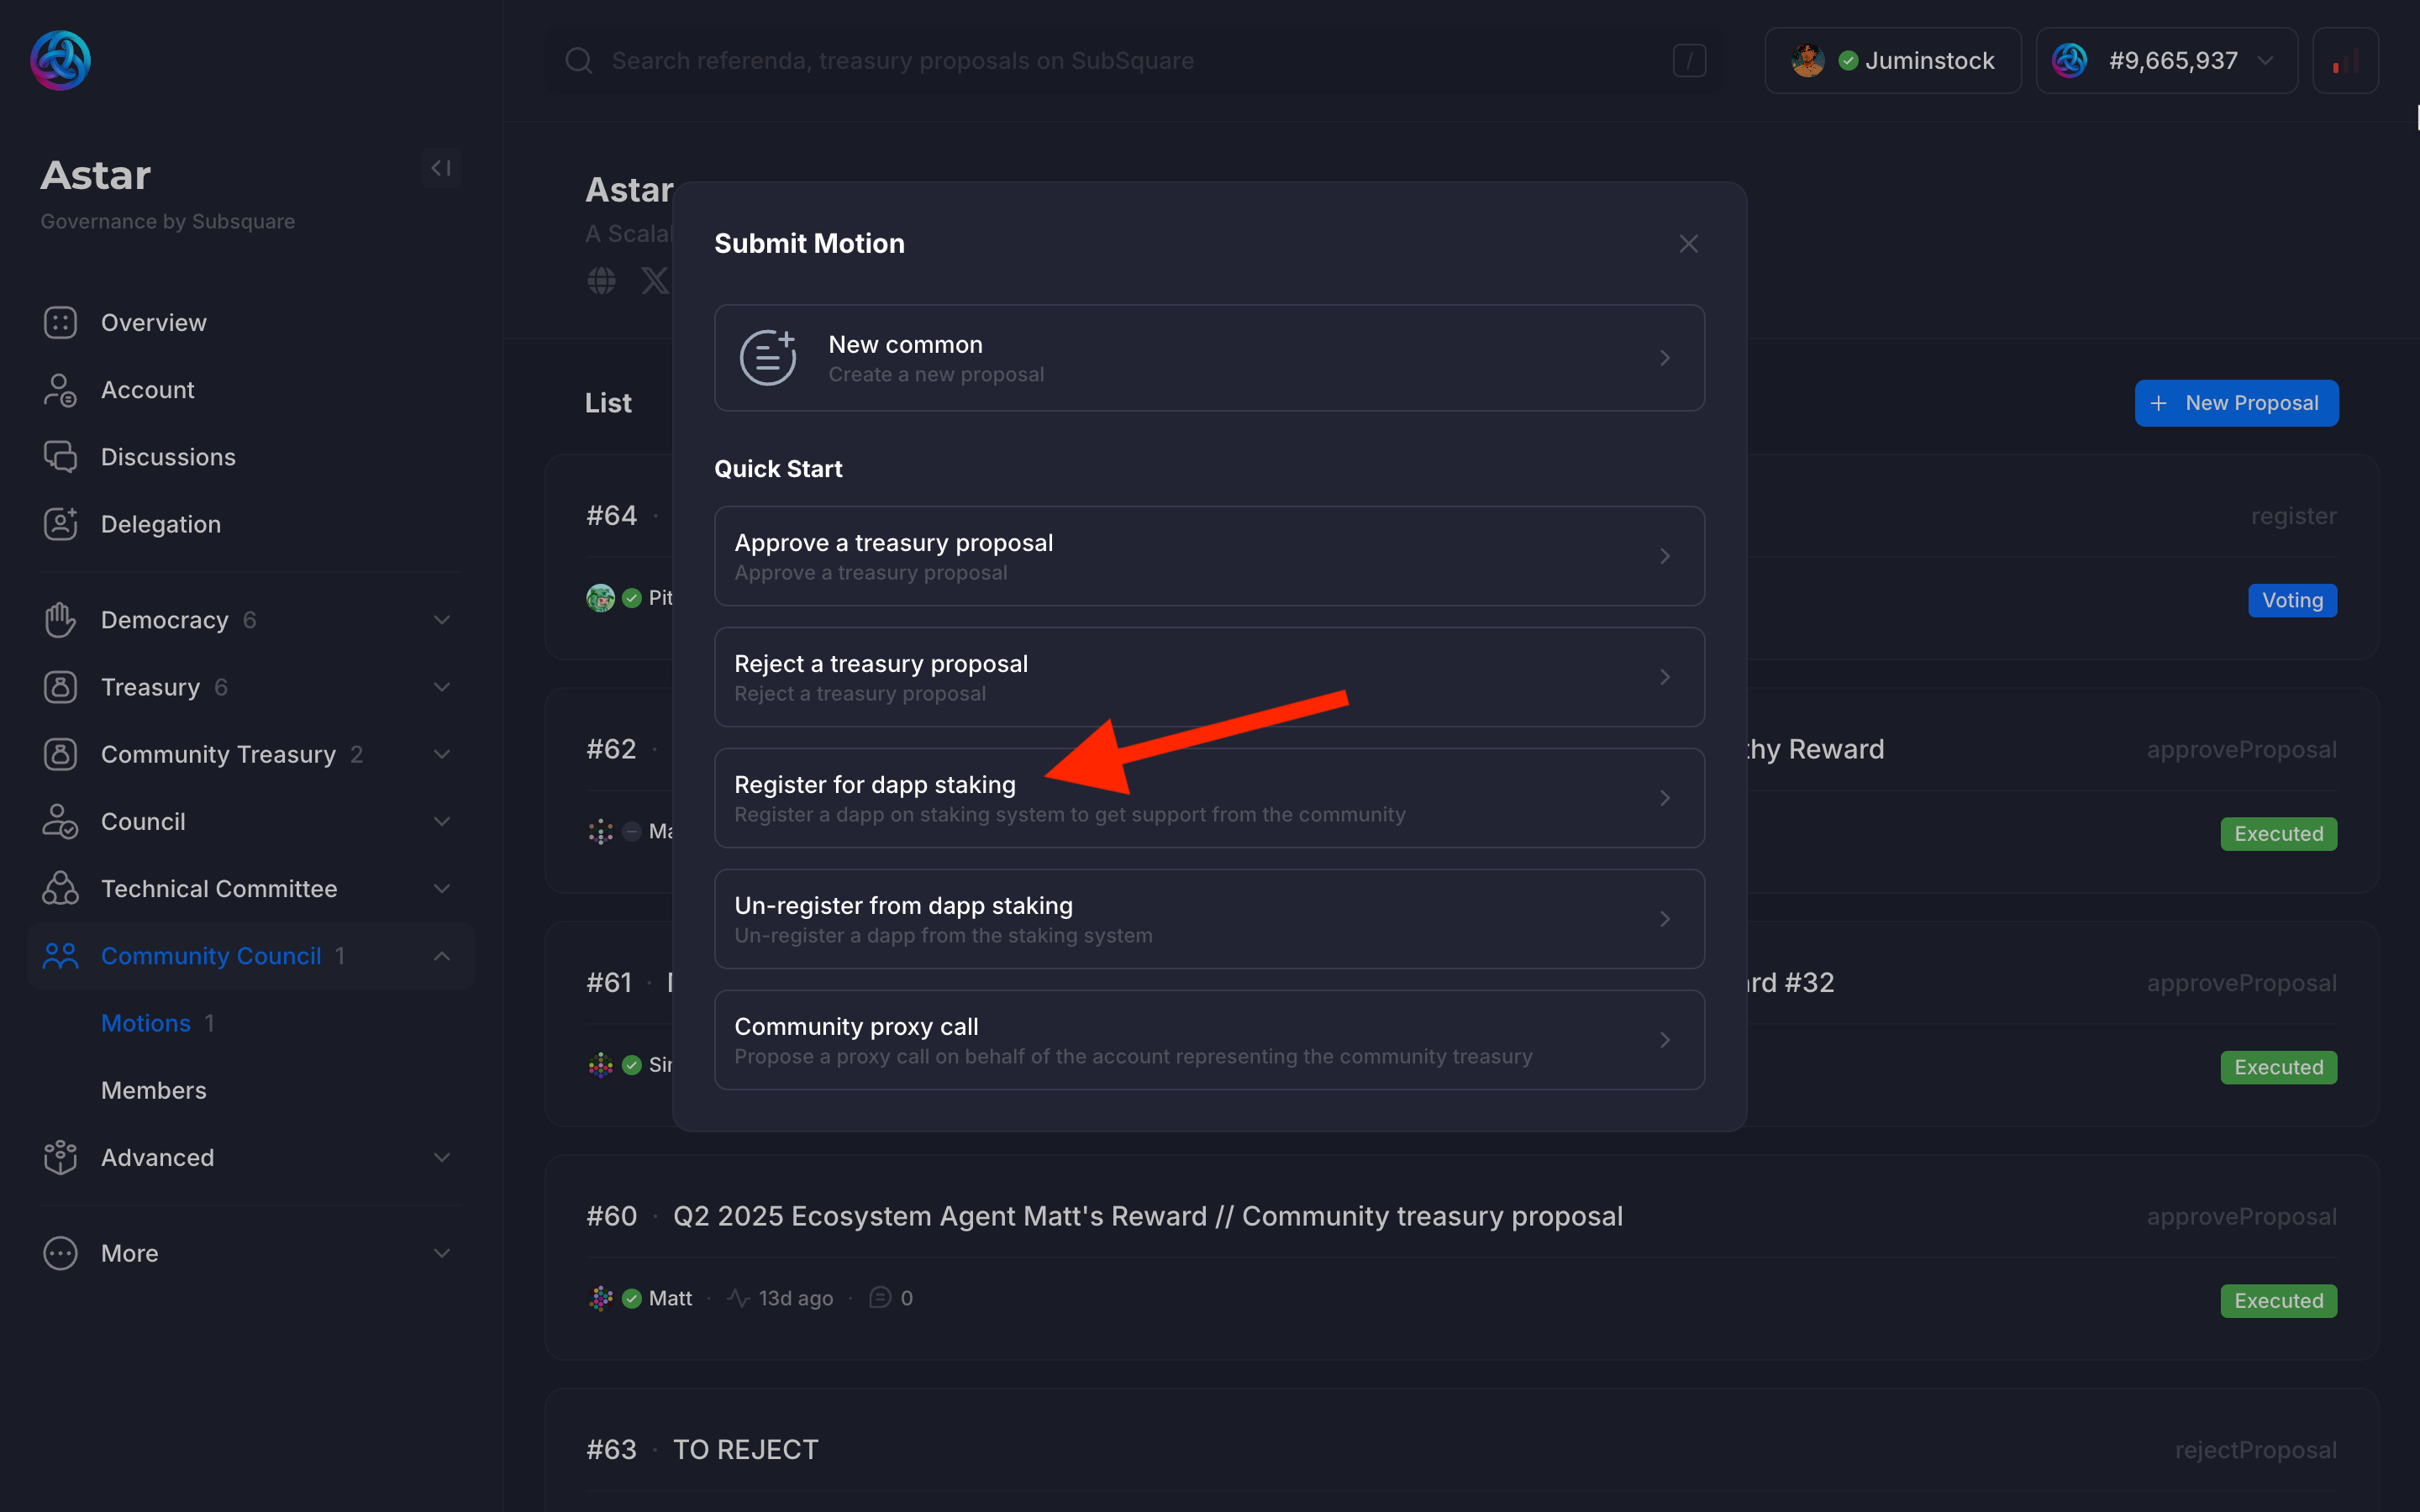
Clicking on the Motions tab under the Community Council sidebar tab will open a view of the Community Council motions.
Clicking on the + New Proposal button will prompt the Council to create a new motion.
For this example, we will select the third option from the Quick Start: Register for dapp staking.
Step 2: Set the Threshold
The first thing to select is the threshold. This can be calculated by taking the expected vote threshold (e.g. 50% or 2/3 of the quorum) and comparing it to the total number of members in the council.
For this particular case, the threshold is set to 2/3 of the council members and we have 3 council members so we set it to 2.
Step 3: Use the dappStaking extrinsic
Unlike the actual staking with the community treasury, registering a new dApp does not require the collectiveProxy.
Instead, the call should directly propose dappStaking → register.
Finally, enter the EVM address of the dApp’s smart contract and that’s it! Click on Submit.
3.3. Main Council
The Main Council serves as Astar Network's primary governance body, designed to manage high-level policy decisions and treasury oversight while maintaining the ability to respond rapidly to network emergencies. The council operates with 6 initial members, with the capacity to expand to 16 members as the network grows and governance needs evolve.
3.3.1. Core Responsibilities and Powers
The Main Council holds comprehensive authority over critical network decisions through super-majority voting mechanisms. Council members manage main treasury spending proposals, requiring the same approval processes as the Community Council to ensure balanced resource allocation.
Beyond treasury management, the Main Council creates and manages external proposals with differentiated voting schemes tailored to proposal complexity and impact. The council's emergency response capabilities represent its most critical function. With a two-thirds majority vote, the Main Council can immediately force-enter or exit Safe Mode, providing rapid network protection during security incidents.
3.3.2. Voting Mechanisms and Thresholds
Main Council operations require careful attention to threshold requirements, as different actions mandate varying consensus levels. Standard treasury proposals typically require simple majority approval, while emergency interventions demand two-thirds majority consensus to ensure adequate deliberation before activating network-wide protective measures.
The council's external proposal creation capability enables fast-tracking of critical governance decisions when time-sensitive situations arise. However, these proposals remain subject to Technical Committee oversight, creating balanced checks and balances within the governance system.
3.4. Technical Committee
The Technical Committee operates as Astar Network's specialized emergency response unit, comprising three highly skilled members with deep expertise in Astar runtime development and blockchain security. The committee can expand to eight members as technical governance needs evolve, ensuring adequate coverage for complex emergency scenarios.
3.4.1. Specialized Emergency Powers
Technical Committee members wield significant emergency intervention capabilities designed for rapid response to security threats. The committee can instantly fast-track critical proposals through unanimous agreement, compressing normal governance timelines from days to minutes when network security demands immediate action.
Individual committee members possess extraordinary veto power over Main Council external proposals, providing technical oversight for governance decisions that might impact network security or stability. This veto authority ensures that governance enthusiasm cannot override technical safety considerations during crisis situations.
The committee controls multiple emergency mechanisms including Safe Mode activation, TxPause implementation for compromised transaction types, and dApp Staking maintenance mode. These granular intervention capabilities enable surgical responses to specific threats without requiring comprehensive network shutdown.
3.5. Emergency Response Mechanisms
Both the Main Council and Technical Committee share authority over Astar Network's comprehensive emergency response system, which provides graduated intervention capabilities for different threat scenarios. These mechanisms balance rapid response requirements with governance legitimacy, ensuring network protection while maintaining democratic oversight.
3.5.1. Activating dApp Staking Maintenance Mode
Maintenance Mode provides protocol-specific intervention capability, particularly valuable for protecting staking-related assets during security incidents. The mechanism preserves existing stake positions and reward calculations while preventing new staking actions and fund withdrawals, creating a protective barrier around compromised protocols.
Configure the DappStaking Extrinsic on Polkadot.js
Select the dappStaking pallet from the extrinsic dropdown menu on Polkadot.js and choose the maintenanceMode function. This call does not require additional parameters, as it toggles the maintenance state for the entire dApp staking system.

3.5.2. Implementing TxPause Functionality
TxPause provides surgical intervention capability by selectively disabling specific transaction types while maintaining overall network operation. This granular approach enables targeted responses to identified vulnerabilities without comprehensive network disruption.
The mechanism operates by specifying exact pallet names and function combinations for suspension. Understanding proper formatting requirements is essential for successful implementation.
Configure the TxPause Extrinsic
Select the txPause pallet and choose the pause function. Enter the exact pallet name as the first parameter, ensuring proper capitalization. Enter the specific function name as the second parameter using correct snake_case formatting.
:::warning Good to know
This action can be executed directly by the Main Council or Technical Committee through the Polkadot.js interface. However, it is not restricted to these bodies, an approved governance referendum can also authorize its execution.
::: :::tip Example Case
To pause balance transfers entirely, use Balances as the pallet name and transfer_all as the function name. To pause specific dApp staking claims, use DappStaking and claim_unlocked respectively.
::: :::info Disable txPause
After the security threat is resolved and appropriate patches are implemented, create a new motion using the txPause pallet and unpause function with identical pallet and function name parameters to restore normal functionality.
:::
3.5.3. Activating Safe Mode
Safe Mode represents Astar Network's most comprehensive emergency response mechanism, designed for existential threats requiring complete transaction restriction except for essential system operations. This mechanism blocks nearly all user-submitted transactions while maintaining critical network functions including governance actions, parachain lifecycle functions, and timestamping operations.
Safe Mode initializes with a 12-hour active period and supports extension in 2-hour increments through additional governance actions, providing flexible response duration based on threat complexity and resolution requirements.
Configure SafeMode Entry
Select the safeMode pallet and choose the forceEnter function. This extrinsic does not require additional parameters and will immediately activate comprehensive network protection upon successful vote completion.
:::warning Good to know
This action can be executed directly by the Main Council or Technical Committee through the Polkadot.js interface. However, it is not restricted to these bodies, an approved governance referendum can also authorize its execution.
::: :::tip Manage Duration Extensions
If additional time is required, create extension motions using the safeMode pallet and forceExtend function, specifying 2-hour increment extensions as needed.
Multiple extensions are permitted for complex security incidents requiring extended resolution periods, though each extension requires separate council approval.
::: :::info Exit Safe Mode
Once security threats are fully resolved and network safety is confirmed, create a final motion using the safeMode pallet and forceExit function.
The exit motion requires the same threshold as activation, ensuring adequate council consensus before removing network-wide protections. :::
Technical Documentation
Please refer to the technical guide for detailed information about constructing these calls using the Polkadot-js App interface, including specific parameter requirements and execution procedures for each emergency mechanism.