Setup Local Validium Node
Validium
This quick start guide shows you how to set up a CDK validium on your local machine that sets up and runs the following components:
- zkEVM databases: data node, event, explorer L1 and L2, pool, state, and bridge service
- zkEVM node components: aggregator, approve service, sequencer and sequence sender, synchronizer
- L1 network (mock)
- Prover
- Explorers L1, L2
- JSON RPC explorer
- L2 gas pricer
- DAC: data availability service, dac setup committee
- zkEVM bridge service and UI
The documentation describes standard deployments. Edit the configuration files to implement your own custom setups.
Prerequisites
Hardware Requirements
- A Linux-based OS (e.g., Ubuntu Server 22.04 LTS).
- At least 16GB RAM with a 4-core CPU.
- An AMD64 architecture system.
CDK does not support ARM-based Macs.
Software Requirements
The tutorial for current version of the environment requires go and docker to be previously installed on your machine. If you don’t have these installed, check out the links provided below:
This document uses docker compose v2.
Install make
Install make on Ubuntu:
sudo apt install make
Clone the repo
Run the following commands:
git clone https://github.com/Snapchain/zkValidium-quickstart.git
cd zkValidium-quickstart
Create the .env file by copying the example:
cp .env.example .env
Launch validium locally
Pull the required Docker images from Docker Hub:
sudo docker compose pull
After pulling the images, start your local CDK validium:
sudo make run
To ensure all services are running properly, check the status of each container:
sudo docker compose ps
You should see similar to this output:
Container status details
$ sudo docker ps --format "table {{.Names}}\t{{.Command}}\t{{.Status}}\t{{.Ports}}"
NAMES                              COMMAND                  STATUS                    PORTS
explorer-sig-provider              "./sig-provider-serv…"   Up 11 minutes             0.0.0.0:8151->8050/tcp, :::8151->8050/tcp
visualizer-proxy                   "/docker-entrypoint.…"   Up 11 minutes             80/tcp, 0.0.0.0:8083->8081/tcp, :::8083->8081/tcp
explorer-visualizer                "./visualizer-server"    Up 11 minutes             0.0.0.0:8152->8050/tcp, :::8152->8050/tcp
explorer-smart-contract-verifier   "./smart-contract-ve…"   Up 11 minutes             0.0.0.0:8150->8050/tcp, :::8150->8050/tcp
explorer-proxy-l2                  "/docker-entrypoint.…"   Up 11 minutes             0.0.0.0:80->80/tcp, :::80->80/tcp, 0.0.0.0:8084->8080/tcp, :::8084->8080/tcp
explorer-stats-l2                  "./stats-server"         Up 11 minutes             0.0.0.0:8154->8050/tcp, :::8154->8050/tcp
explorer-stats-db-l2               "docker-entrypoint.s…"   Up 11 minutes             0.0.0.0:7434->5432/tcp, :::7434->5432/tcp
explorer-frontend-l2               "./entrypoint.sh nod…"   Up 11 minutes             0.0.0.0:3001->3000/tcp, :::3001->3000/tcp
explorer-backend-l2                "sh -c 'bin/blocksco…"   Up 11 minutes             0.0.0.0:4001->4000/tcp, :::4001->4000/tcp
zkevm-explorer-json-rpc            "/bin/sh -c '/app/zk…"   Up 11 minutes             0.0.0.0:8124->8124/tcp, :::8124->8124/tcp, 8123/tcp, 0.0.0.0:8134->8134/tcp, :::8134->8134/tcp
explorer-backend-l2-db             "docker-entrypoint.s…"   Up 11 minutes             0.0.0.0:5437->5432/tcp, :::5437->5432/tcp
explorer-proxy-l1                  "/docker-entrypoint.…"   Up 11 minutes             0.0.0.0:81->80/tcp, :::81->80/tcp, 0.0.0.0:8082->8080/tcp, :::8082->8080/tcp
explorer-stats-l1                  "./stats-server"         Up 12 minutes             0.0.0.0:8153->8050/tcp, :::8153->8050/tcp
explorer-stats-db-l1               "docker-entrypoint.s…"   Up 12 minutes             0.0.0.0:7433->5432/tcp, :::7433->5432/tcp
explorer-frontend-l1               "./entrypoint.sh nod…"   Up 12 minutes             0.0.0.0:3000->3000/tcp, :::3000->3000/tcp
explorer-backend-l1                "sh -c 'bin/blocksco…"   Up 12 minutes             0.0.0.0:4000->4000/tcp, :::4000->4000/tcp
explorer-backend-l1-db             "docker-entrypoint.s…"   Up 12 minutes             0.0.0.0:5436->5432/tcp, :::5436->5432/tcp
zkevm-bridge-ui                    "/bin/sh /app/script…"   Up 12 minutes             0.0.0.0:8088->80/tcp, :::8088->80/tcp
zkevm-bridge-service               "/bin/sh -c '/app/zk…"   Up 12 minutes             0.0.0.0:8080->8080/tcp, :::8080->8080/tcp, 0.0.0.0:9090->9090/tcp, :::9090->9090/tcp
zkevm-bridge-db                    "docker-entrypoint.s…"   Up 12 minutes             5438/tcp, 0.0.0.0:5438->5432/tcp, :::5438->5432/tcp
zkevm-json-rpc                     "/bin/sh -c '/app/zk…"   Up 12 minutes             0.0.0.0:8123->8123/tcp, :::8123->8123/tcp, 0.0.0.0:8133->8133/tcp, :::8133->8133/tcp, 0.0.0.0:9091->9091/tcp, :::9091->9091/tcp
zkevm-aggregator                   "/bin/sh -c '/app/zk…"   Up 12 minutes             8123/tcp, 0.0.0.0:50081->50081/tcp, :::50081->50081/tcp, 0.0.0.0:9093->9091/tcp, :::9093->9091/tcp
zkevm-l2gaspricer                  "/bin/sh -c '/app/zk…"   Up 12 minutes             8123/tcp
zkevm-sequence-sender              "/bin/sh -c '/app/zk…"   Up 12 minutes             8123/tcp
zkevm-sequencer                    "/bin/sh -c '/app/zk…"   Up 12 minutes             0.0.0.0:6060->6060/tcp, :::6060->6060/tcp, 0.0.0.0:6900->6900/tcp, :::6900->6900/tcp, 8123/tcp, 0.0.0.0:9092->9091/tcp, :::9092->9091/tcp
zkevm-eth-tx-manager               "/bin/sh -c '/app/zk…"   Up 12 minutes             8123/tcp, 0.0.0.0:9094->9091/tcp, :::9094->9091/tcp
zkevm-sync                         "/bin/sh -c '/app/zk…"   Up 12 minutes             8123/tcp, 0.0.0.0:9095->9091/tcp, :::9095->9091/tcp
zkevm-prover                       "zkProver -c /usr/sr…"   Up 12 minutes             0.0.0.0:50061->50061/tcp, :::50061->50061/tcp, 0.0.0.0:50071->50071/tcp, :::50071->50071/tcp
zkevm-data-availability            "/bin/sh -c '/app/cd…"   Up 12 minutes             0.0.0.0:8444->8444/tcp, :::8444->8444/tcp
zkevm-data-node-db                 "docker-entrypoint.s…"   Up 12 minutes (healthy)   0.0.0.0:5444->5432/tcp, :::5444->5432/tcp
zkevm-mock-l1-network              "geth --http --http.…"   Up 12 minutes             0.0.0.0:8545-8546->8545-8546/tcp, :::8545-8546->8545-8546/tcp, 30303/tcp, 30303/udp
zkevm-event-db                     "docker-entrypoint.s…"   Up 12 minutes             0.0.0.0:5435->5432/tcp, :::5435->5432/tcp
zkevm-pool-db                      "docker-entrypoint.s…"   Up 12 minutes             0.0.0.0:5433->5432/tcp, :::5433->5432/tcp
zkevm-state-db                     "docker-entrypoint.s…"   Up 12 minutes             0.0.0.0:5432->5432/tcp, :::5432->5432/tcp
If a service isn’t running (i.e. it is in Exit 1 state), investigate further using the logs:
sudo docker compose logs <container_name>
Find the <container_name> in the docker command output.
Useful commands
To stop CDK validium, use:
sudo make stop
To restart all services:
sudo make restart
This local deployment runs on an L1 Geth instance.
Test validium
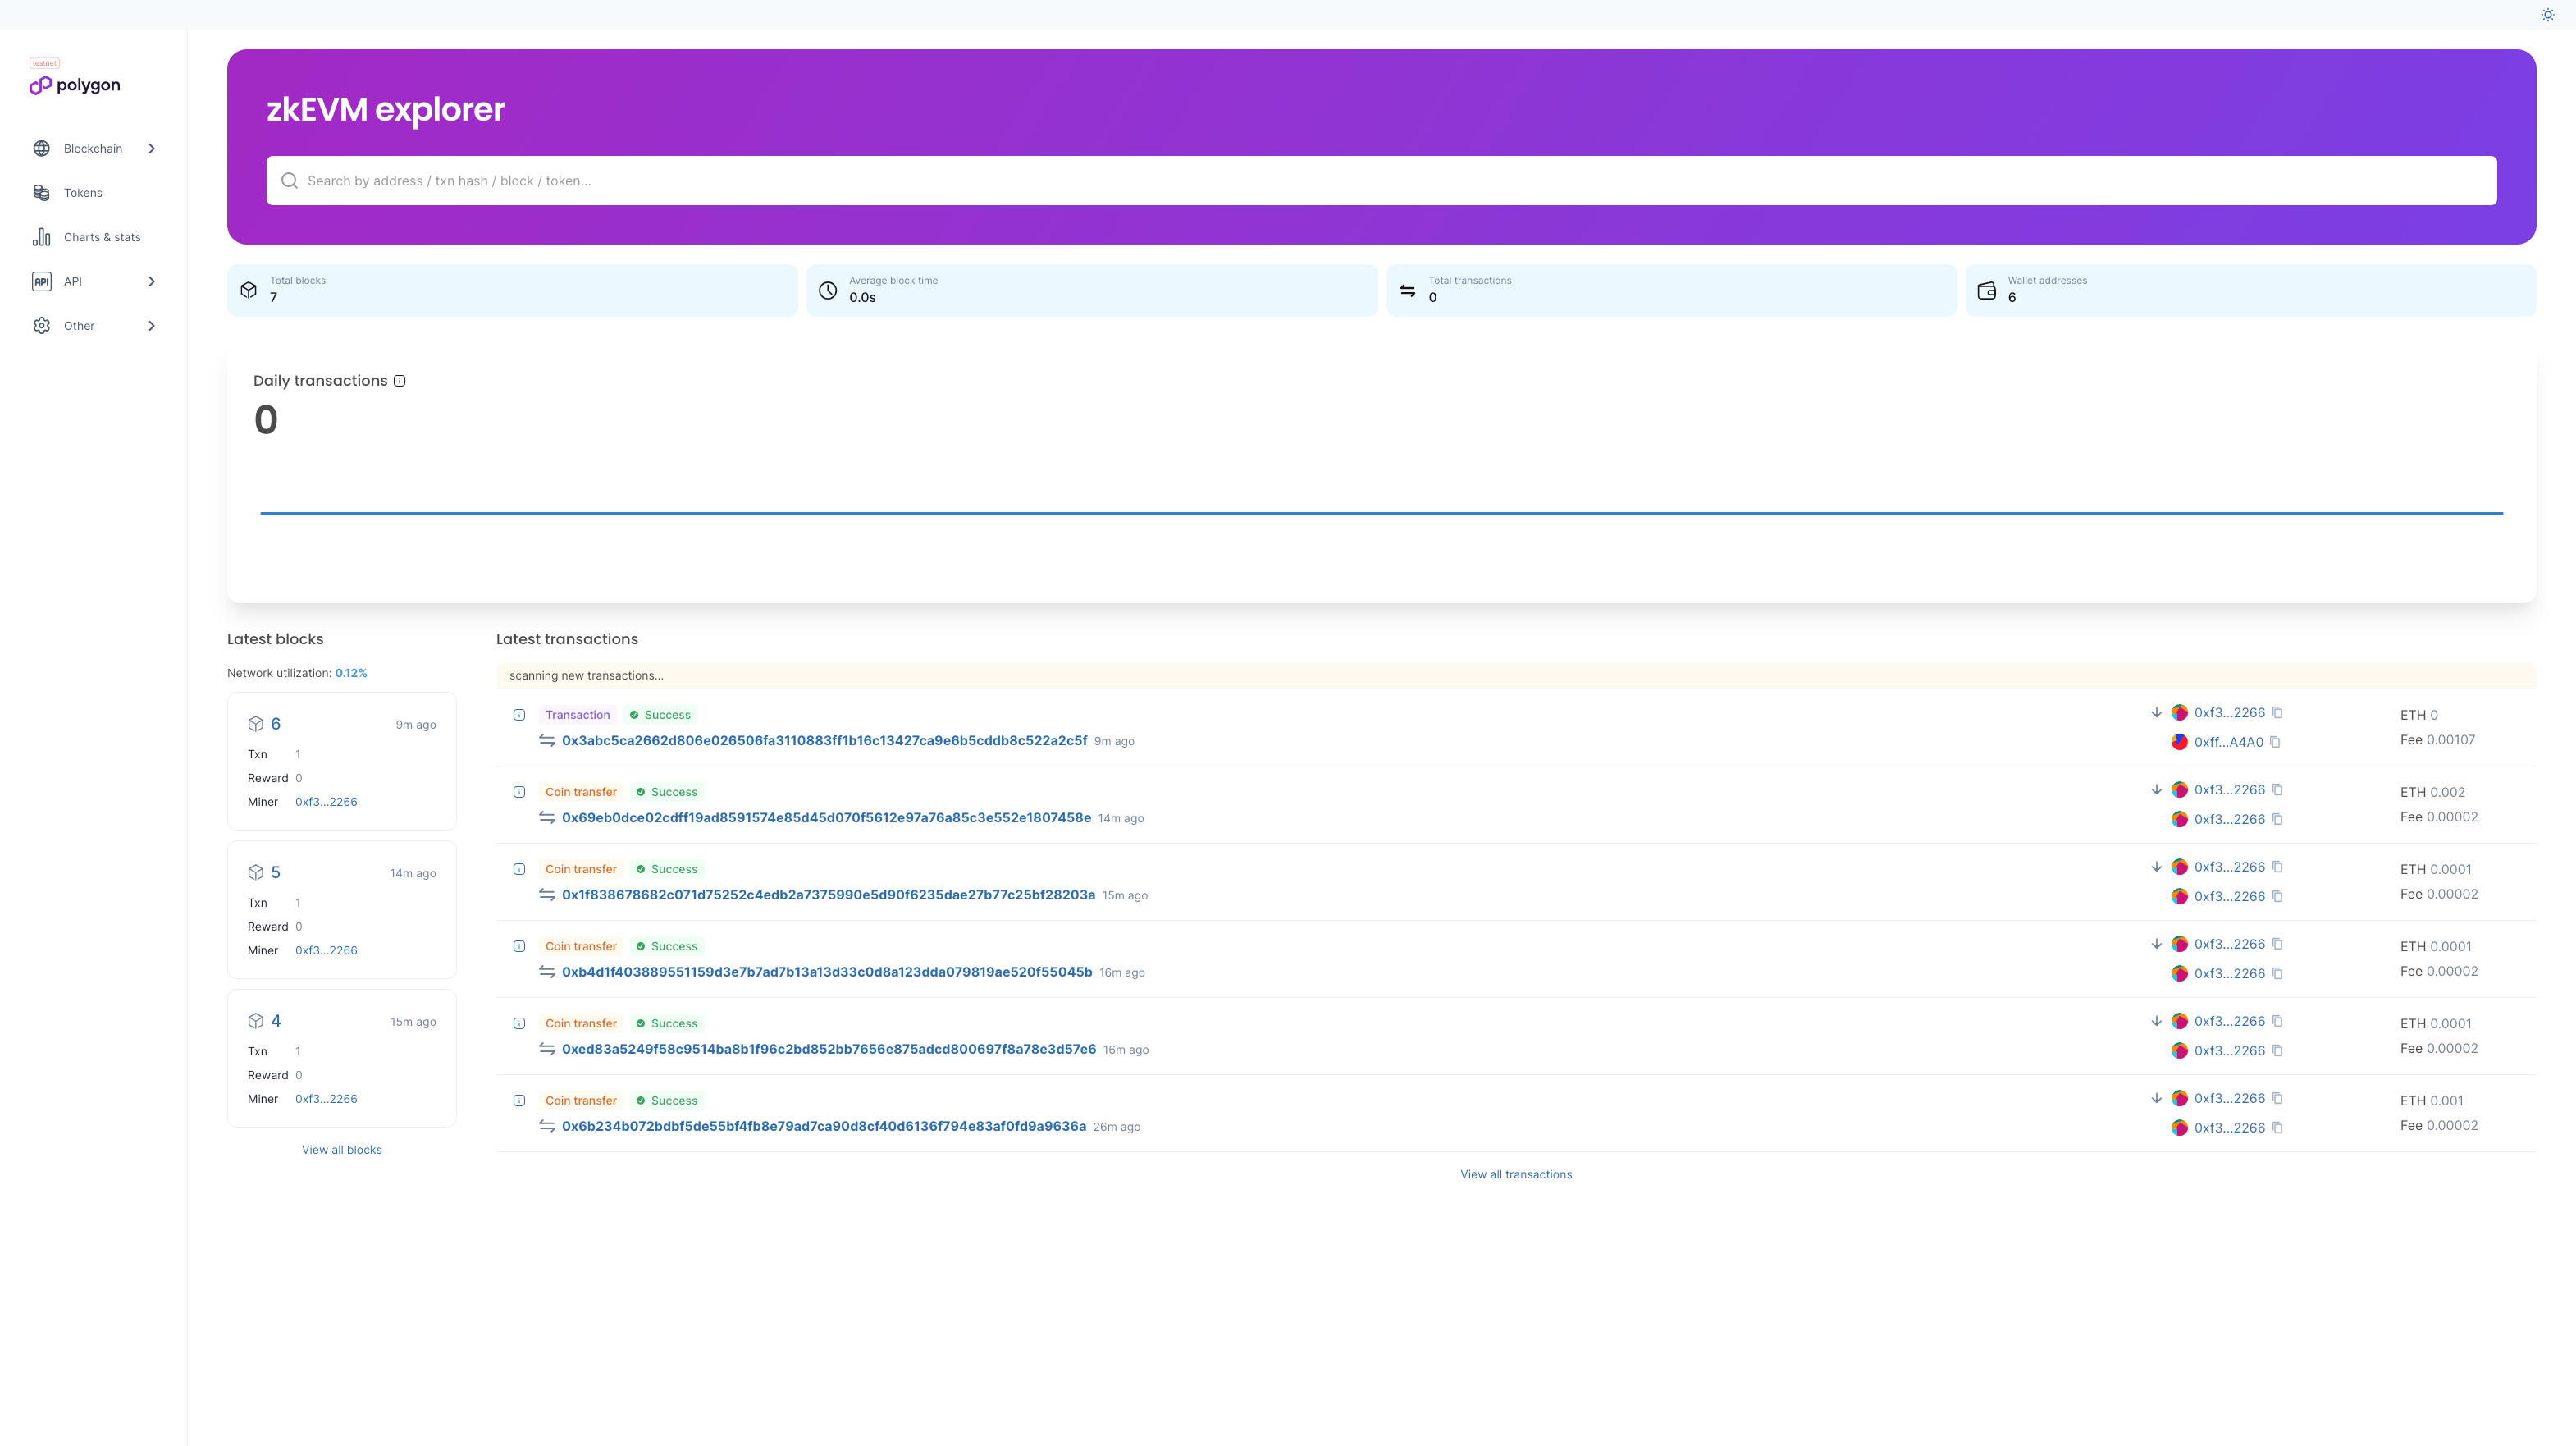
Verify the block explorer is running by navigating to localhost.
You should see a page similar to this:
Add the network to a Web3 wallet
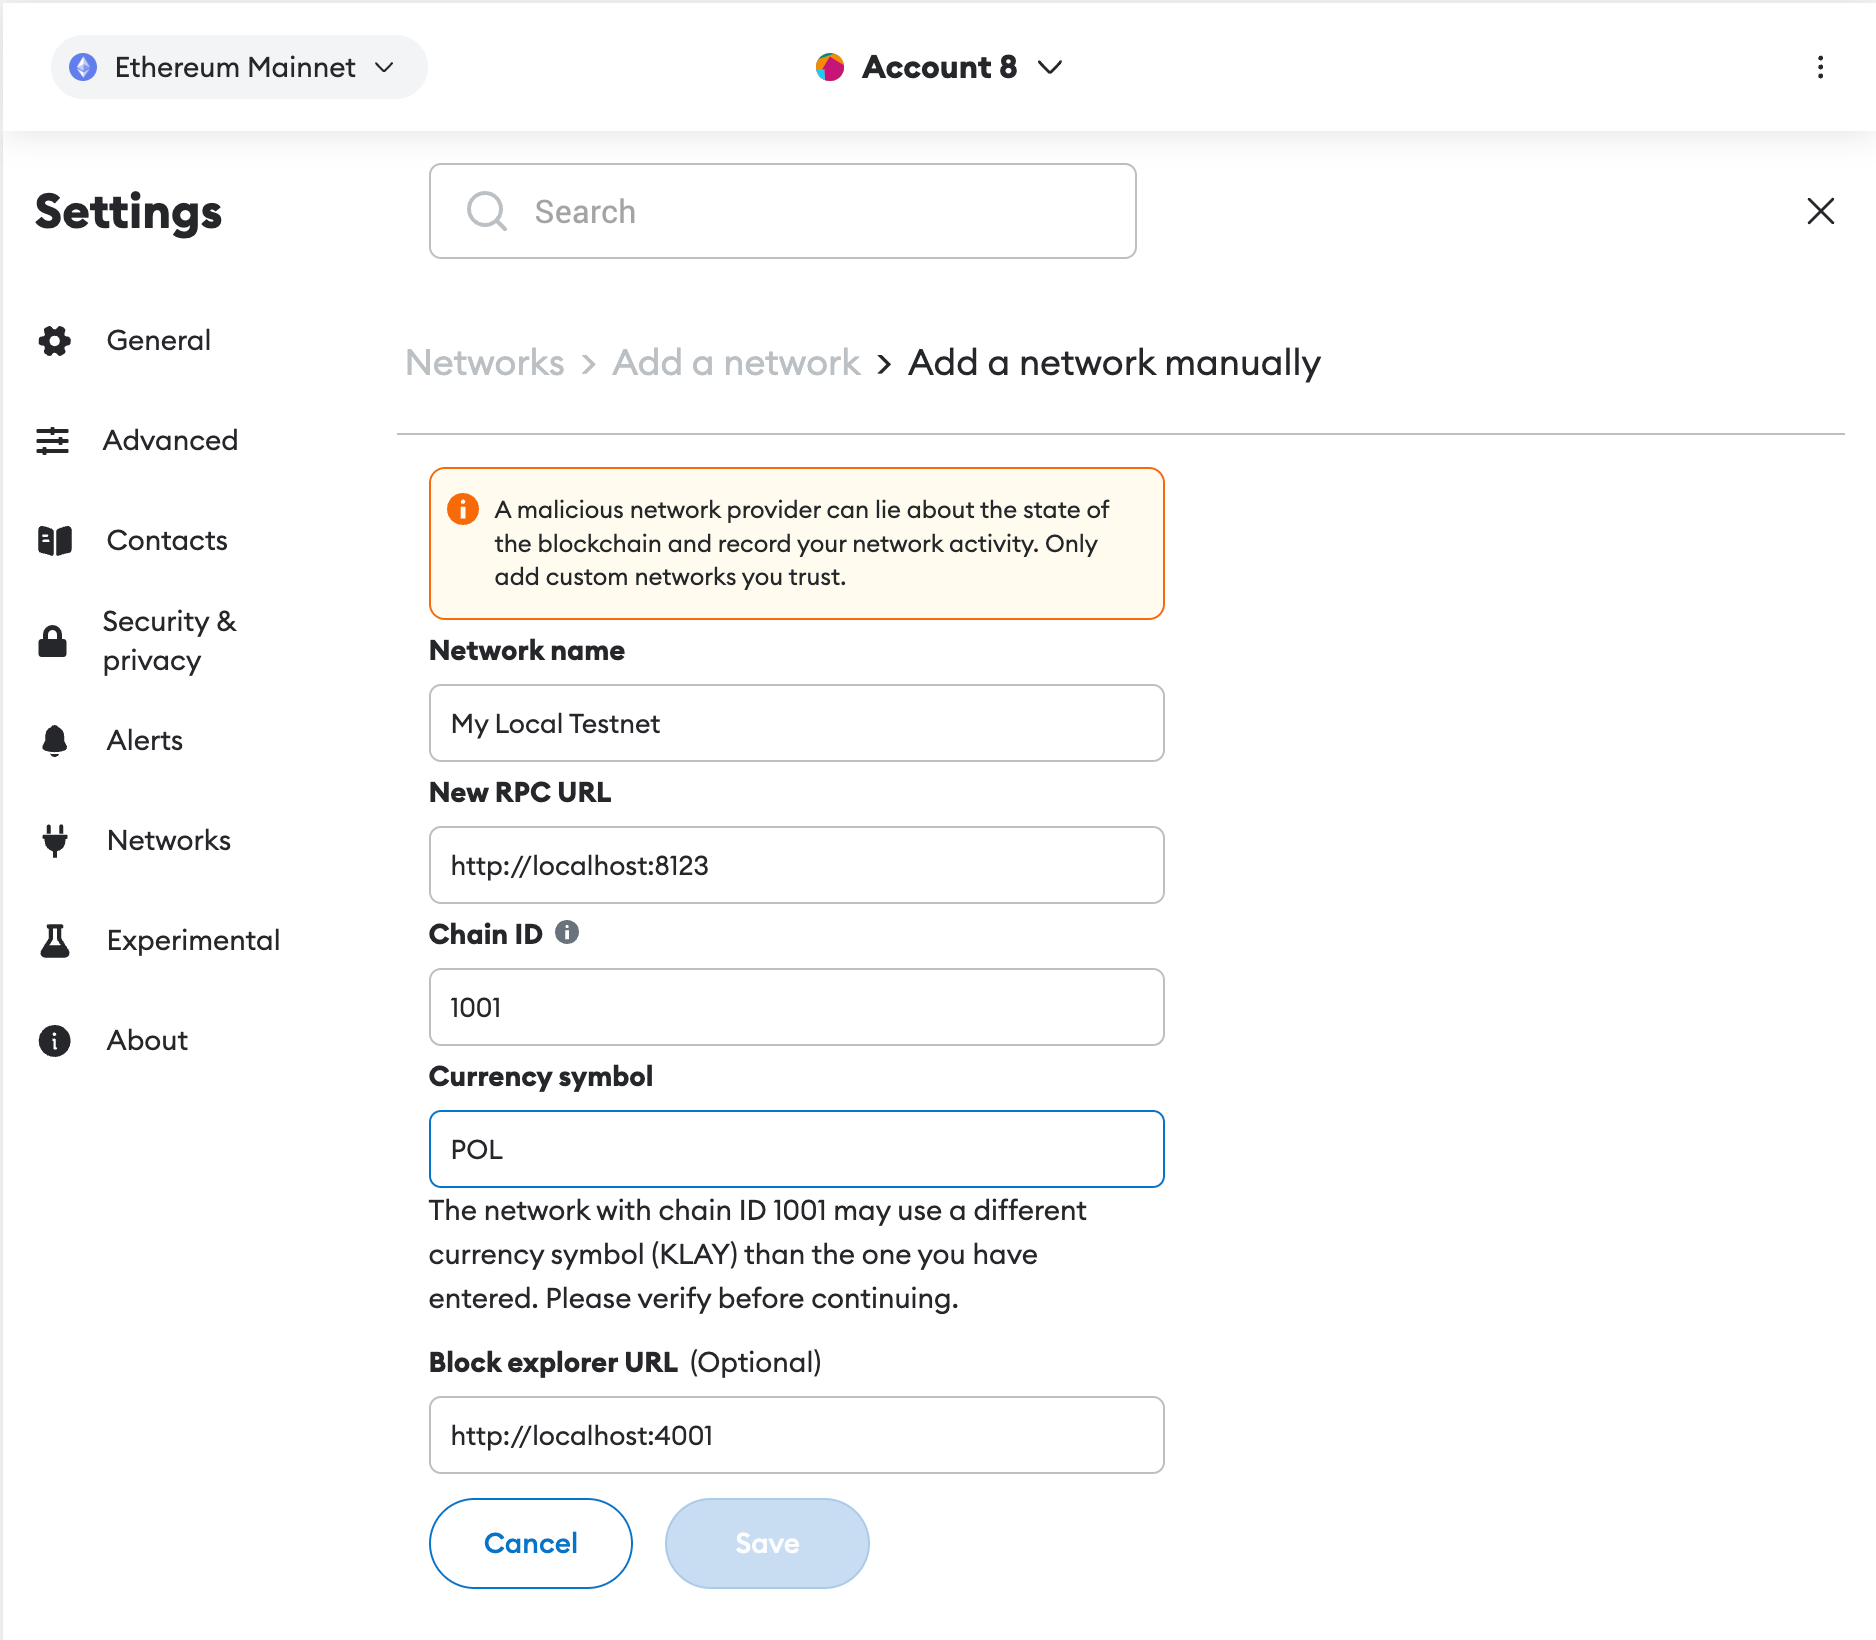
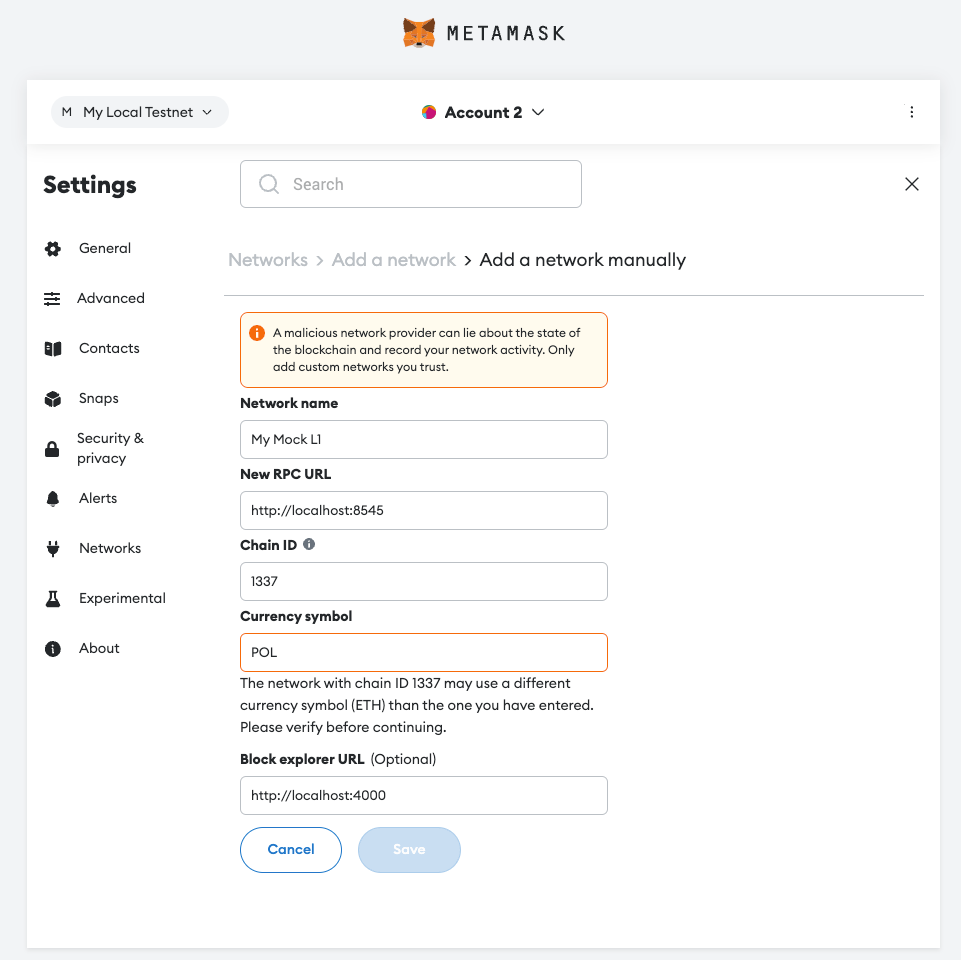
Follow MetaMask’s instructions on how to set up a network manually.
- Set the chain ID to 1001.
- The currency symbol can be anything but we will use POL by default.
- The RPC node and block explorer containers can be found at ports 8123 and 80, respectively.
Switch to the new network:
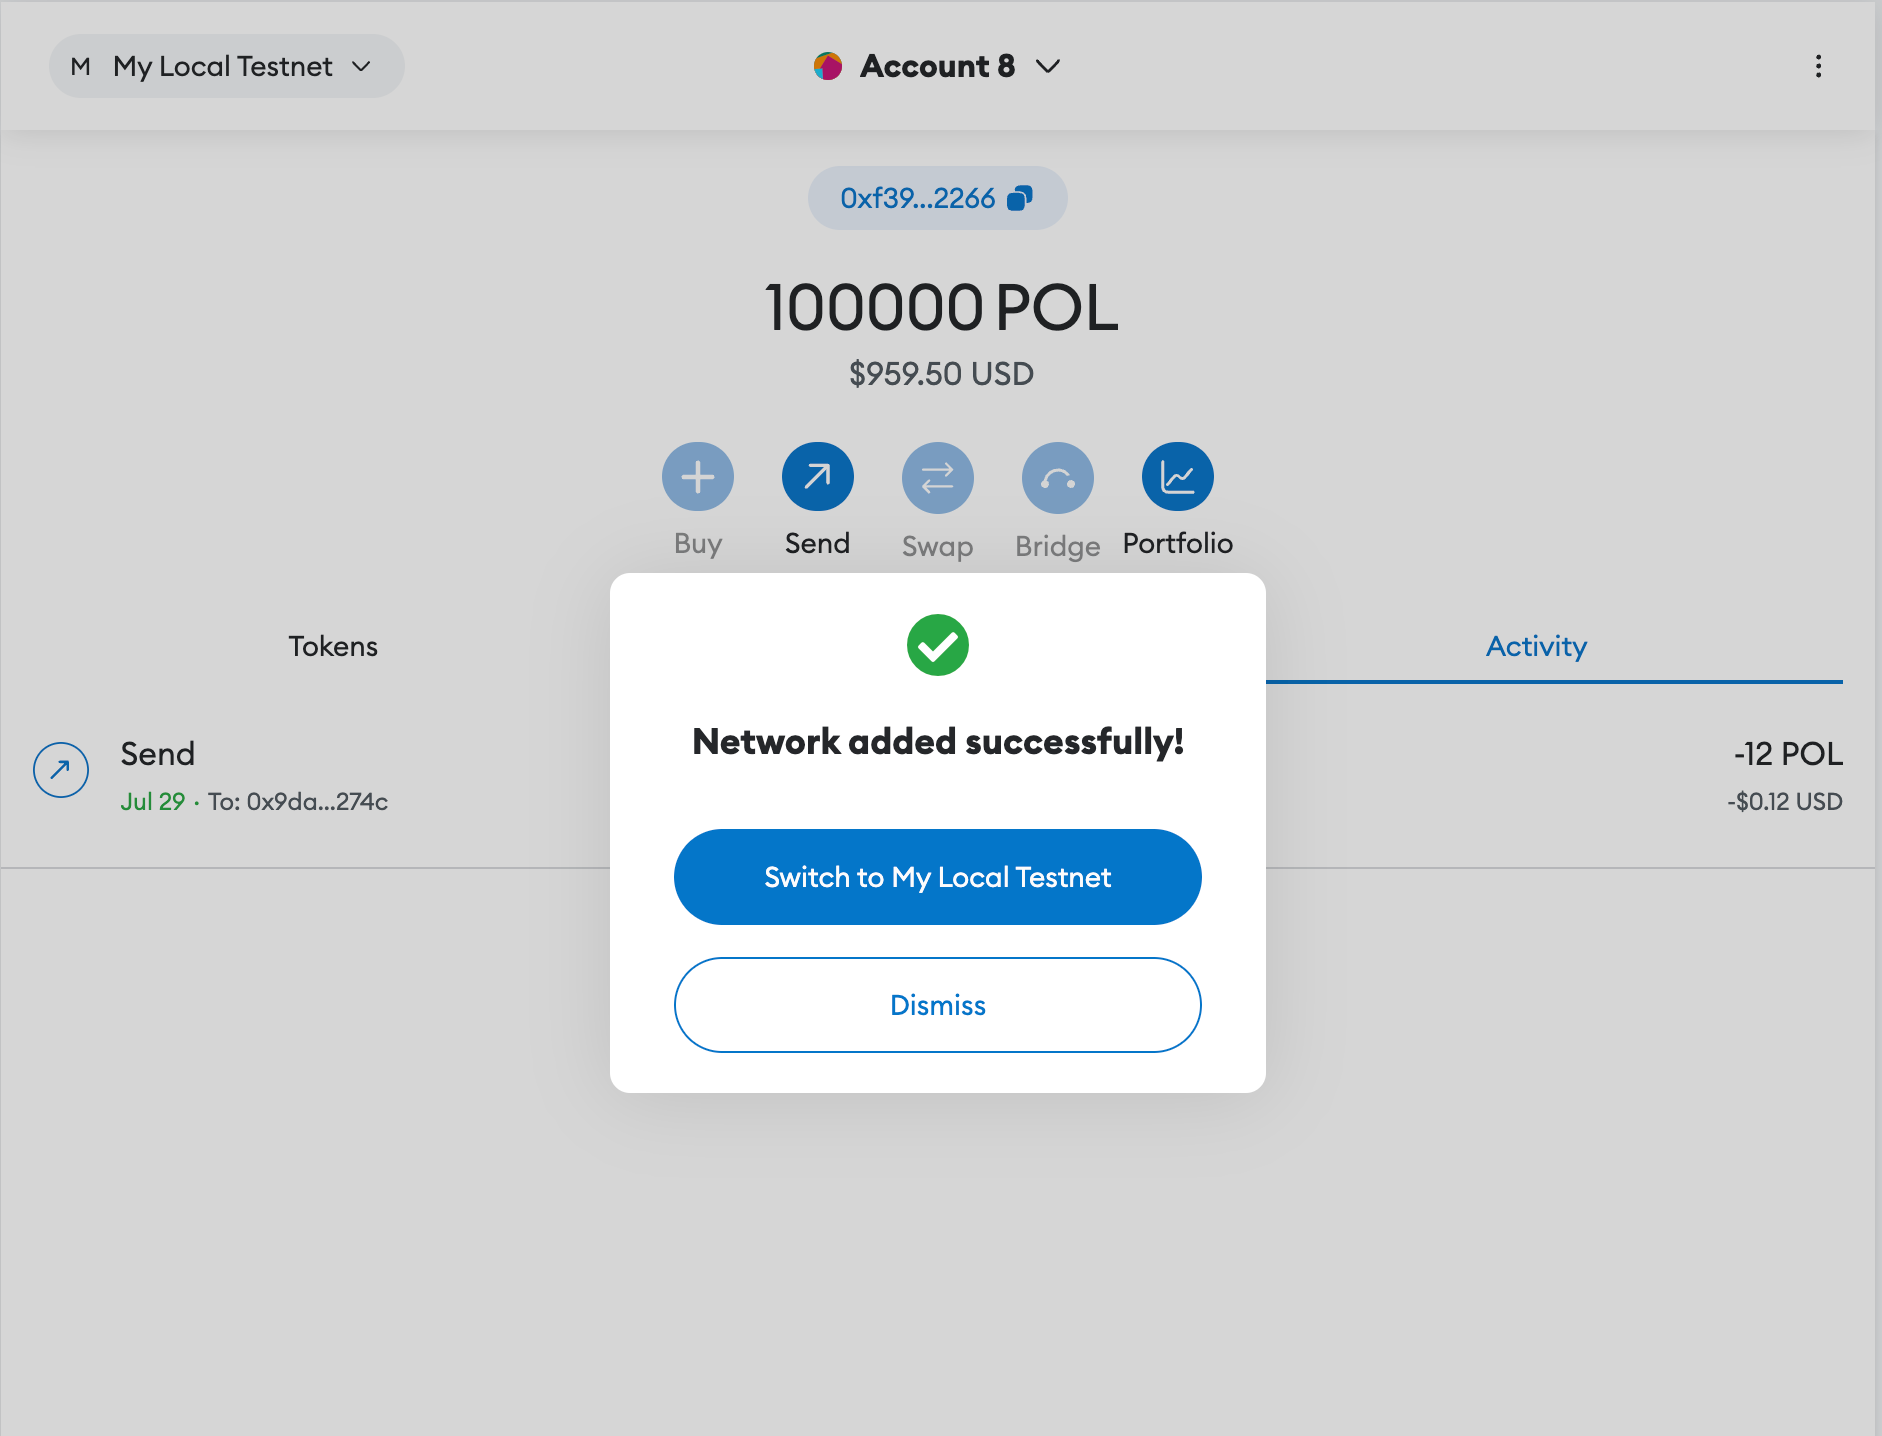
- An account with test funds is available with private key
0xac0974bec39a17e36ba4a6b4d238ff944bacb478cbed5efcae784d7bf4f2ff80 - NEVER transfer real assets to the address associated with this private key.
Import the account to MetaMask. The balance shows up as 100000 POL:
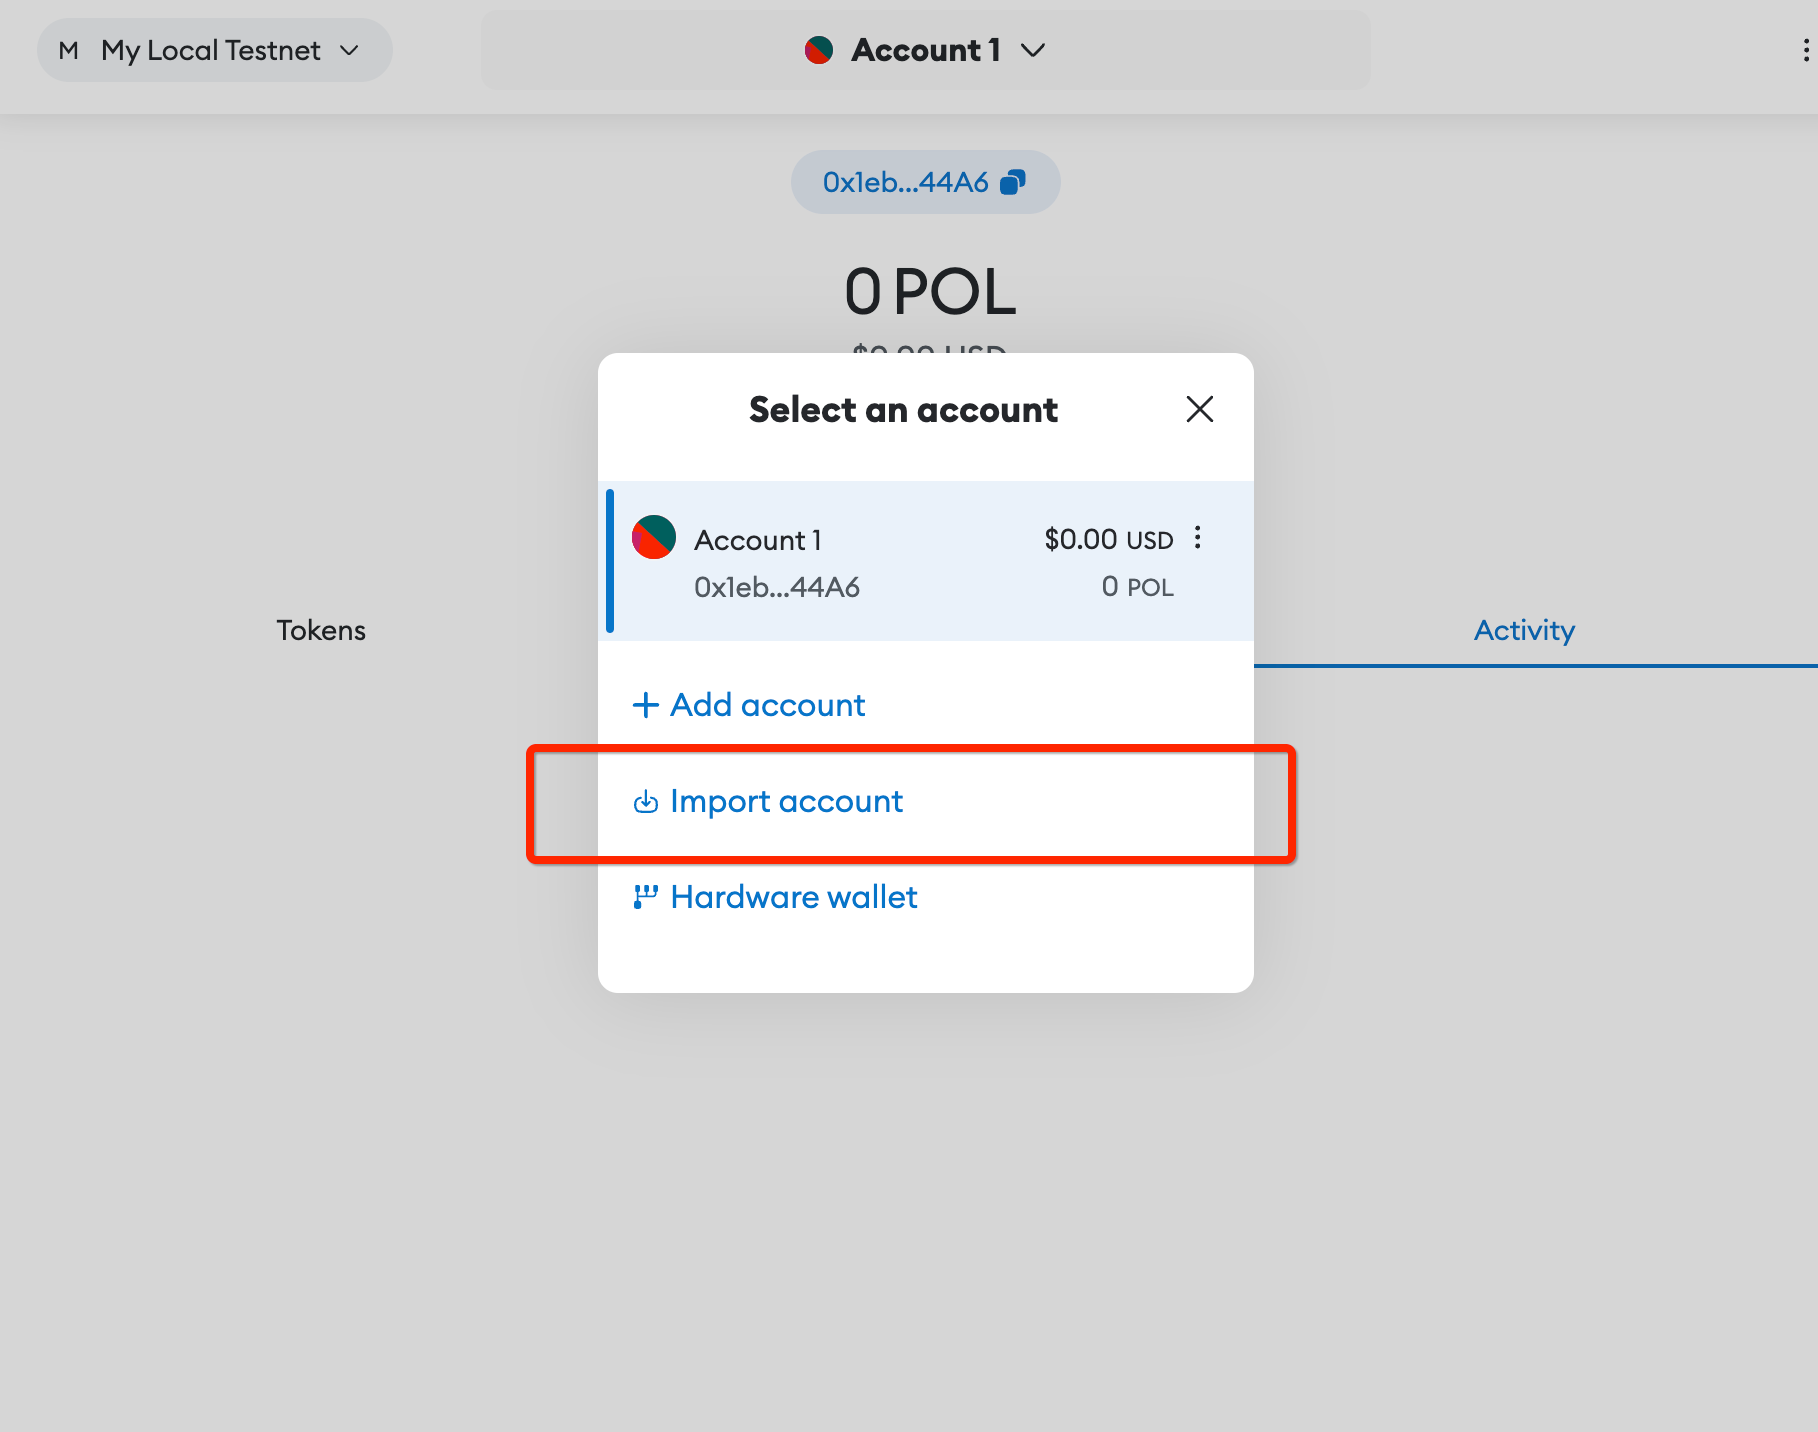
Transfer some tokens to another account:

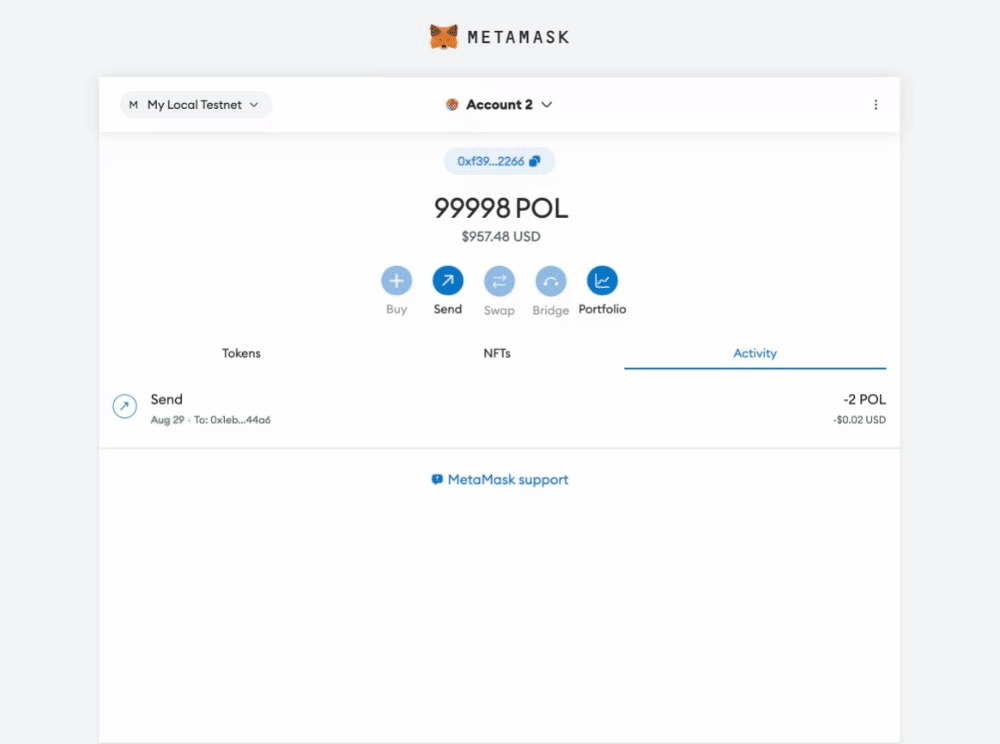
After confirming the transaction, check the updated balances:
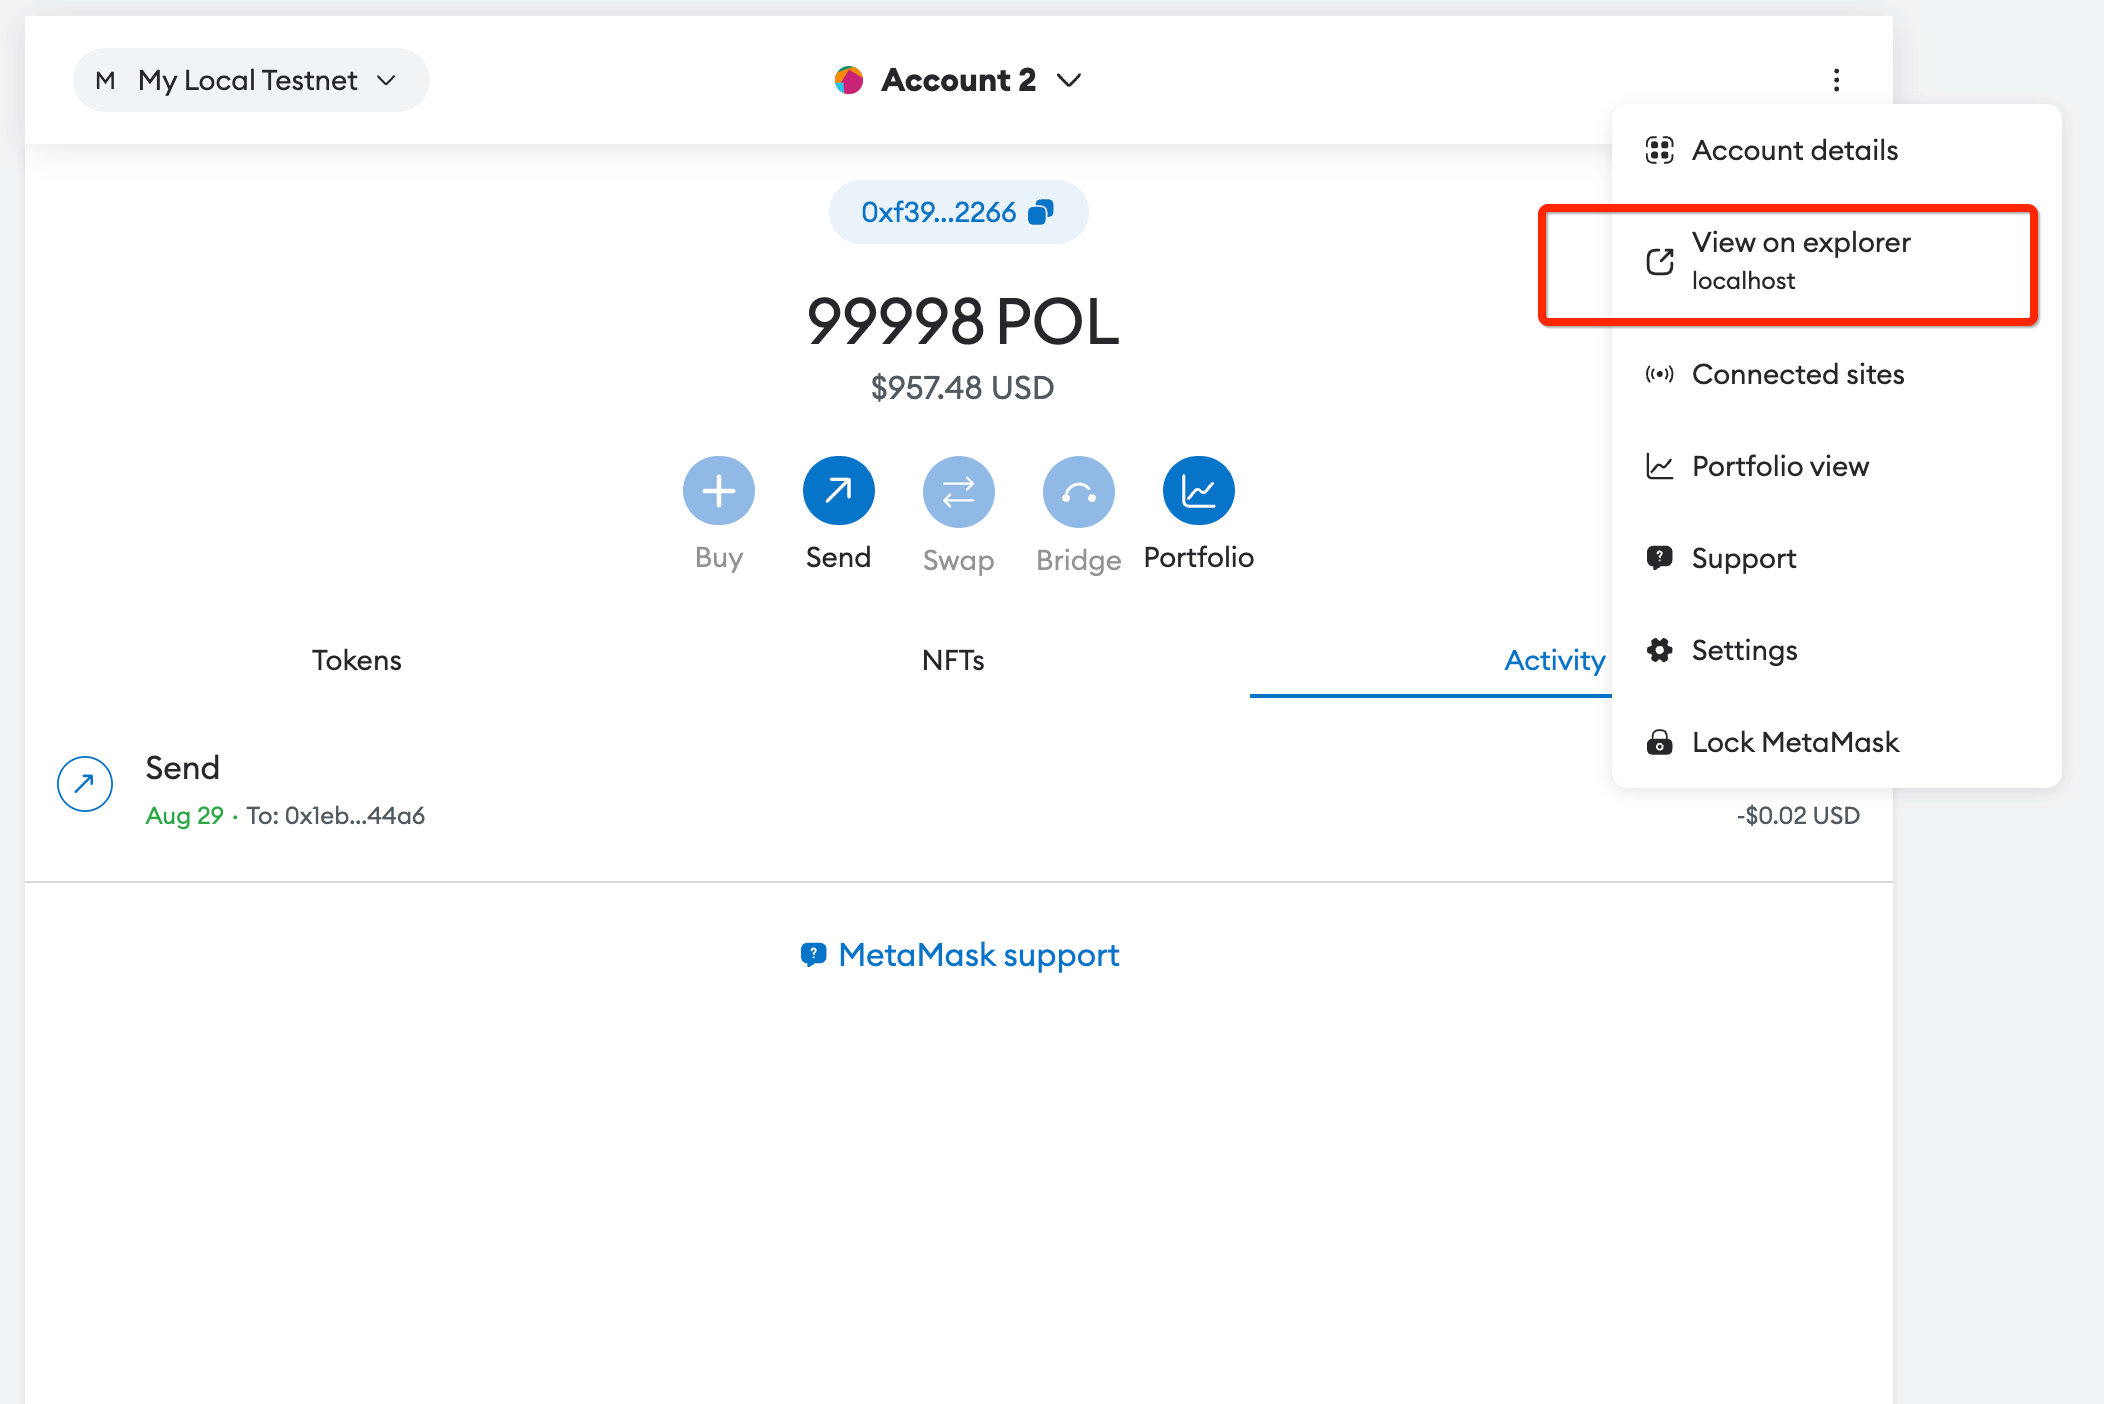
You can also view the transaction details in the block explorer by clicking on the transaction details in MetaMask:
If you encounter a stuck transaction, it is likely due to an incorrect nonce setting.
To resolve this issue, follow the steps below:
- Open Metamask and navigate to your account.
- Click on Settings.
- In the Settings menu, select Advanced.
- Locate the option Clear activity and nonce data and click on it.
- This resets the nonce data associated with the account, which often resolves transaction-related issues.
Test the bridge
CDK has a native bridge with UI that allows you to transfer funds between the L1 and the L2 validium.
L1 to L2
Add the L1 RPC to MetaMask:
Switch to the L1 network and you will see the previously imported account with ~999 POL on the L1 chain.
Verify the bridge UI by navigating to localhost:8088.
Click on Connect a wallet > MetaMask.
You won’t see this view the second time around.
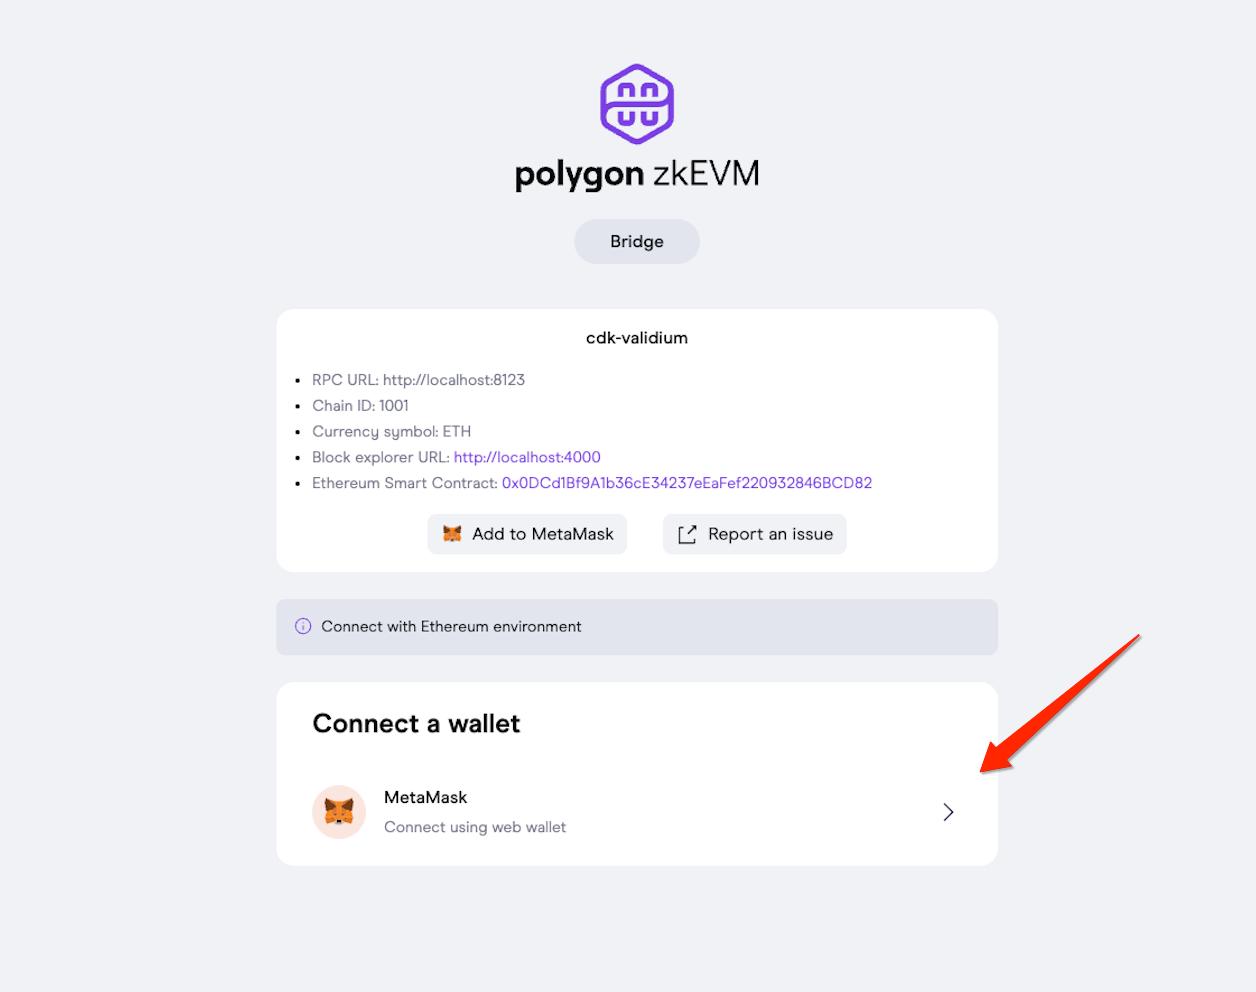
Select the previously imported account 0xf39Fd6e51aad88F6F4ce6aB8827279cffFb92266. Once you are connected, you should see a page like this:
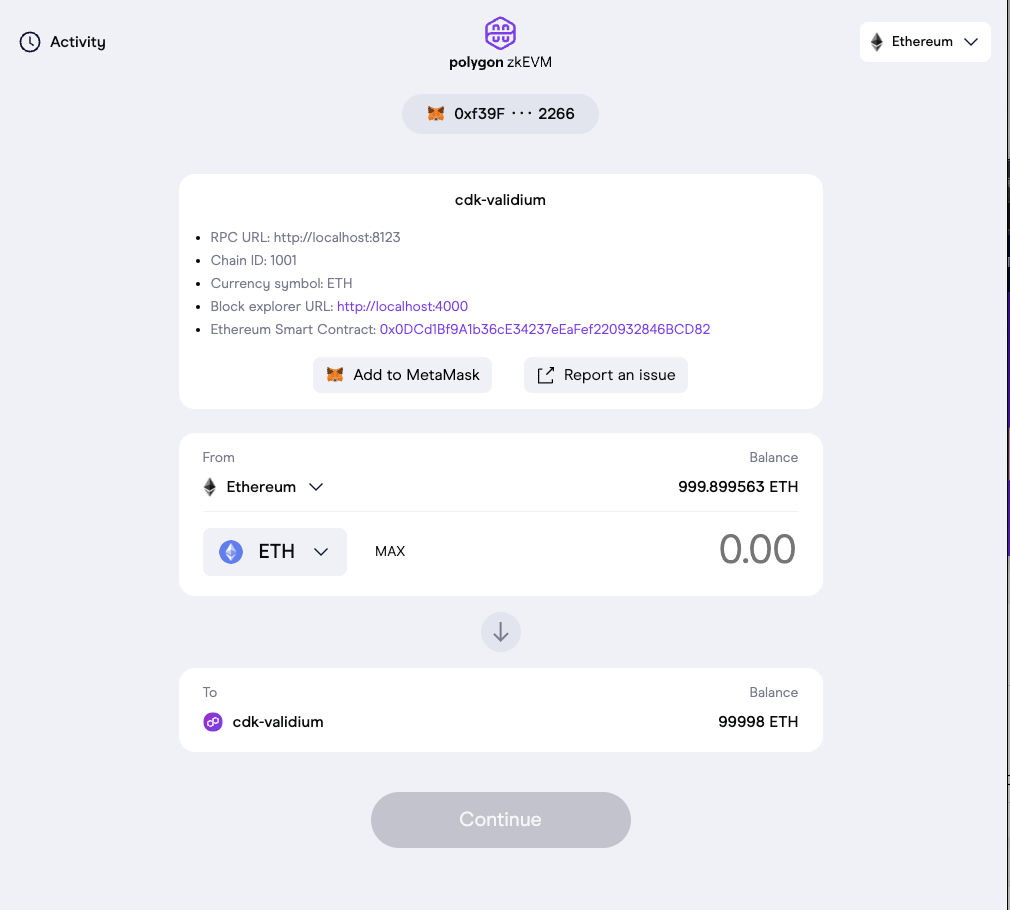
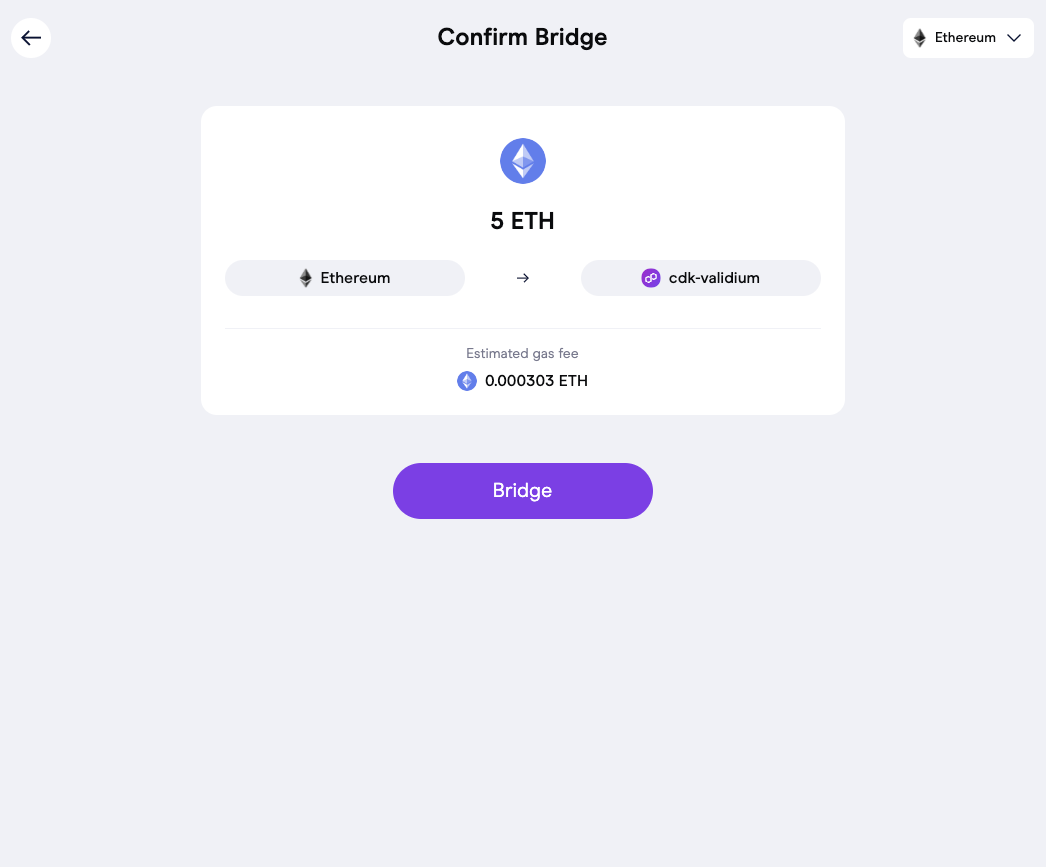
Enter the amount (e.g. 5) to bridge and click Continue, after confirming you understood what you’re doing, you will see the Confirm Bridge page.
Click Bridge and approve the transaction on the MetaMask pop-up:
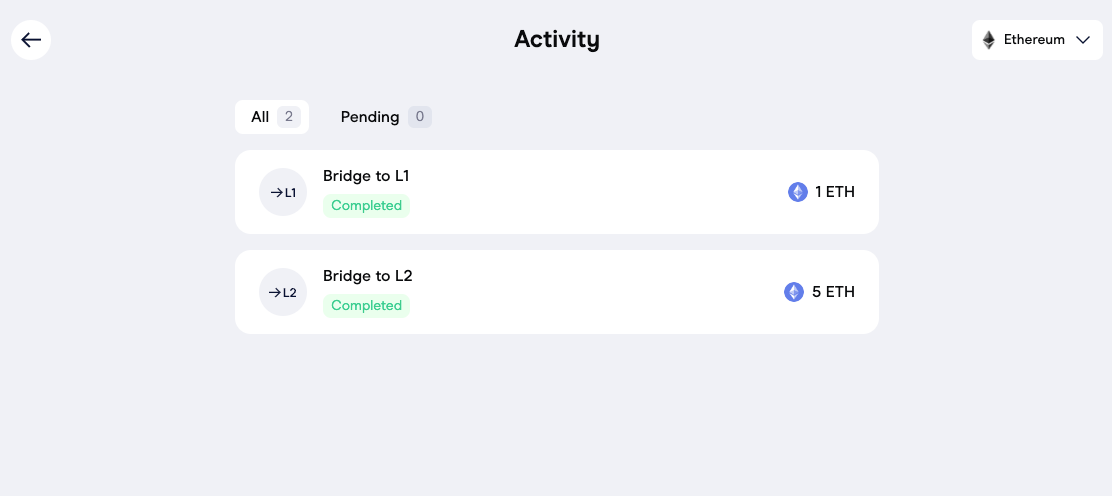
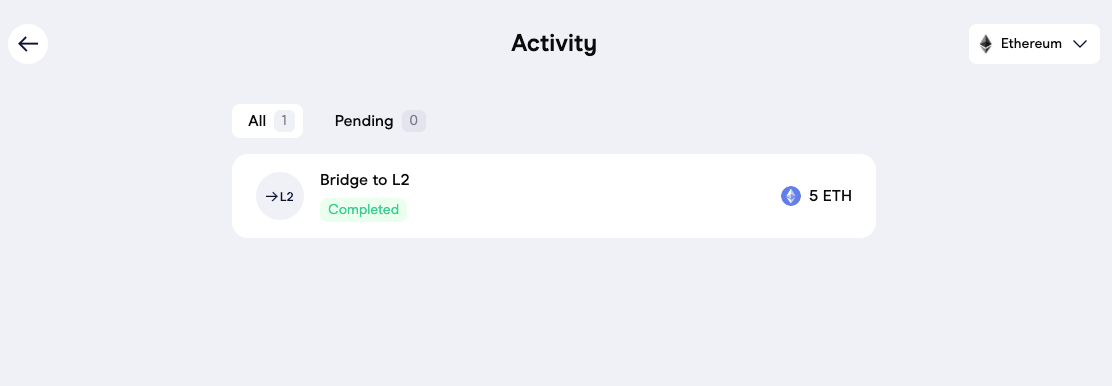
Once bridging is complete, you should see the Activity page:
L2 to L1
witch network on MetaMask to your validium chain and navigate back to localhost:8088.
You should see both the updated L1 and L2 balances:

Enter an amount and follow the same process to bridge the fund back to the L1.
You cannot bridge back fund more than what you have previously bridged from L1 to the L2.
The L2->L1 bridging is slightly different than L1->L2 and you will see the Activity page like this after the transaction is executed:
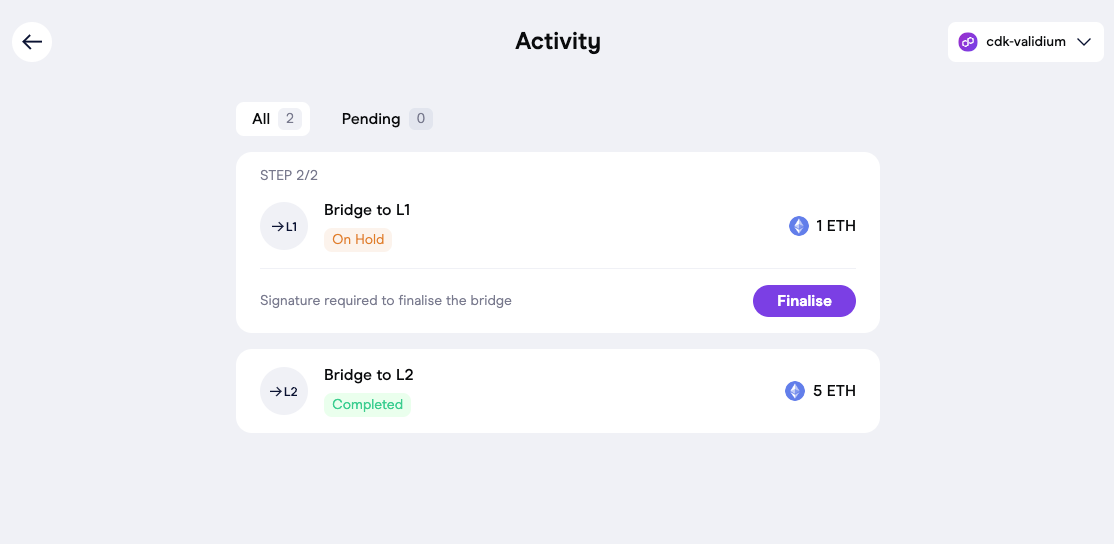
Click Finalise and approve the transaction (Note: MetaMask will pop up a window to ask you to switch to the L1 network first). Then you will see this once the bridging is completed: