Swanky CLI
Swanky CLI is a Node.js based CLI application that abstracts away and extends the functionality of Polkadot.js, cargo contract, and other ink! based smart contract developer tools.
It aims to ease development of and interaction with ink! smart contracts and provides simple tools to bootstrap contract environment (project) with contract and integration tests templates, local node and accounts management, smart contracts interaction on both local and remote networks, compatibility checks between the contract pallet and compiler...
It also comes with a preconfigured Docker image and .codespaces configuration for easy dev environment setup.
With all of the features mentioned above, even more is in active or planned development. The whole project is public, and everyone is welcome to contribute or suggest features:
Templates provided in the current version of swanky-cli, as well as environment in the swanky-base image, and supported tools target ink! v4, and use cargo contract v2.
Cargo contract v3 introduced breaking changes to how artifacts are stored and you'll have to move them manually if you wish to use it.
Installing
The CLI can be installed and used in different ways:
- using a preconfigured environment of a dev-container locally with VS Code
- using the dev-container in a cloud-based environment such as GitHub Codespaces or Gitpod
- using the swanky-base container image locally (same is used in the dev-container)
- downloading a precompiled binary
- as an npm package (installed globally, or via the
npxcommand)
Note that using the precompiled binaries, NPM, or compiling it yourself requires you to have the local environment set up correctly
Cloud based environments
Similar to using the dev container locally, GitHub will detect the .devcontainer config in your project and let you run the project in a cloud-based IDE.
You'll have to sign up for an account to use Gitpod, but the process is the same.
Currently it is not possible to forward ws:// ports from GitHub Codespaces, so if you'd like to interact with the swanky-node from contracts-ui or a similar service, use Gitpod or one of the other methods.
Download the precompiled binaries
-
Download the correct archive for your platform from the releases section of swanky-cli github page.
-
Extract the archive to the appropriate location, for example the
softwaredirectory. -
Add the
swankyexecutable to your path variable by creating a symbolic link to it from a commonbindirectory or somewhere similar.
- MacOS
- Debian/Ubuntu
ln -s /Users/my_name/software/swanky-cli/bin/swanky /usr/local/bin
ln -s /home/my_name/swanky-cli/bin/swanky /usr/local/bin
Globally with npm
This approach may seem simpler, but due to the nature of Node.js dependency management, may result in version inconsistency or other errors.
$ npm install -g @astar-network/swanky-cli
or
$ npx @astar-network/swanky-cli [command]
Using swanky-cli
If you're using a dev container, or have followed the installation instructions, you should have swanky command available in your terminal.
Running it without any arguments (or with -h/--help) will provide you with a list of top-level commands and the app version.
Passing help as an argument and providing it -n/--nested-commands flag will show full list of commands, including nested ones:
swanky help --nested-commands
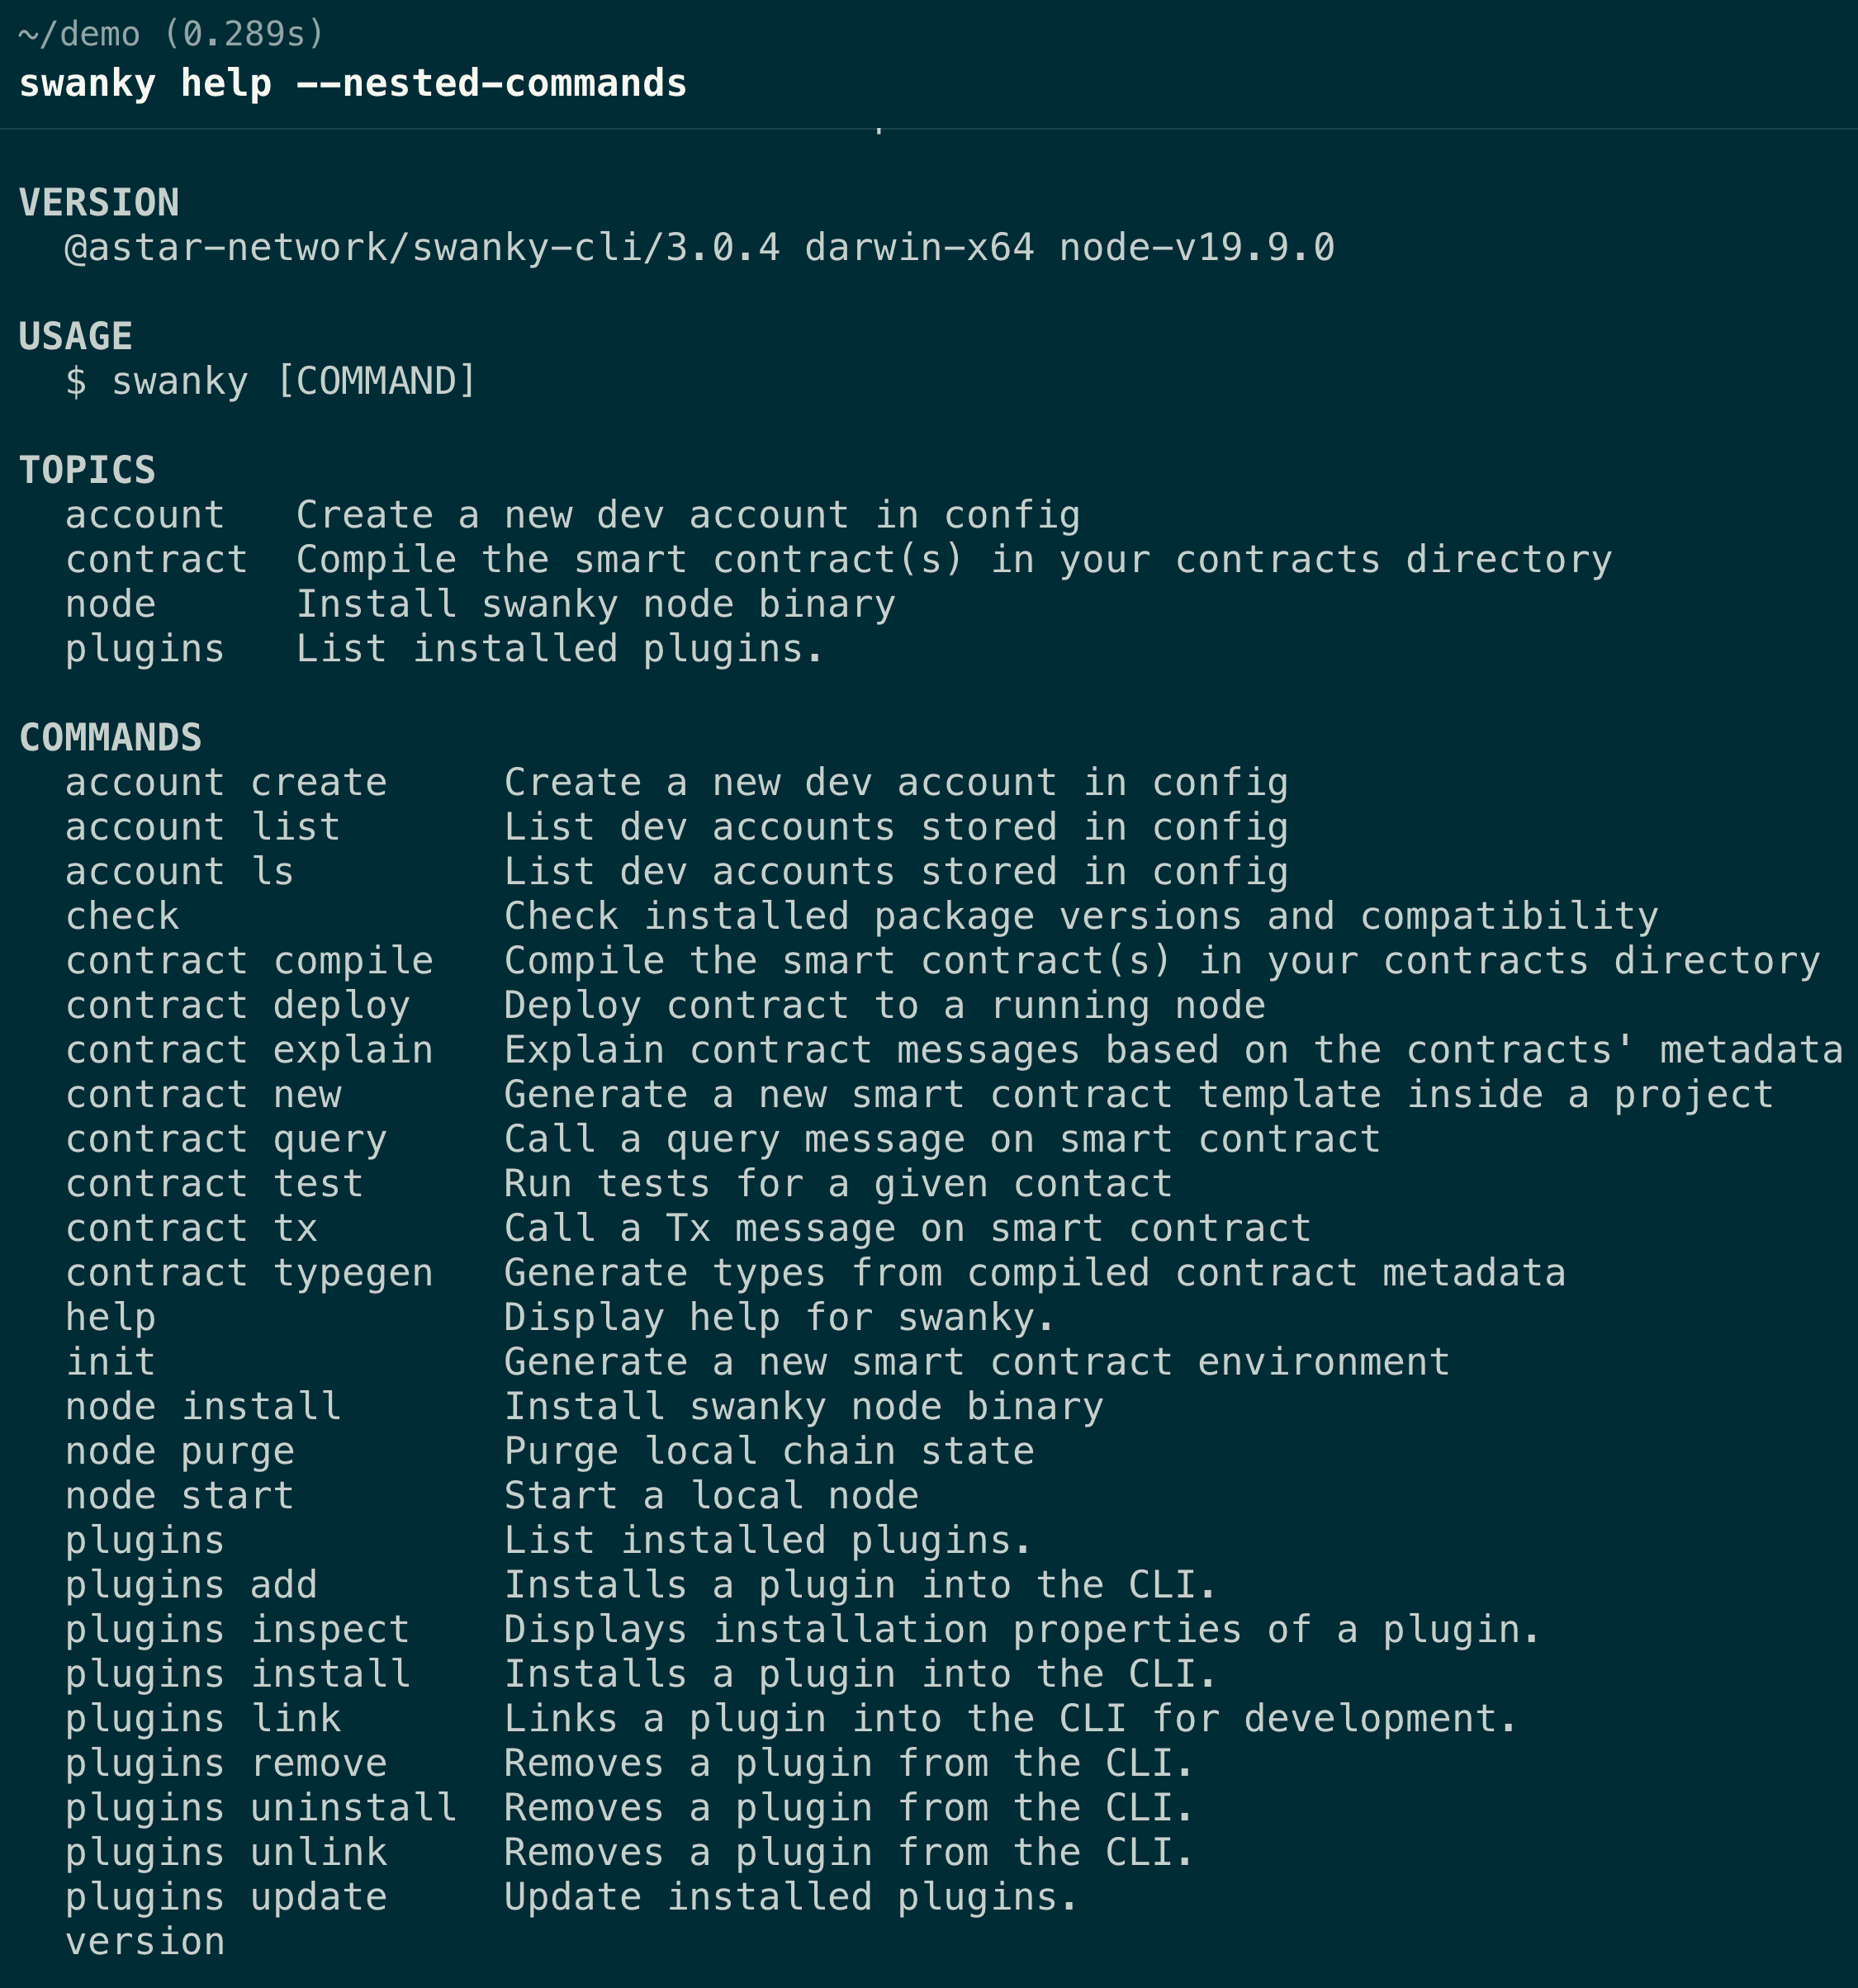
Note that every command and subcommand also supports -h/--help flags to display their usage instructions.
Likewise, most of the commands support -v /--verbose flag, which you can use to get more detailed output (useful for debugging and reporting errors).
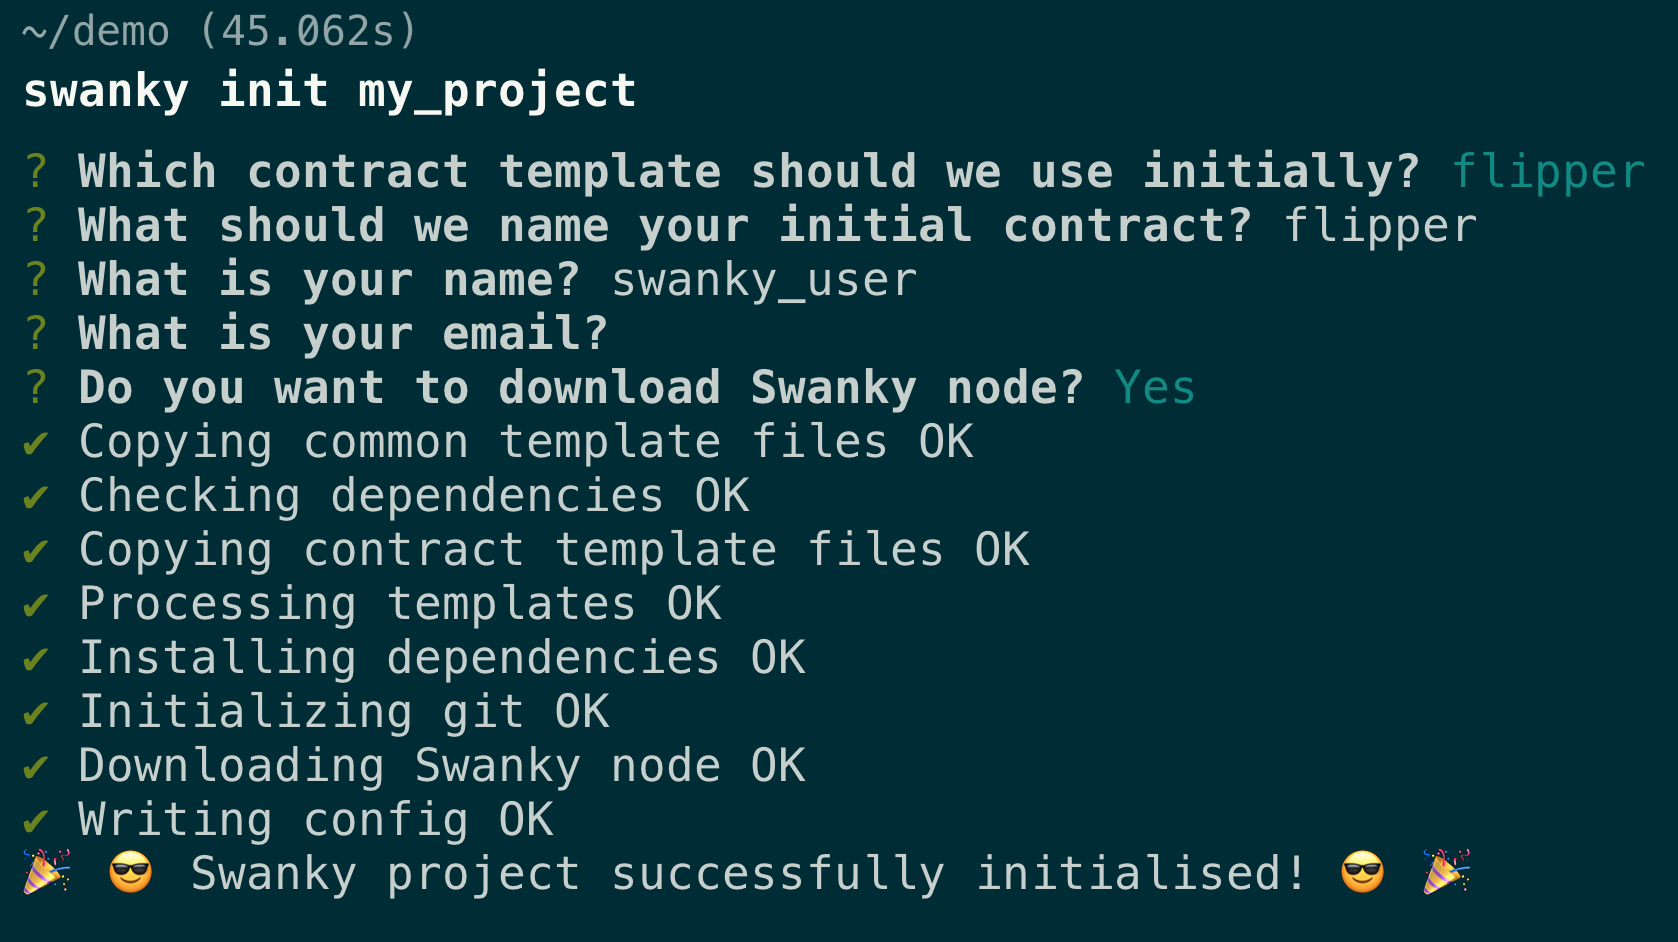
Bootstrap a new project
Using the swanky init command, you'll be prompted for a series of answers to define your project and the first smart contract within it.
After gathering all the required information, the app will proceed to check your environment, scaffold the project, download and install (optionally) swanky node and the project dependencies.
swanky init PROJECT_NAME
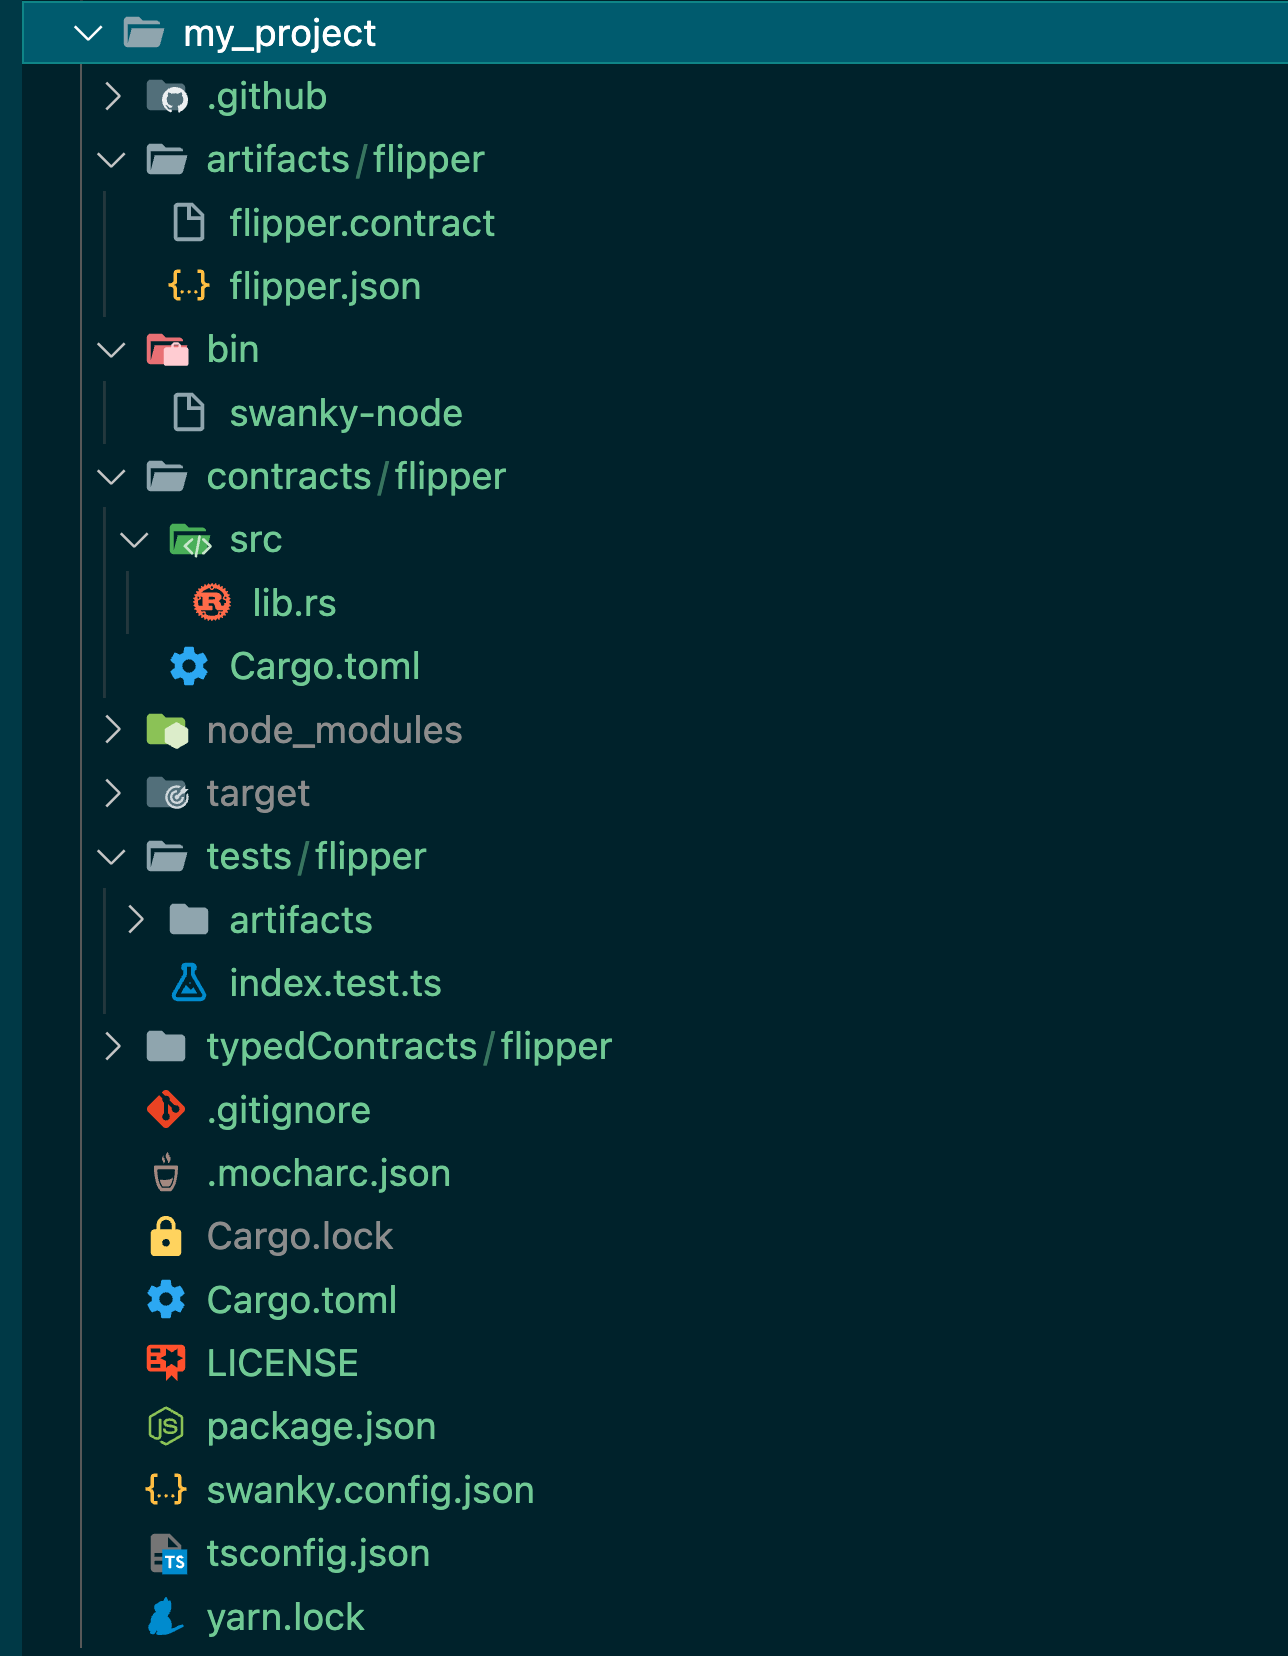
The resulting folder structure should look something like this:
If you want to start from a more complete example like those in the swanky-dapps repo, or rmrk-ink, or you want to convert your existing contract to a swanky project, you can use swanky init --convert command.
It will prompt you for locations of your contract files, as well as additional crates and tests.
In the last step, you'll be provided a list of files to be copied over and you'll be able to deselect any of them that are maybe not needed.
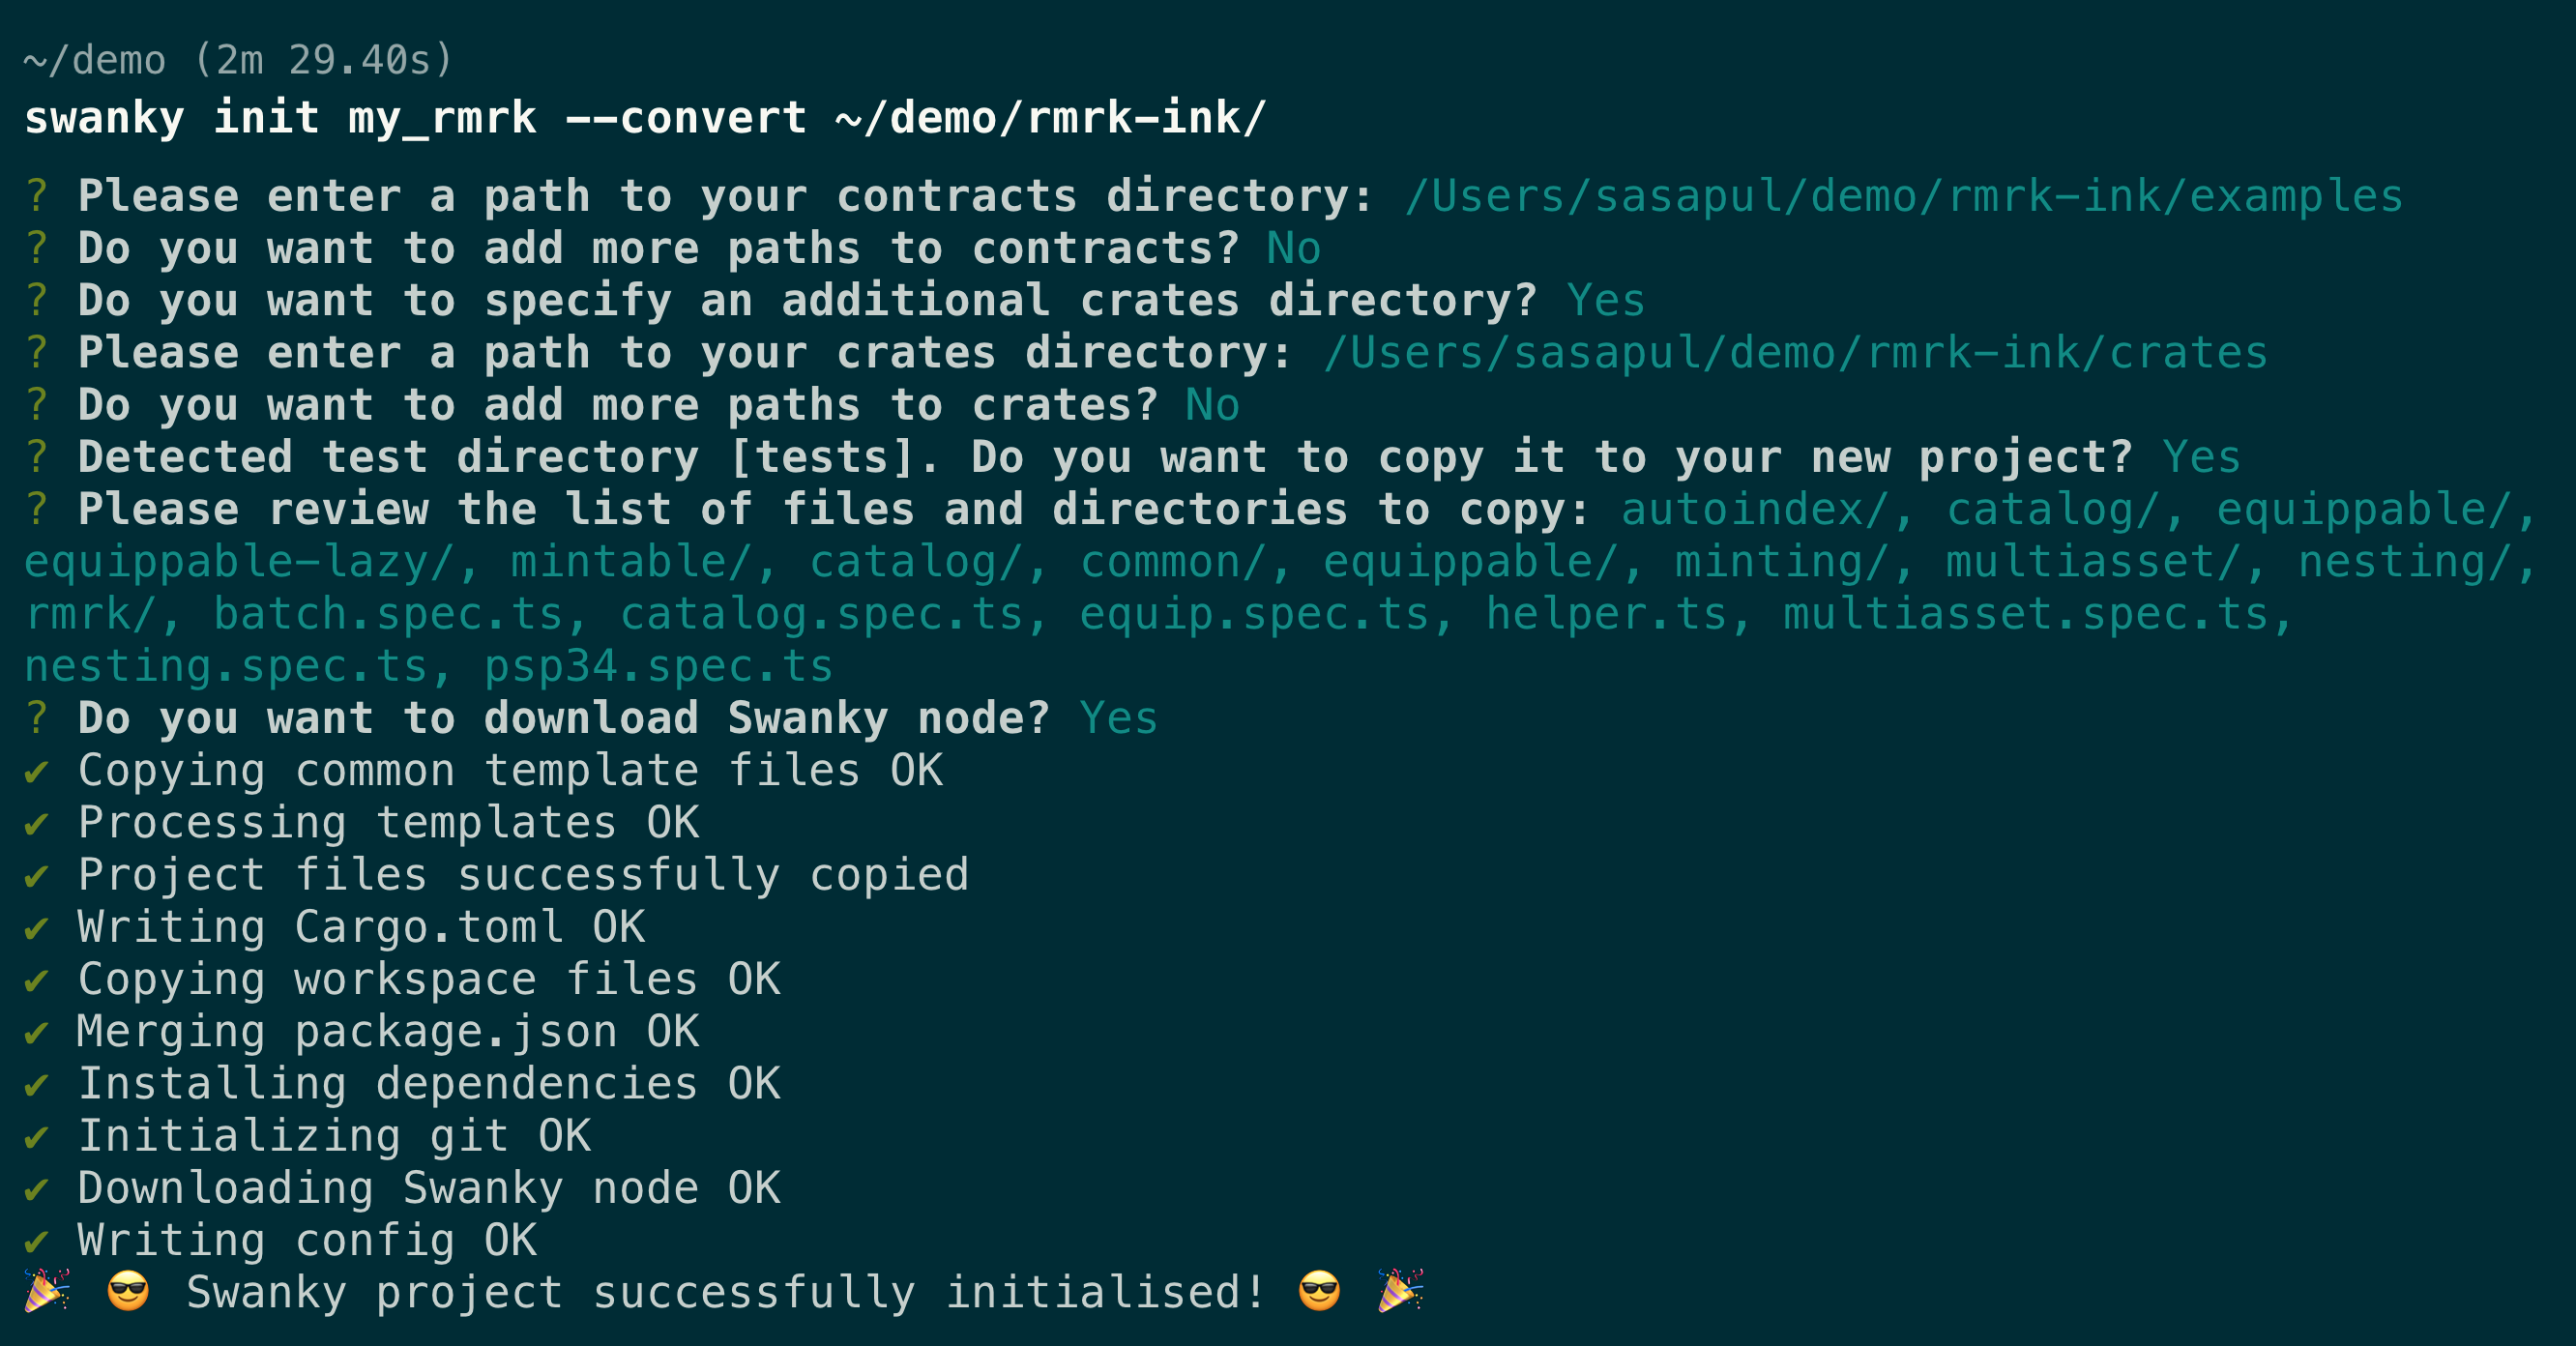
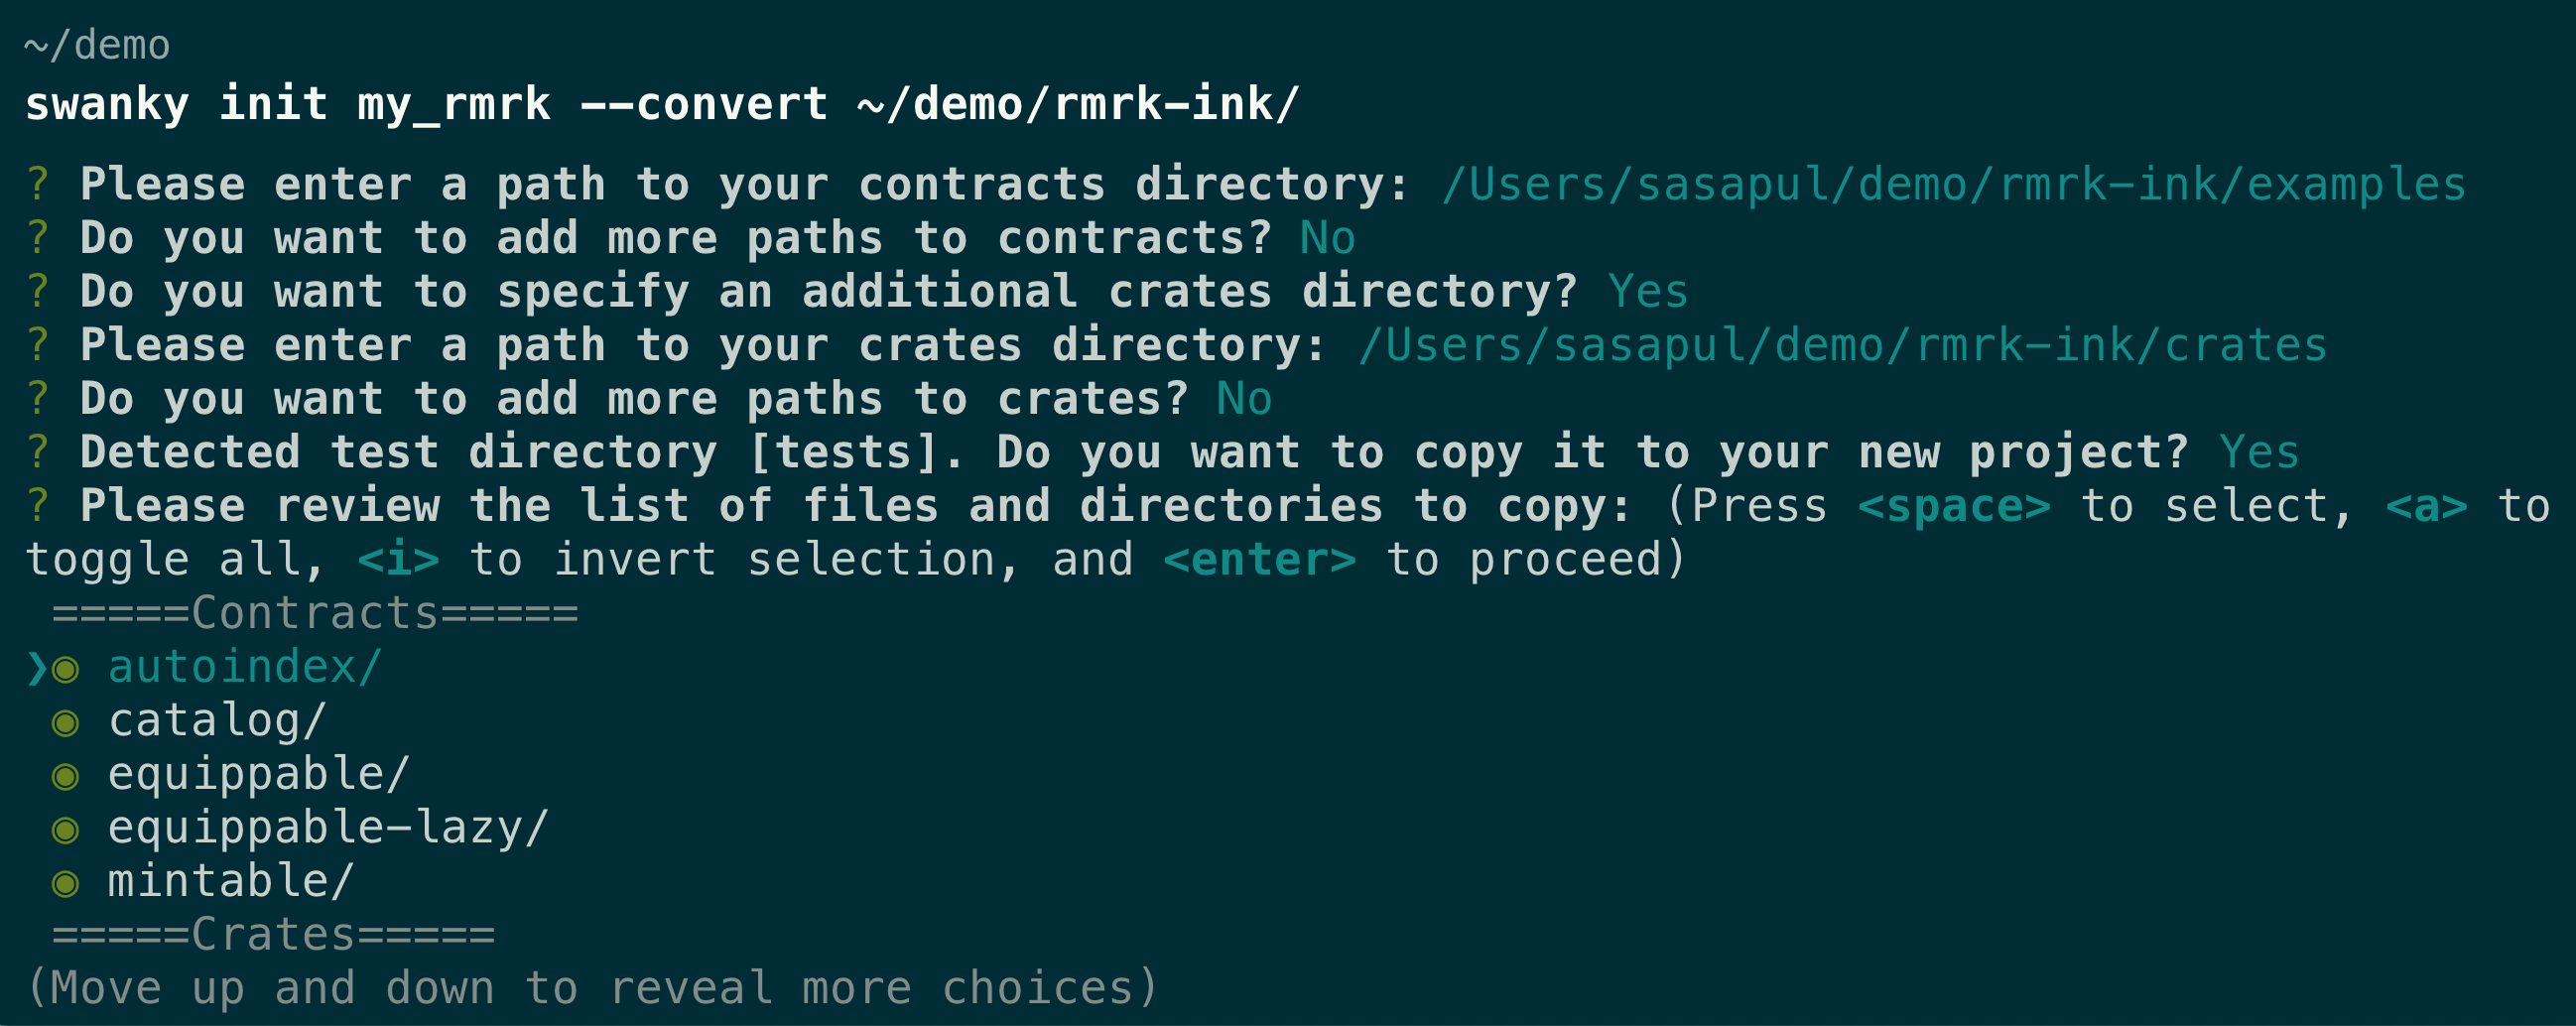
Swanky will look for a common ink! configuration, and will do it's best to copy everything to equivalent paths, but it is likely that you'll have to adjust some configs and import paths manually after conversion.
Resources:
Check dependencies and compatibility
You can quickly check the presence and versions of required dependencies by running swanky check command.
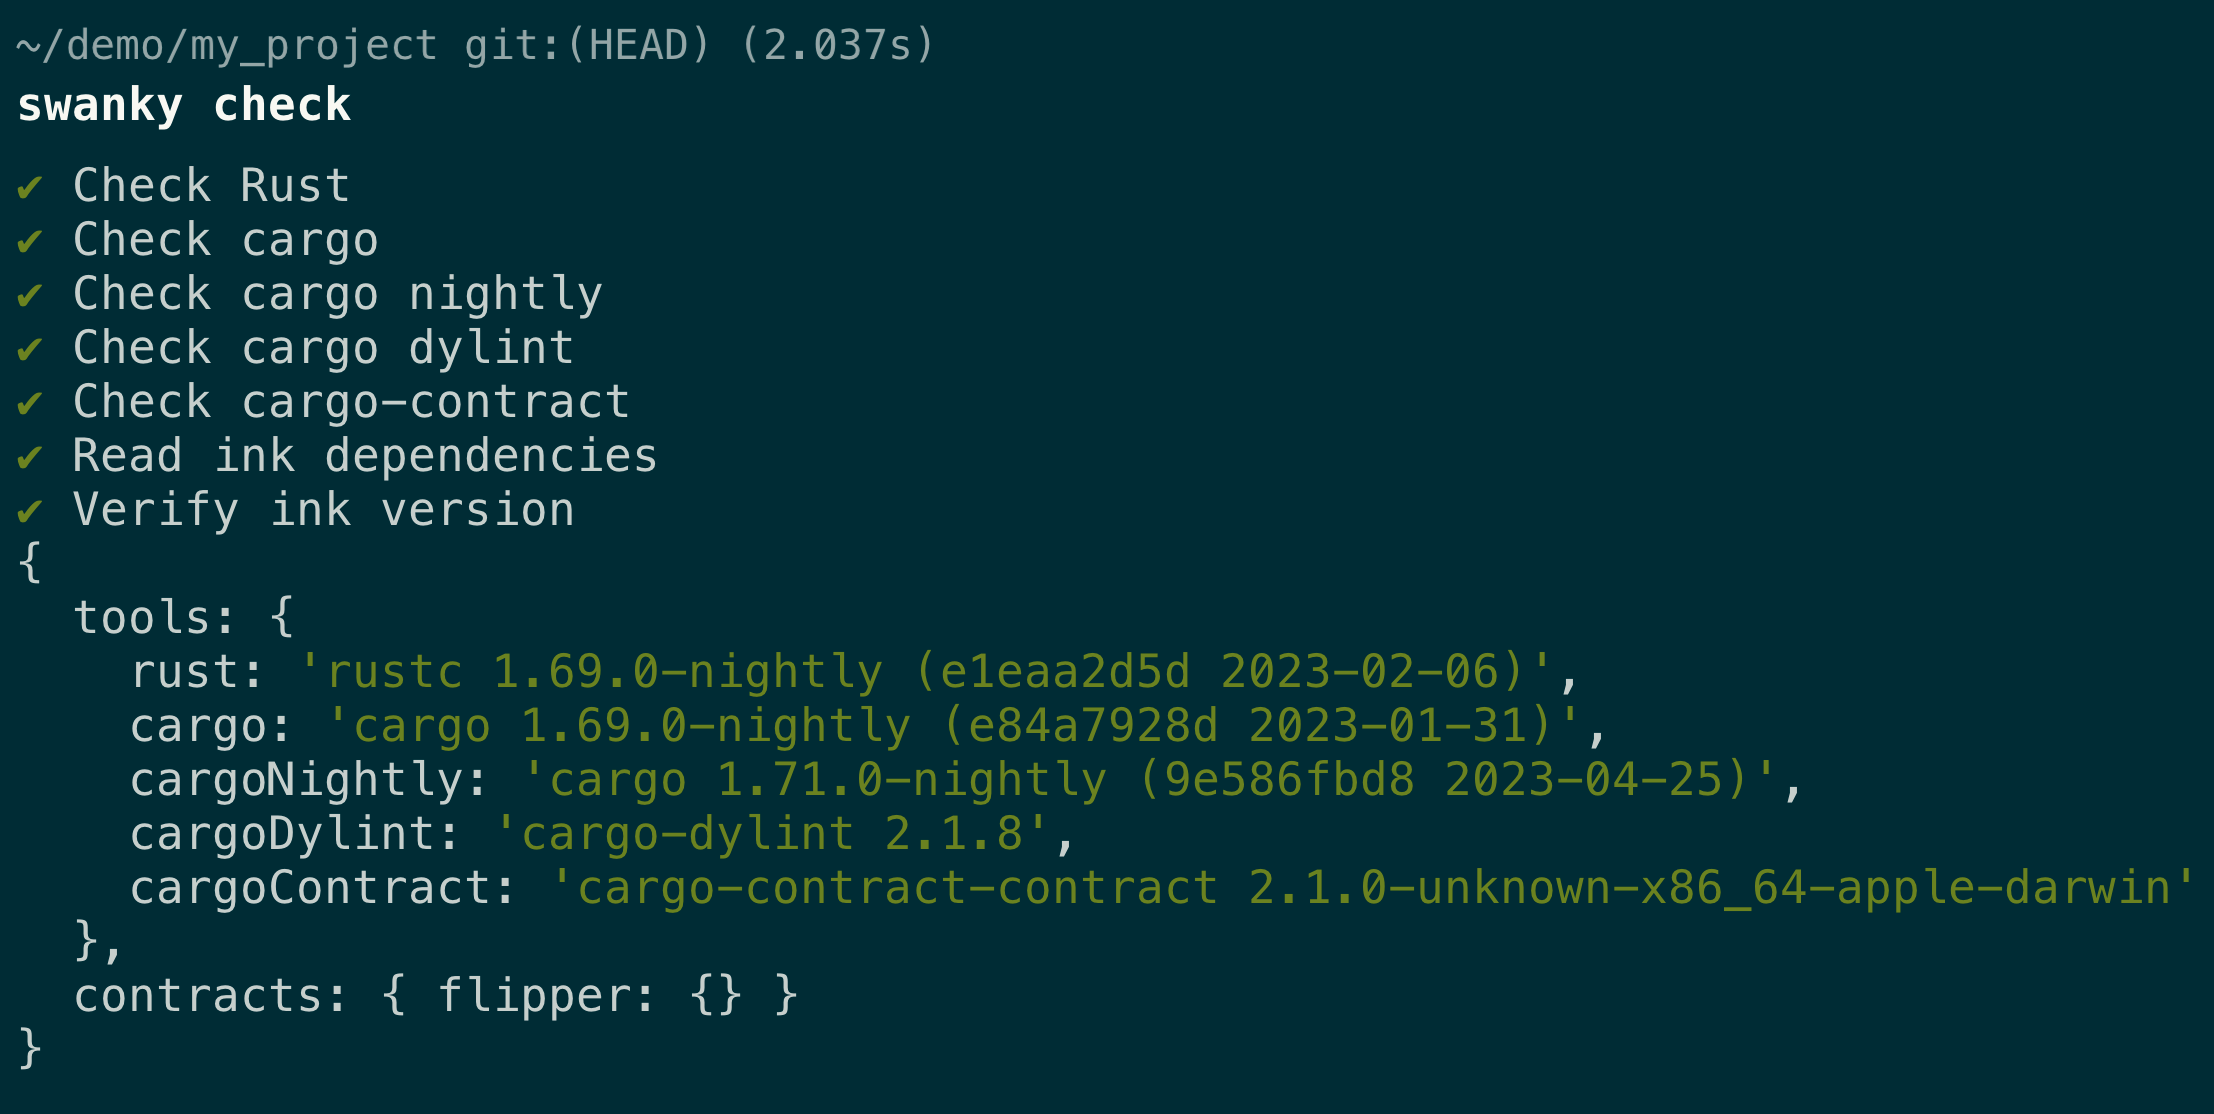
For now, you will need to be be in a project folder to run this command.
This command will be updated to fix that, and provide more useful information.
Resources:
Manage accounts
Create and list accounts used for contract interaction.
These are the accounts stored inside your swanky.config.json, so the command needs to be ran from within the project directory.
During account creation you'll have an option of passing your own mnemonic, or have Swanky generate one for you by passing -g flag.
You can also mark the account as "production" which will require you to set a password and encrypt the mnemonic.
Be careful not to use a dev account on live networks, as their mnemonic is stored in plain text in the config!
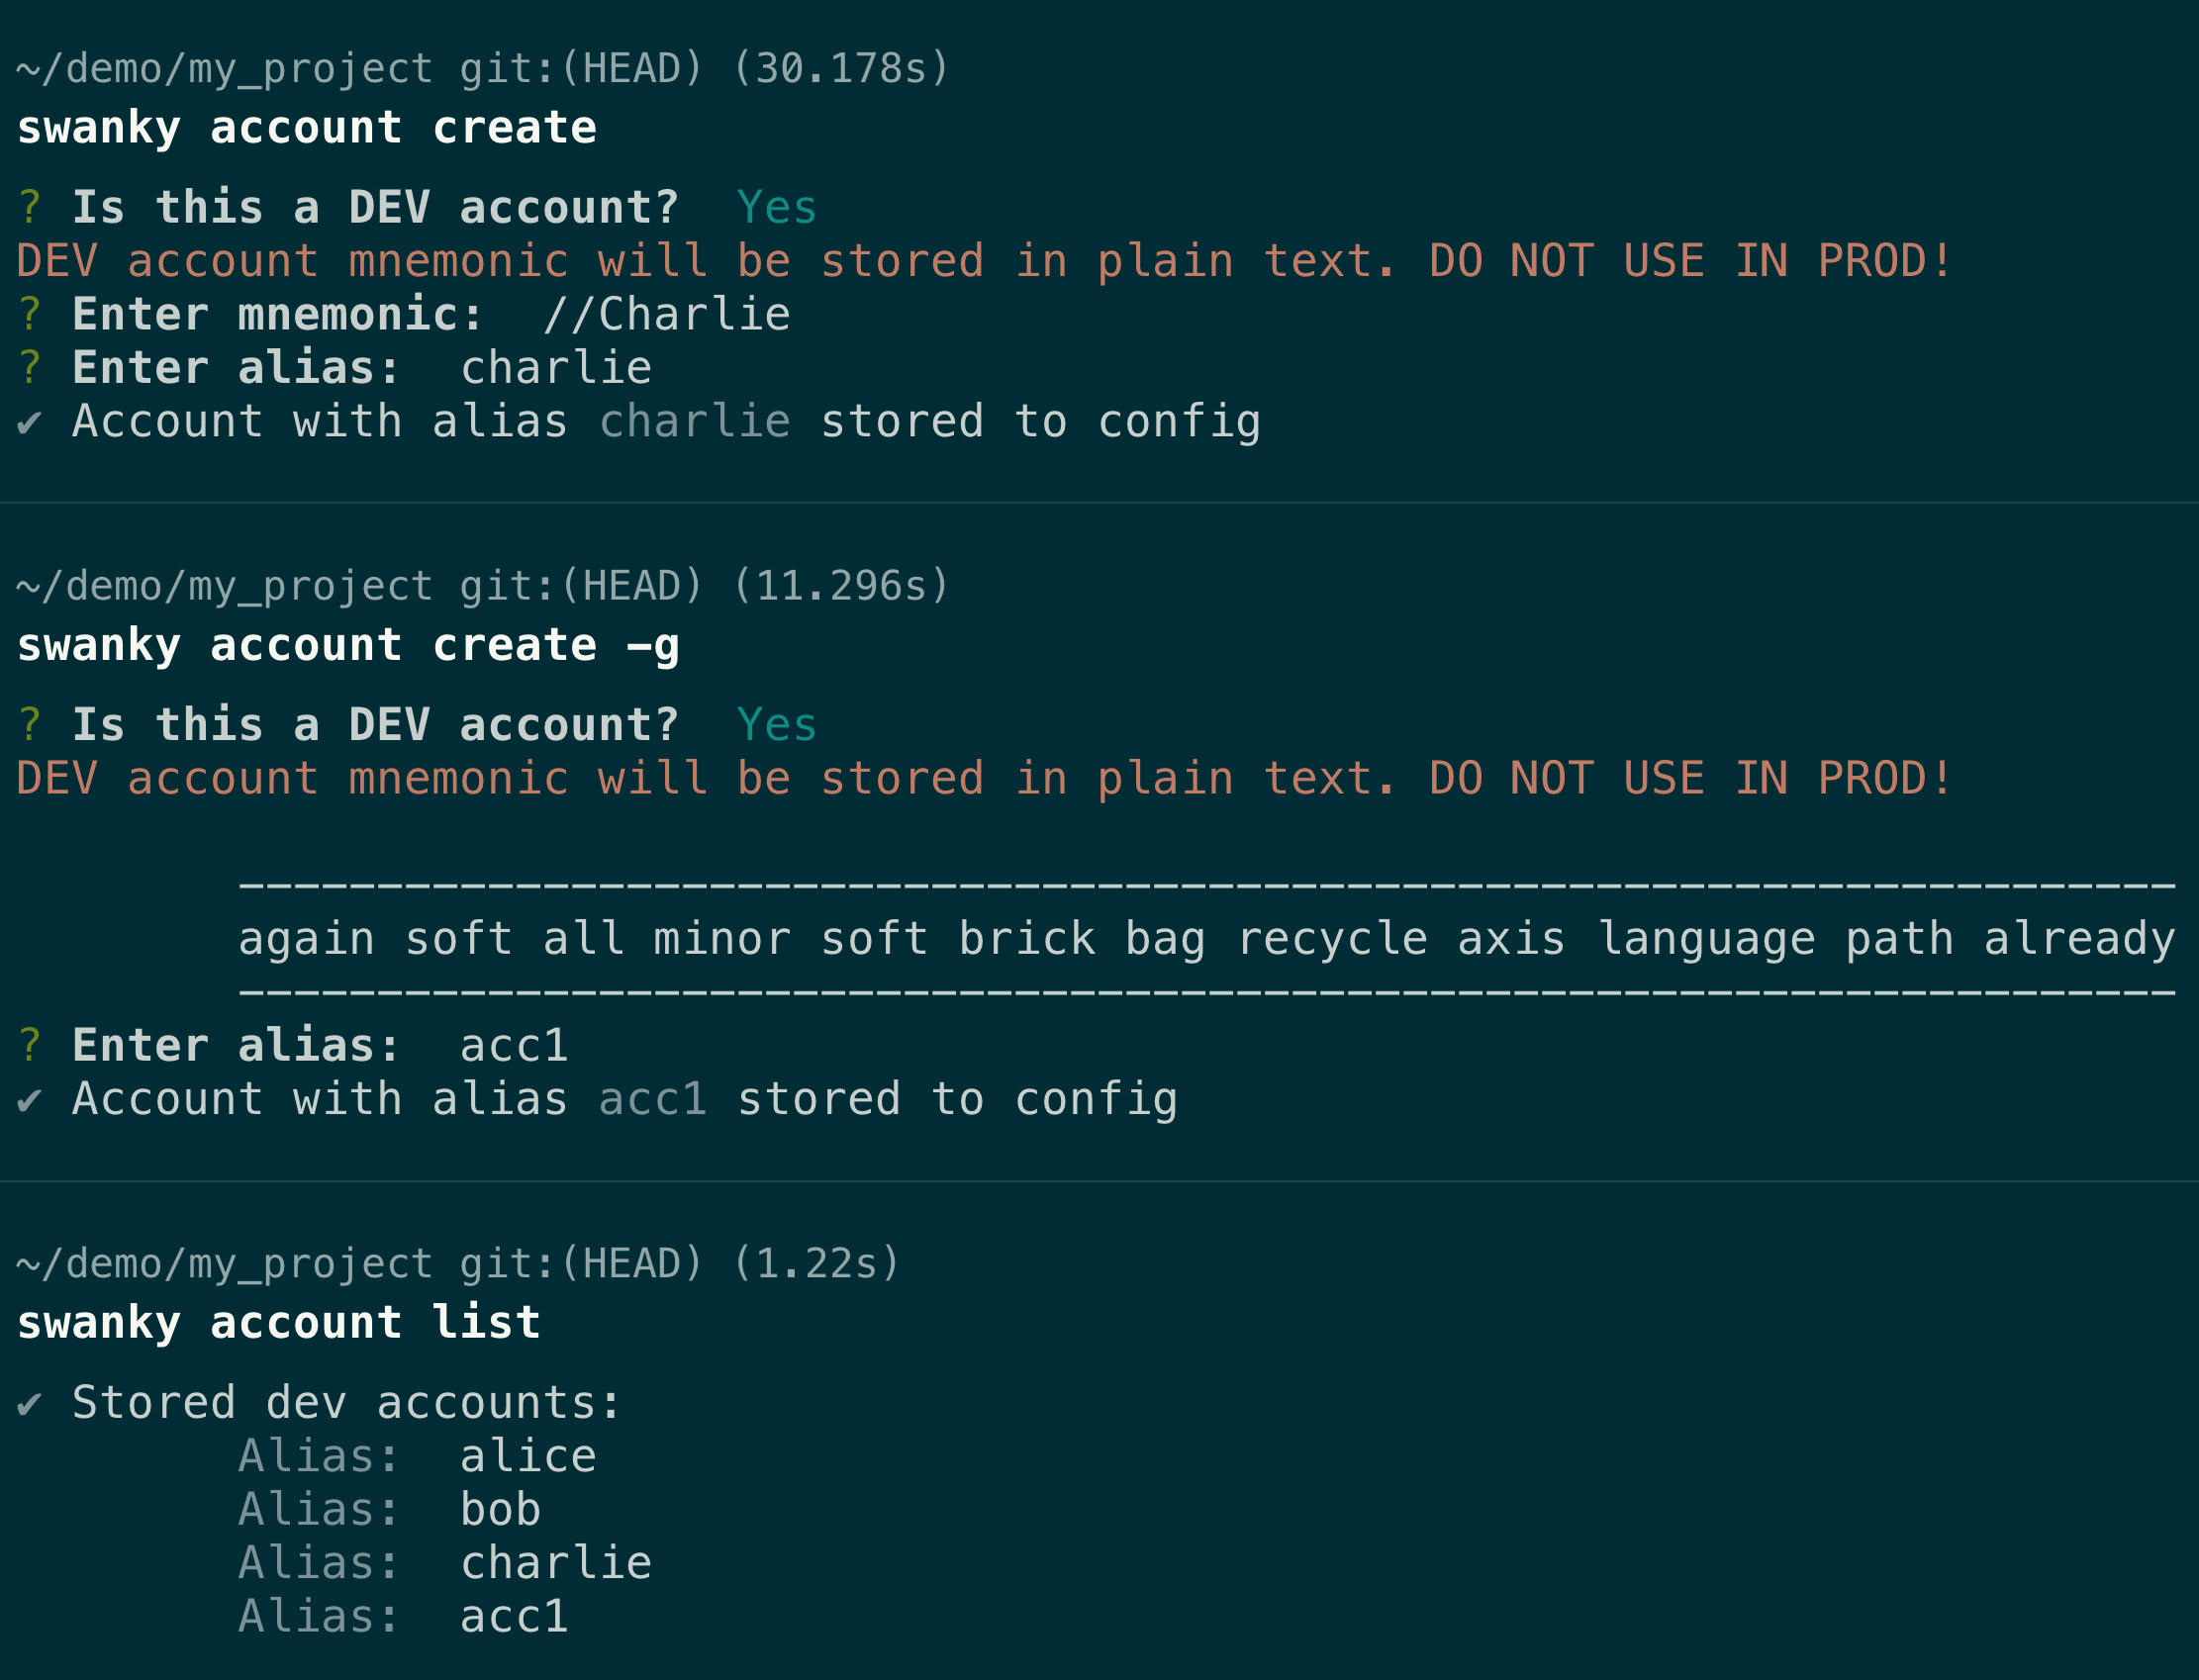
Newly generated accounts that are not the preconfigured dev accounts (Alice, Bob, Charlie...) will have no funds initially, so you'll have to transfer some manually.
Resources:
Interact with contracts
swanky contract command offers several subcommands for different interactions with your contracts.
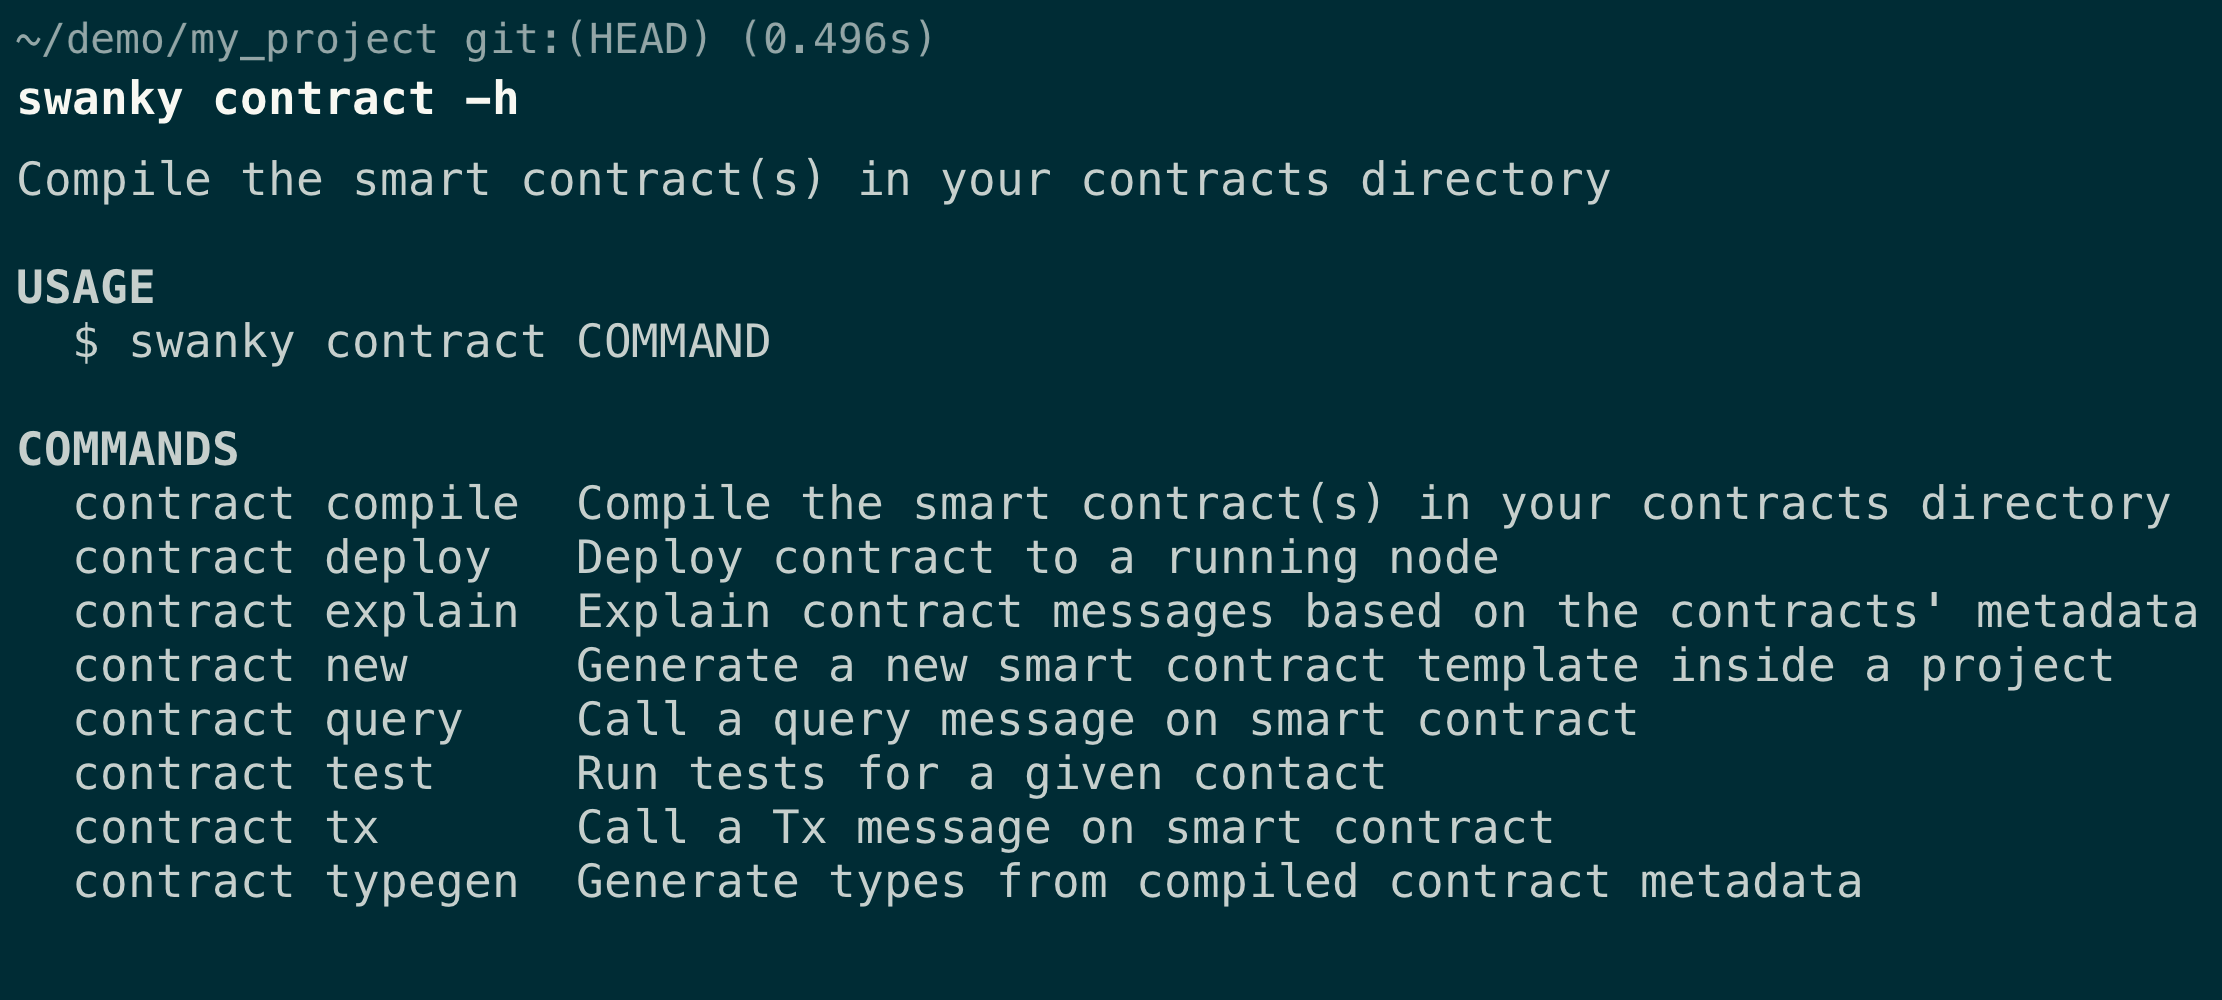
The command names are self explanatory, and to get more detailed information on using a specific command, you can use the help flag with it:
swanky contract SUB_COMMAND --help
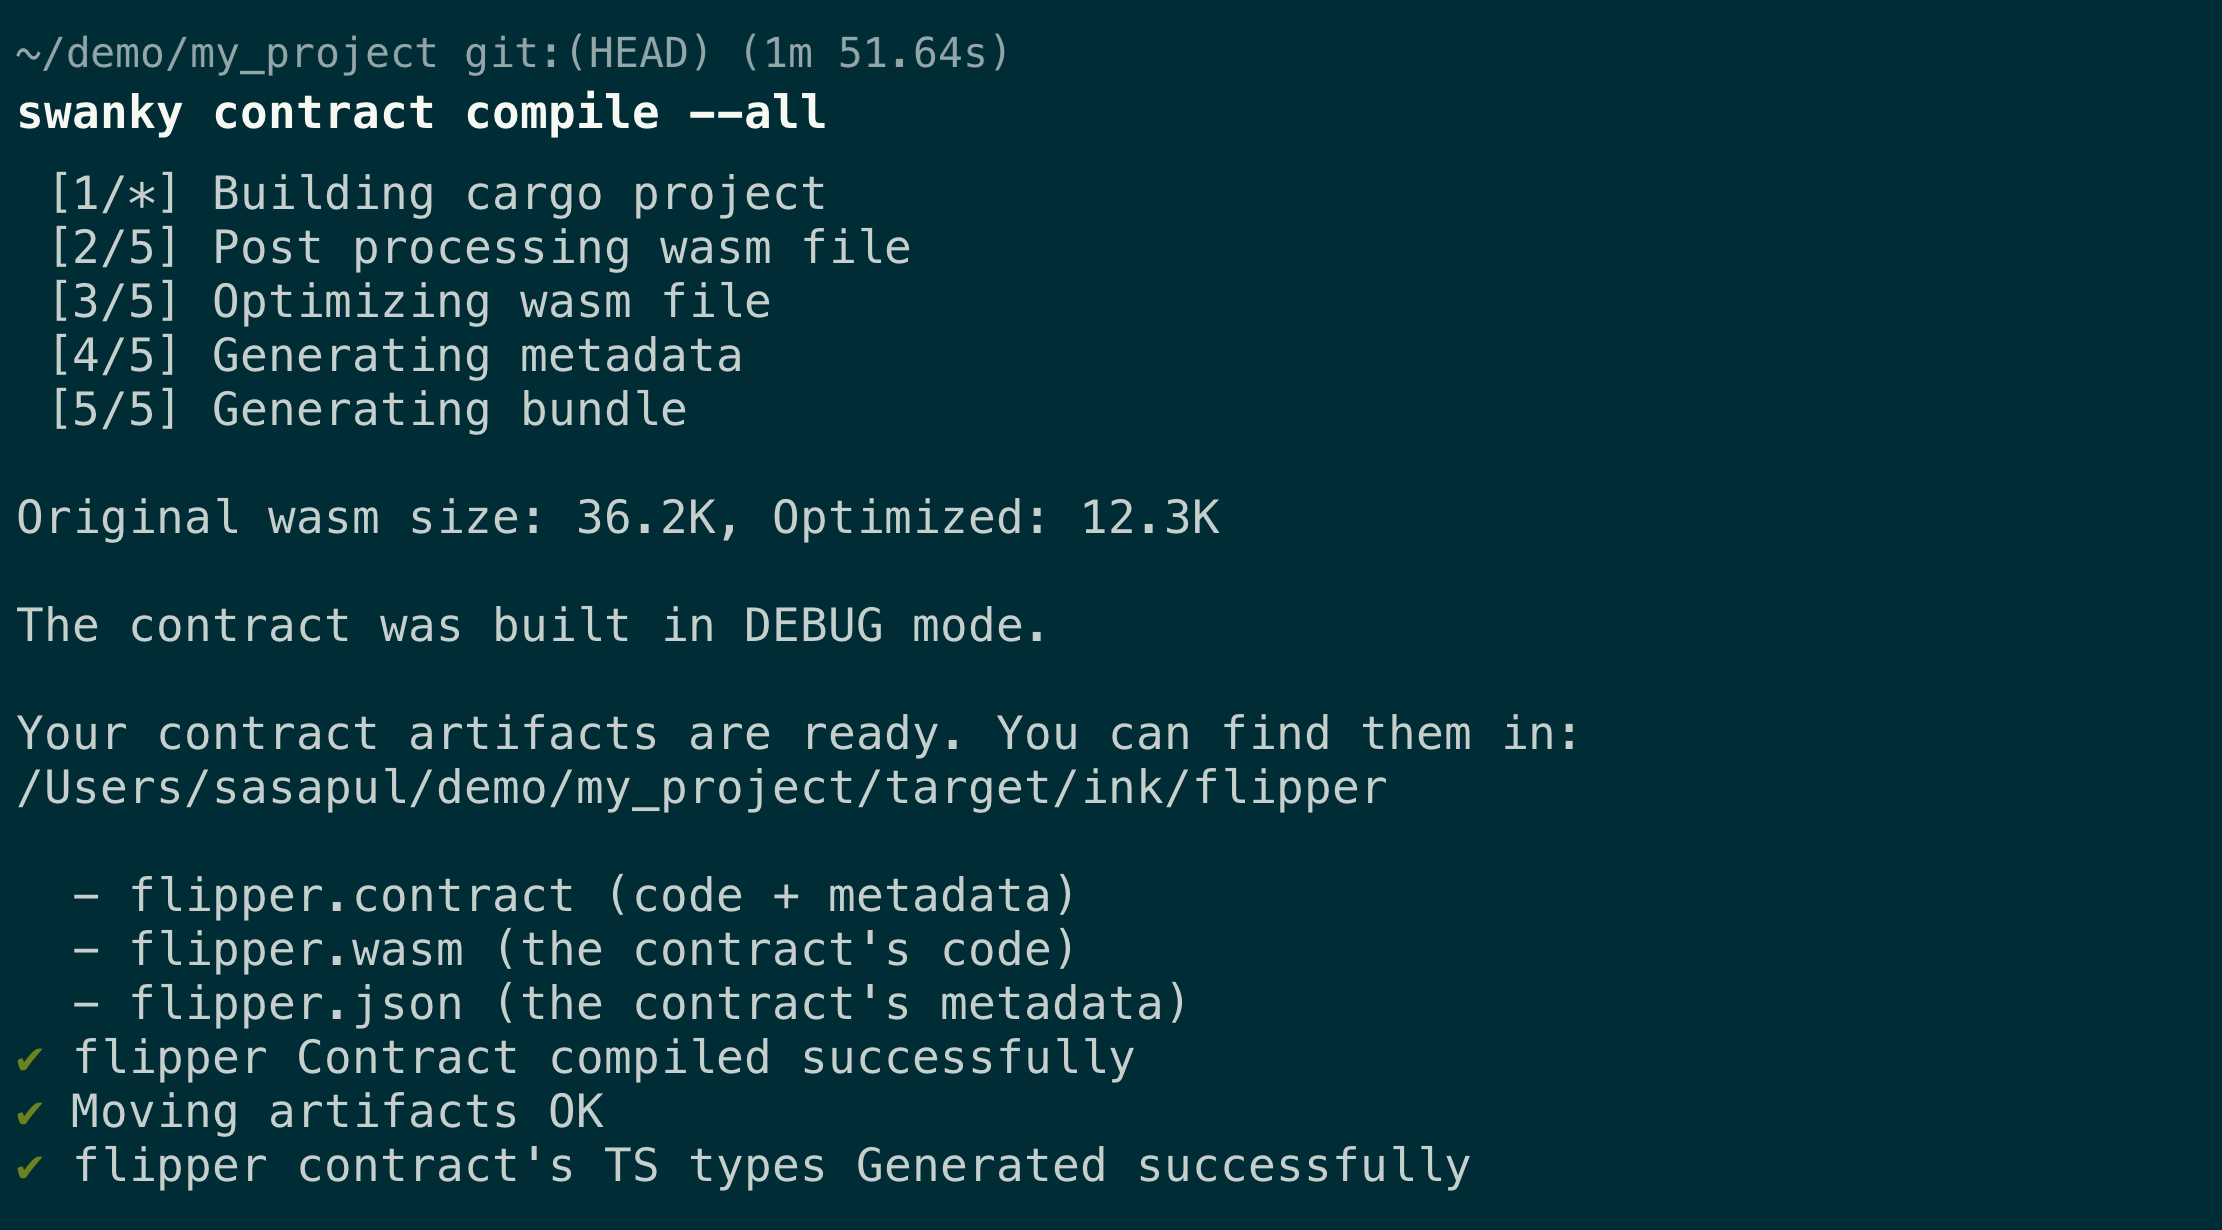
Compile
Your contracts are listed in swanky.config.json, and can be referred to by name field. Calling swanky contract compile CONTRACT_NAME will run cargo-contract compiler, generate TS types using Typechain, and move the artifacts and types to appropriate locations for later usage.
If you have multiple contracts and wish to compile them all at once, you can pass the --all flag instead of the contract name.
Likewise, if you're compiling for production, you need to pass the --prod flag.
Resources:
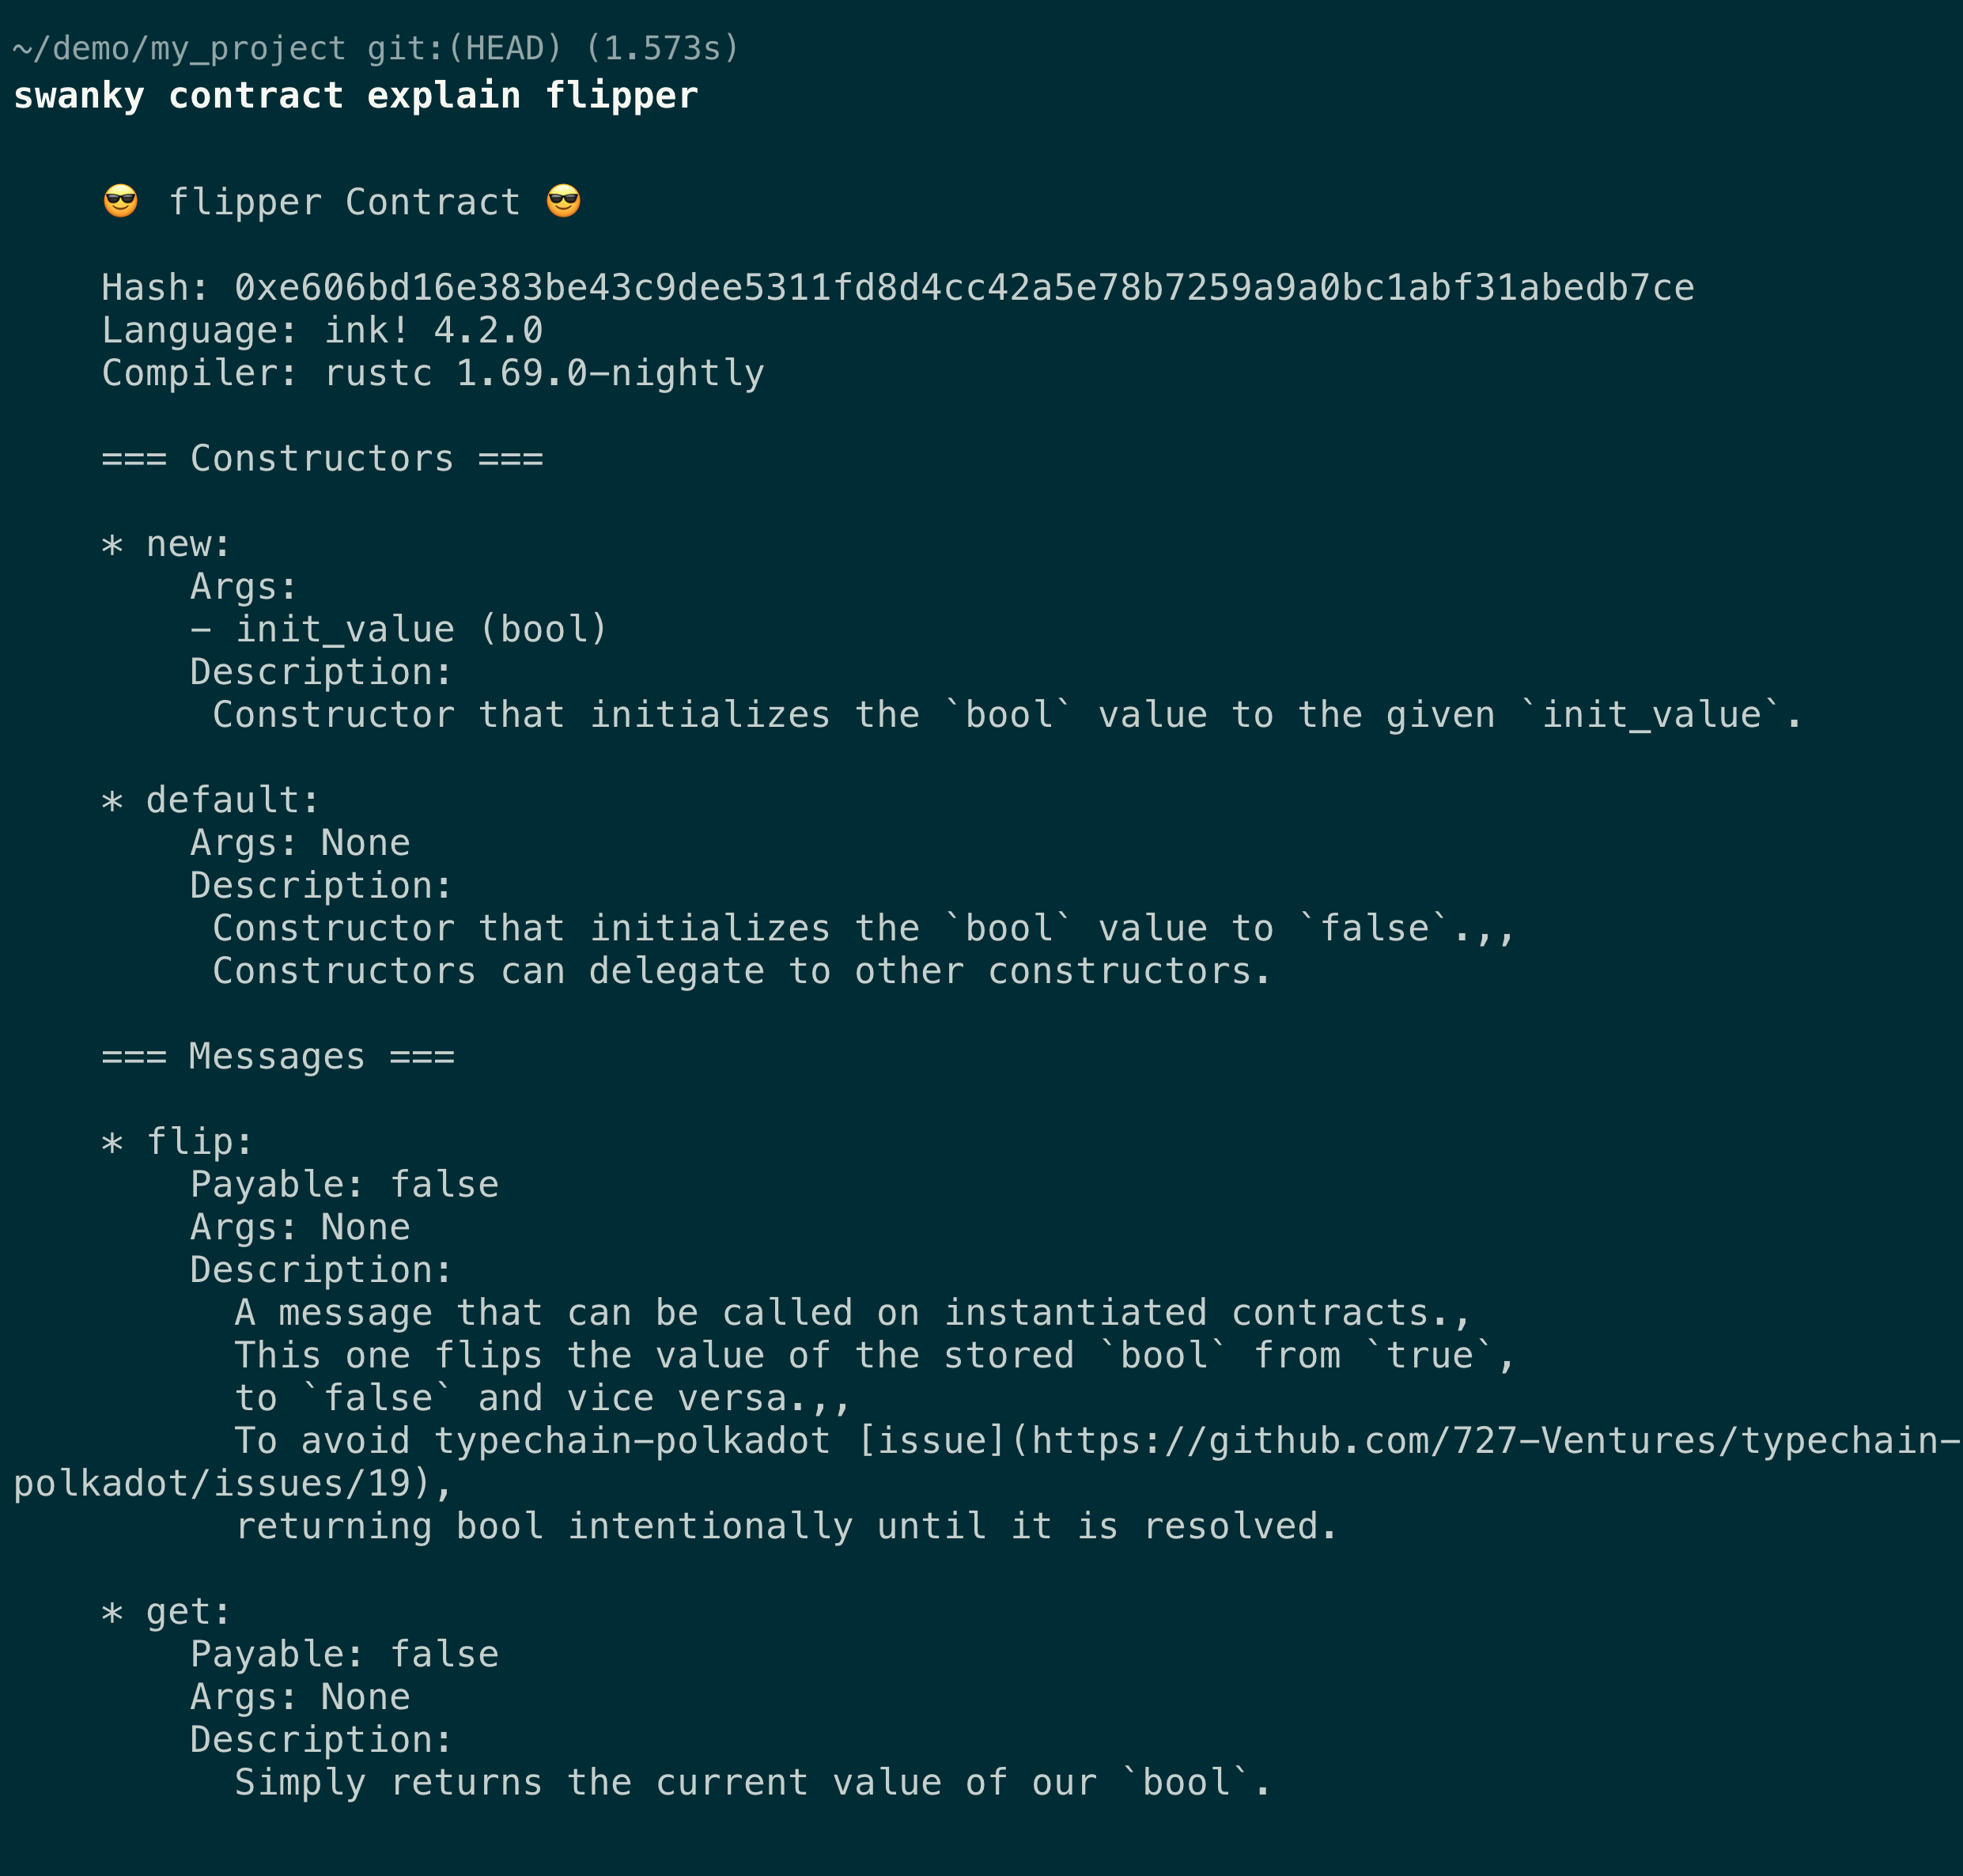
Get detailed contract description
Compiling the contract will generate it's metadata too.
Swanky provides contract explain CONTRACT_NAME command to get a more human friendly version of that metadata:
Resources:
Run E2E tests
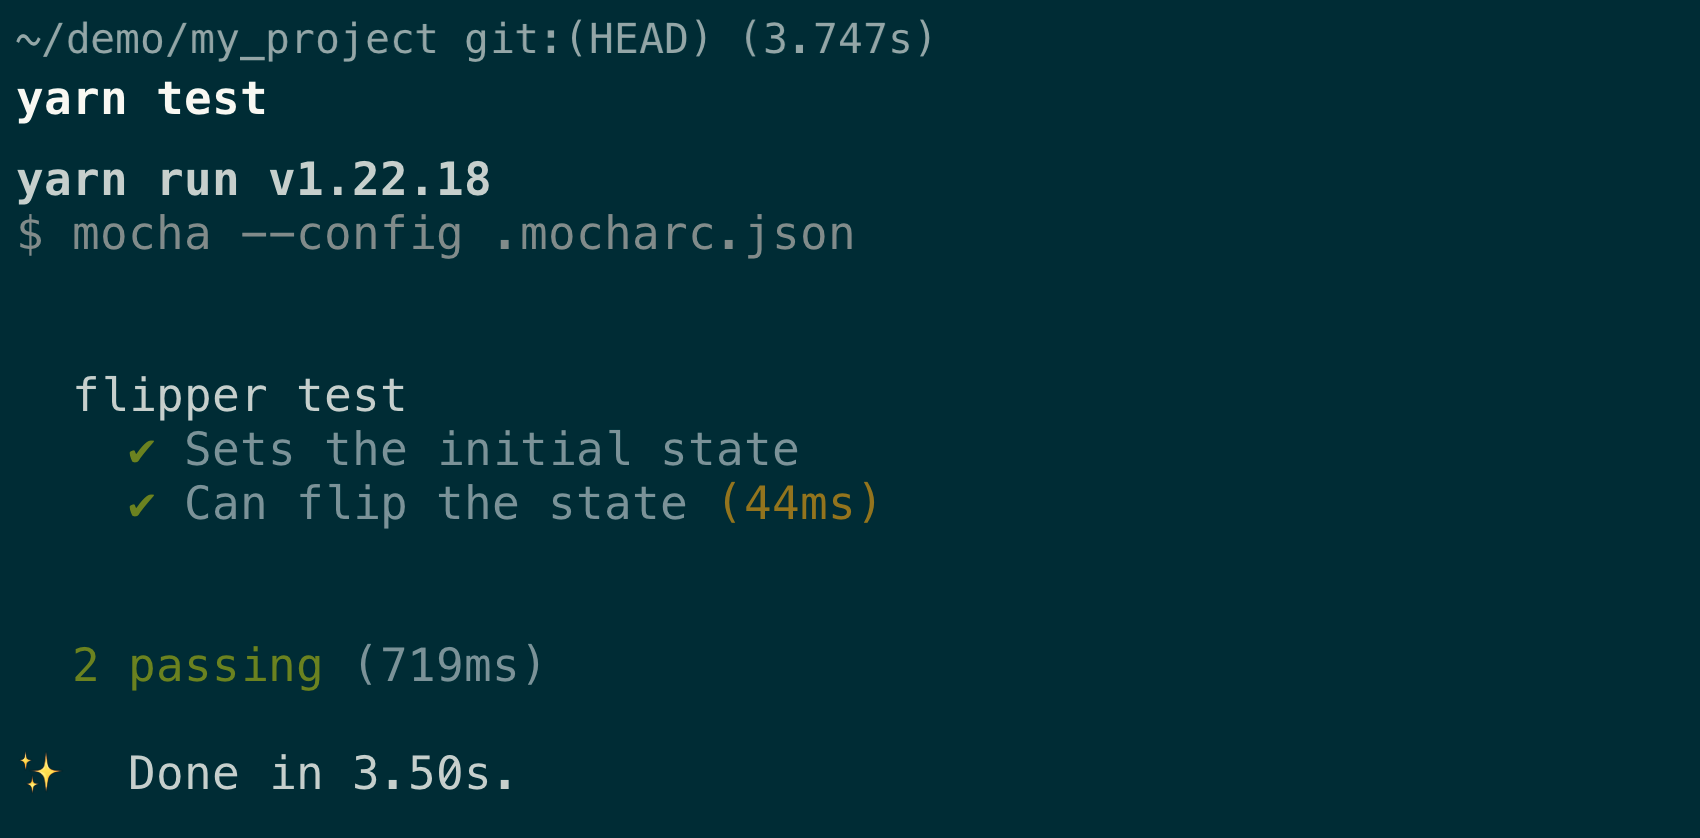
You can test your contracts using Mocha framework and Chai assertions.
Please note these tests are not ink! E2E tests, but are written in TypeScript, and require a local node to be running.
You can get more information on ink! E2E test framework in the ink! documentation.
A contract template will provide you with a simple test as well, which you can use as a starting point.
The tests utilize @polkadot/api library, and contract types generated by typechain-polkadot.
The types are generated during the compile step and copied to typedContract/contract_nae directory, and in the tests/*/artifacts/ directory. If you need only the types generated
(if you for example deleted or edited them), you can do that without going through the whole compilation step by using swanky contract typegen command.
Running swanky contract test CONTRACT_NAME will detect all *.test.ts files in the tests/contract_name/ directory, and run them sequentially, or in all directories inside tests/ if you pass the -a/--all flag.
Running the tests programmatically may throw warnings about duplicate dependencies on @polkadot/* libraries.
This occurs because those libraries are included in swanky app itself, as well as in the test files.
Apart from the warning text spamming, no negative consequence of this has been observed.
If you want to avoid the warnings anyway, you can run tests as a yarn/npm command:
yarn test or
npm run test
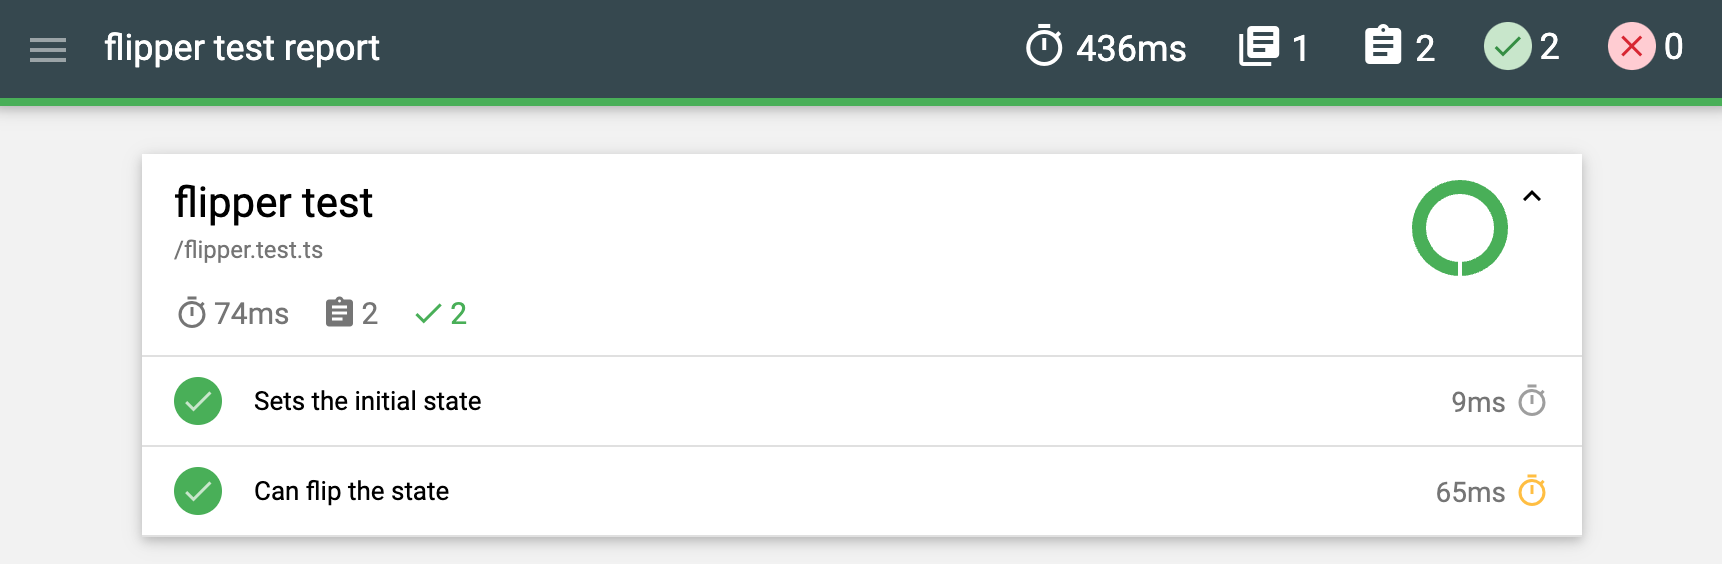
Web based report will be generated and stored in tests/*/testReports directory. You can copy the path of the reports and use the serve app to view them in browser. (serve is included in swanky-dev-container)
serve PATH_TO_REPORTS
Resources:
Deploy your contract
When your contract is compiled and tested, you can deploy it to a local node or a remote network.
You will need to supply account you wish to deploy the contract from (--account), and any arguments required by your contract's constructor (-a).
By default, your contract will be deployed to a local node, but you can pass a custom network via -n/--network flag. Available networks are configured in swanky.config.json file.
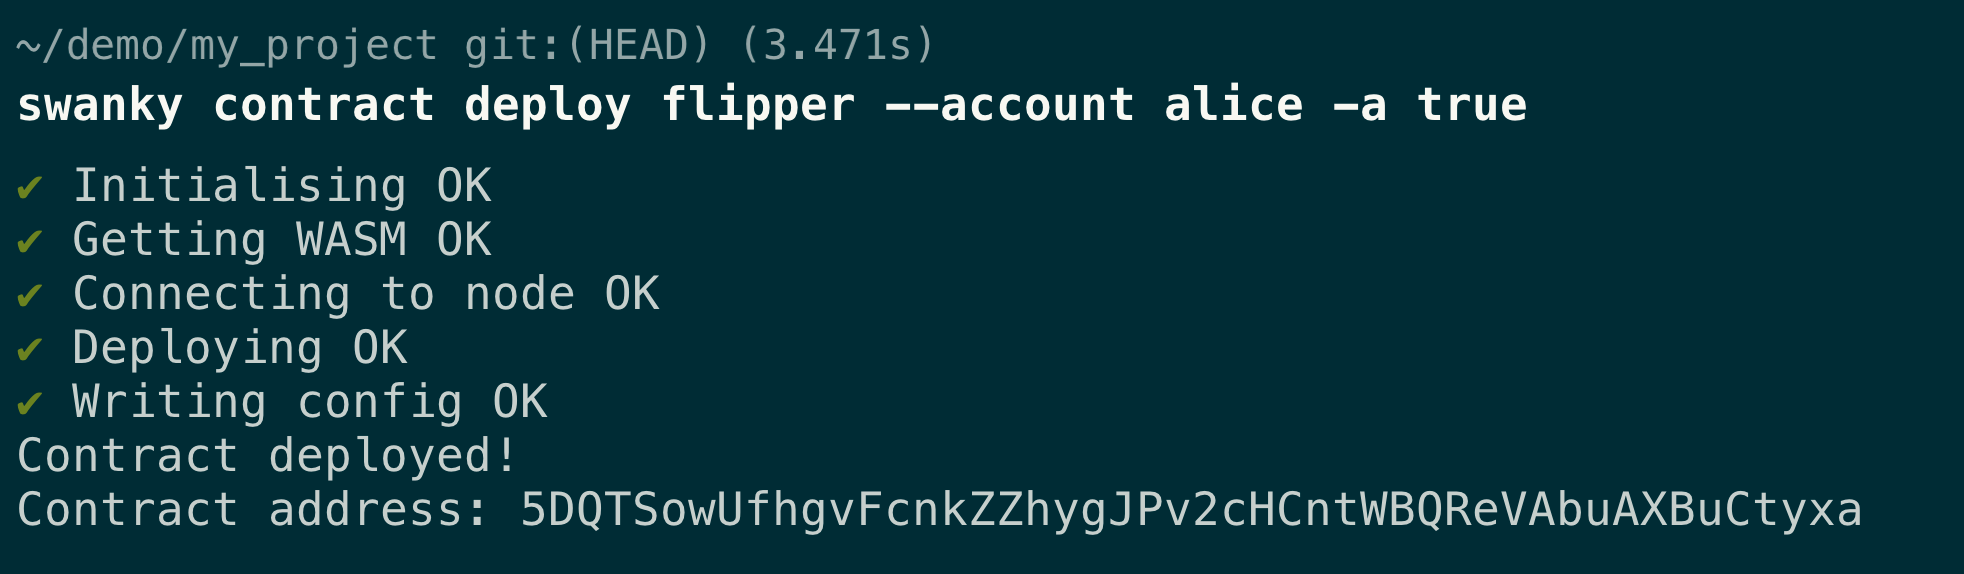
Successfully running the deploy command will print out the address your contract is deployed to, as well as save it into swanky.config.json
Resources:
Run queries and transactions
Once your contract is deployed, you can call it from the CLI using query or tx commands.
Use query for read-only calls, and tx for the calls that change the chain state and require signing (and a gas fee).
Both commands require CONTRACT_NAME and MESSAGE_NAME parameters, and for tx a caller account needs to be provided too. (-a/--account).
If the message you're calling requires arguments to be passed, you can do that using -p/--param flag.

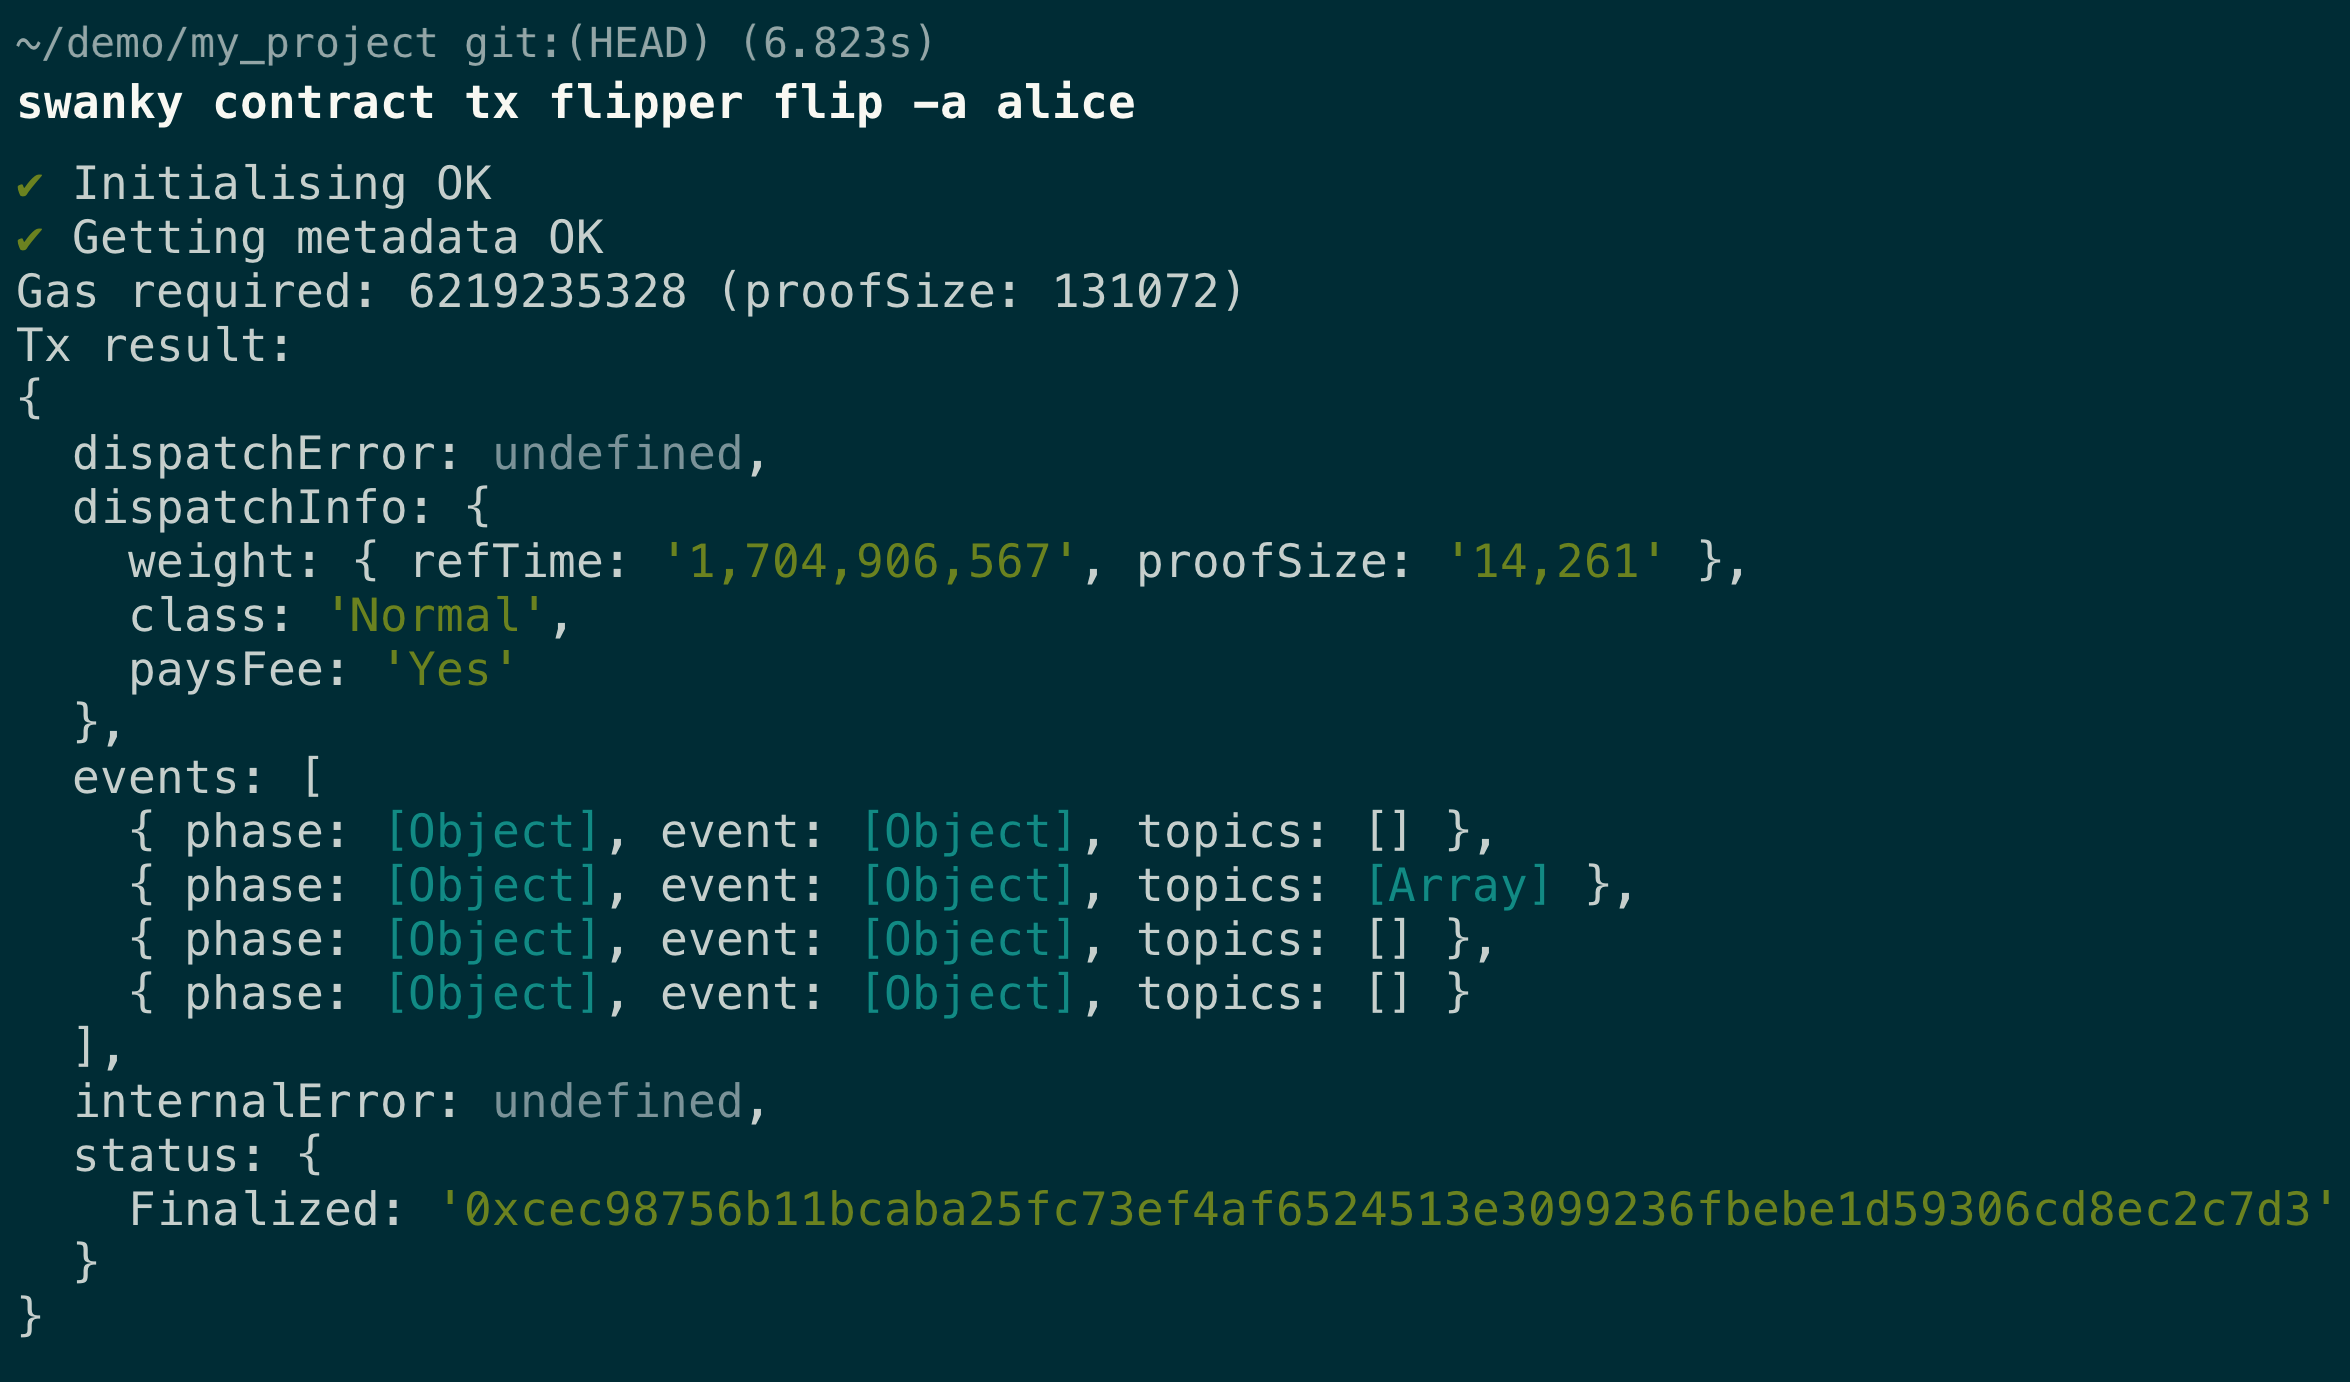
Result of a query is straight forward, OK followed by what ever the response is.
The transaction (tx) is a bit more raw though. Important to note are the dispatchError and internalError fields, plus the status field.
If the errors are undefined, and the status finalized, your transaction has been successful.
Gas fee for tx is calculated and applied automatically, but you can provide a gas limit manually by using the -g/--gas flag.
Keep in mind that the transaction will fail if you provide too low a value.
Resources:
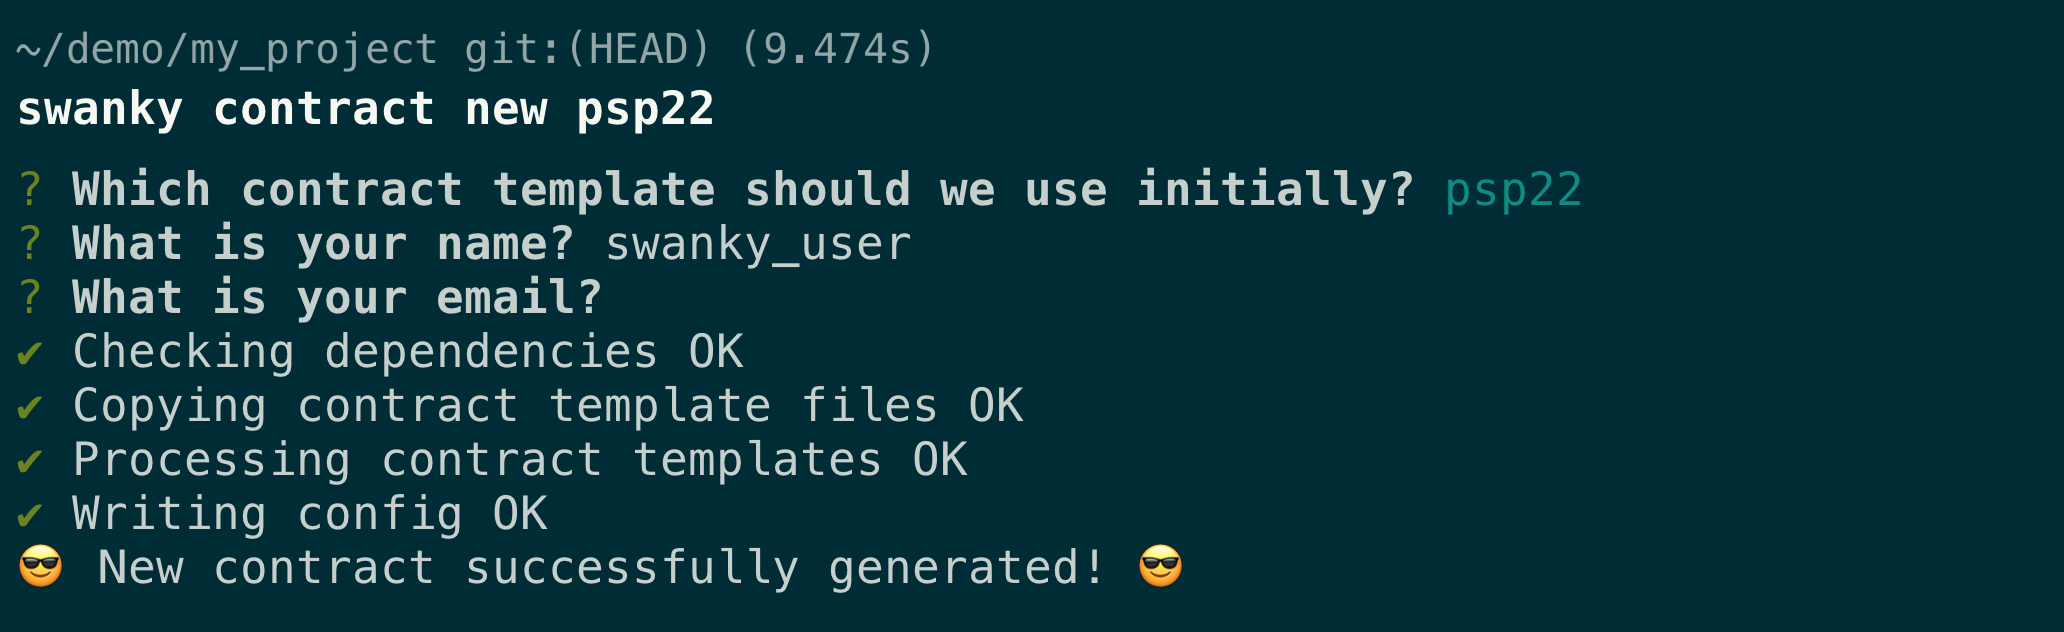
Add a new contract from template
You can create additional contracts in the same project, using the contract new command and selecting from predefined templates.
The contract will be referred by name when using the relevant contract commands, and you can check the details in swanky.config.json
Resources:
Interact with a local node
If you have chosen to download and use the Swanky Node during init step, you can use swanky node commands to start and manage it.
Simply running swanky node start will start the node, and the node will preserve the state across restarts.
If you want to reset the node state, use the swanky node purge command.
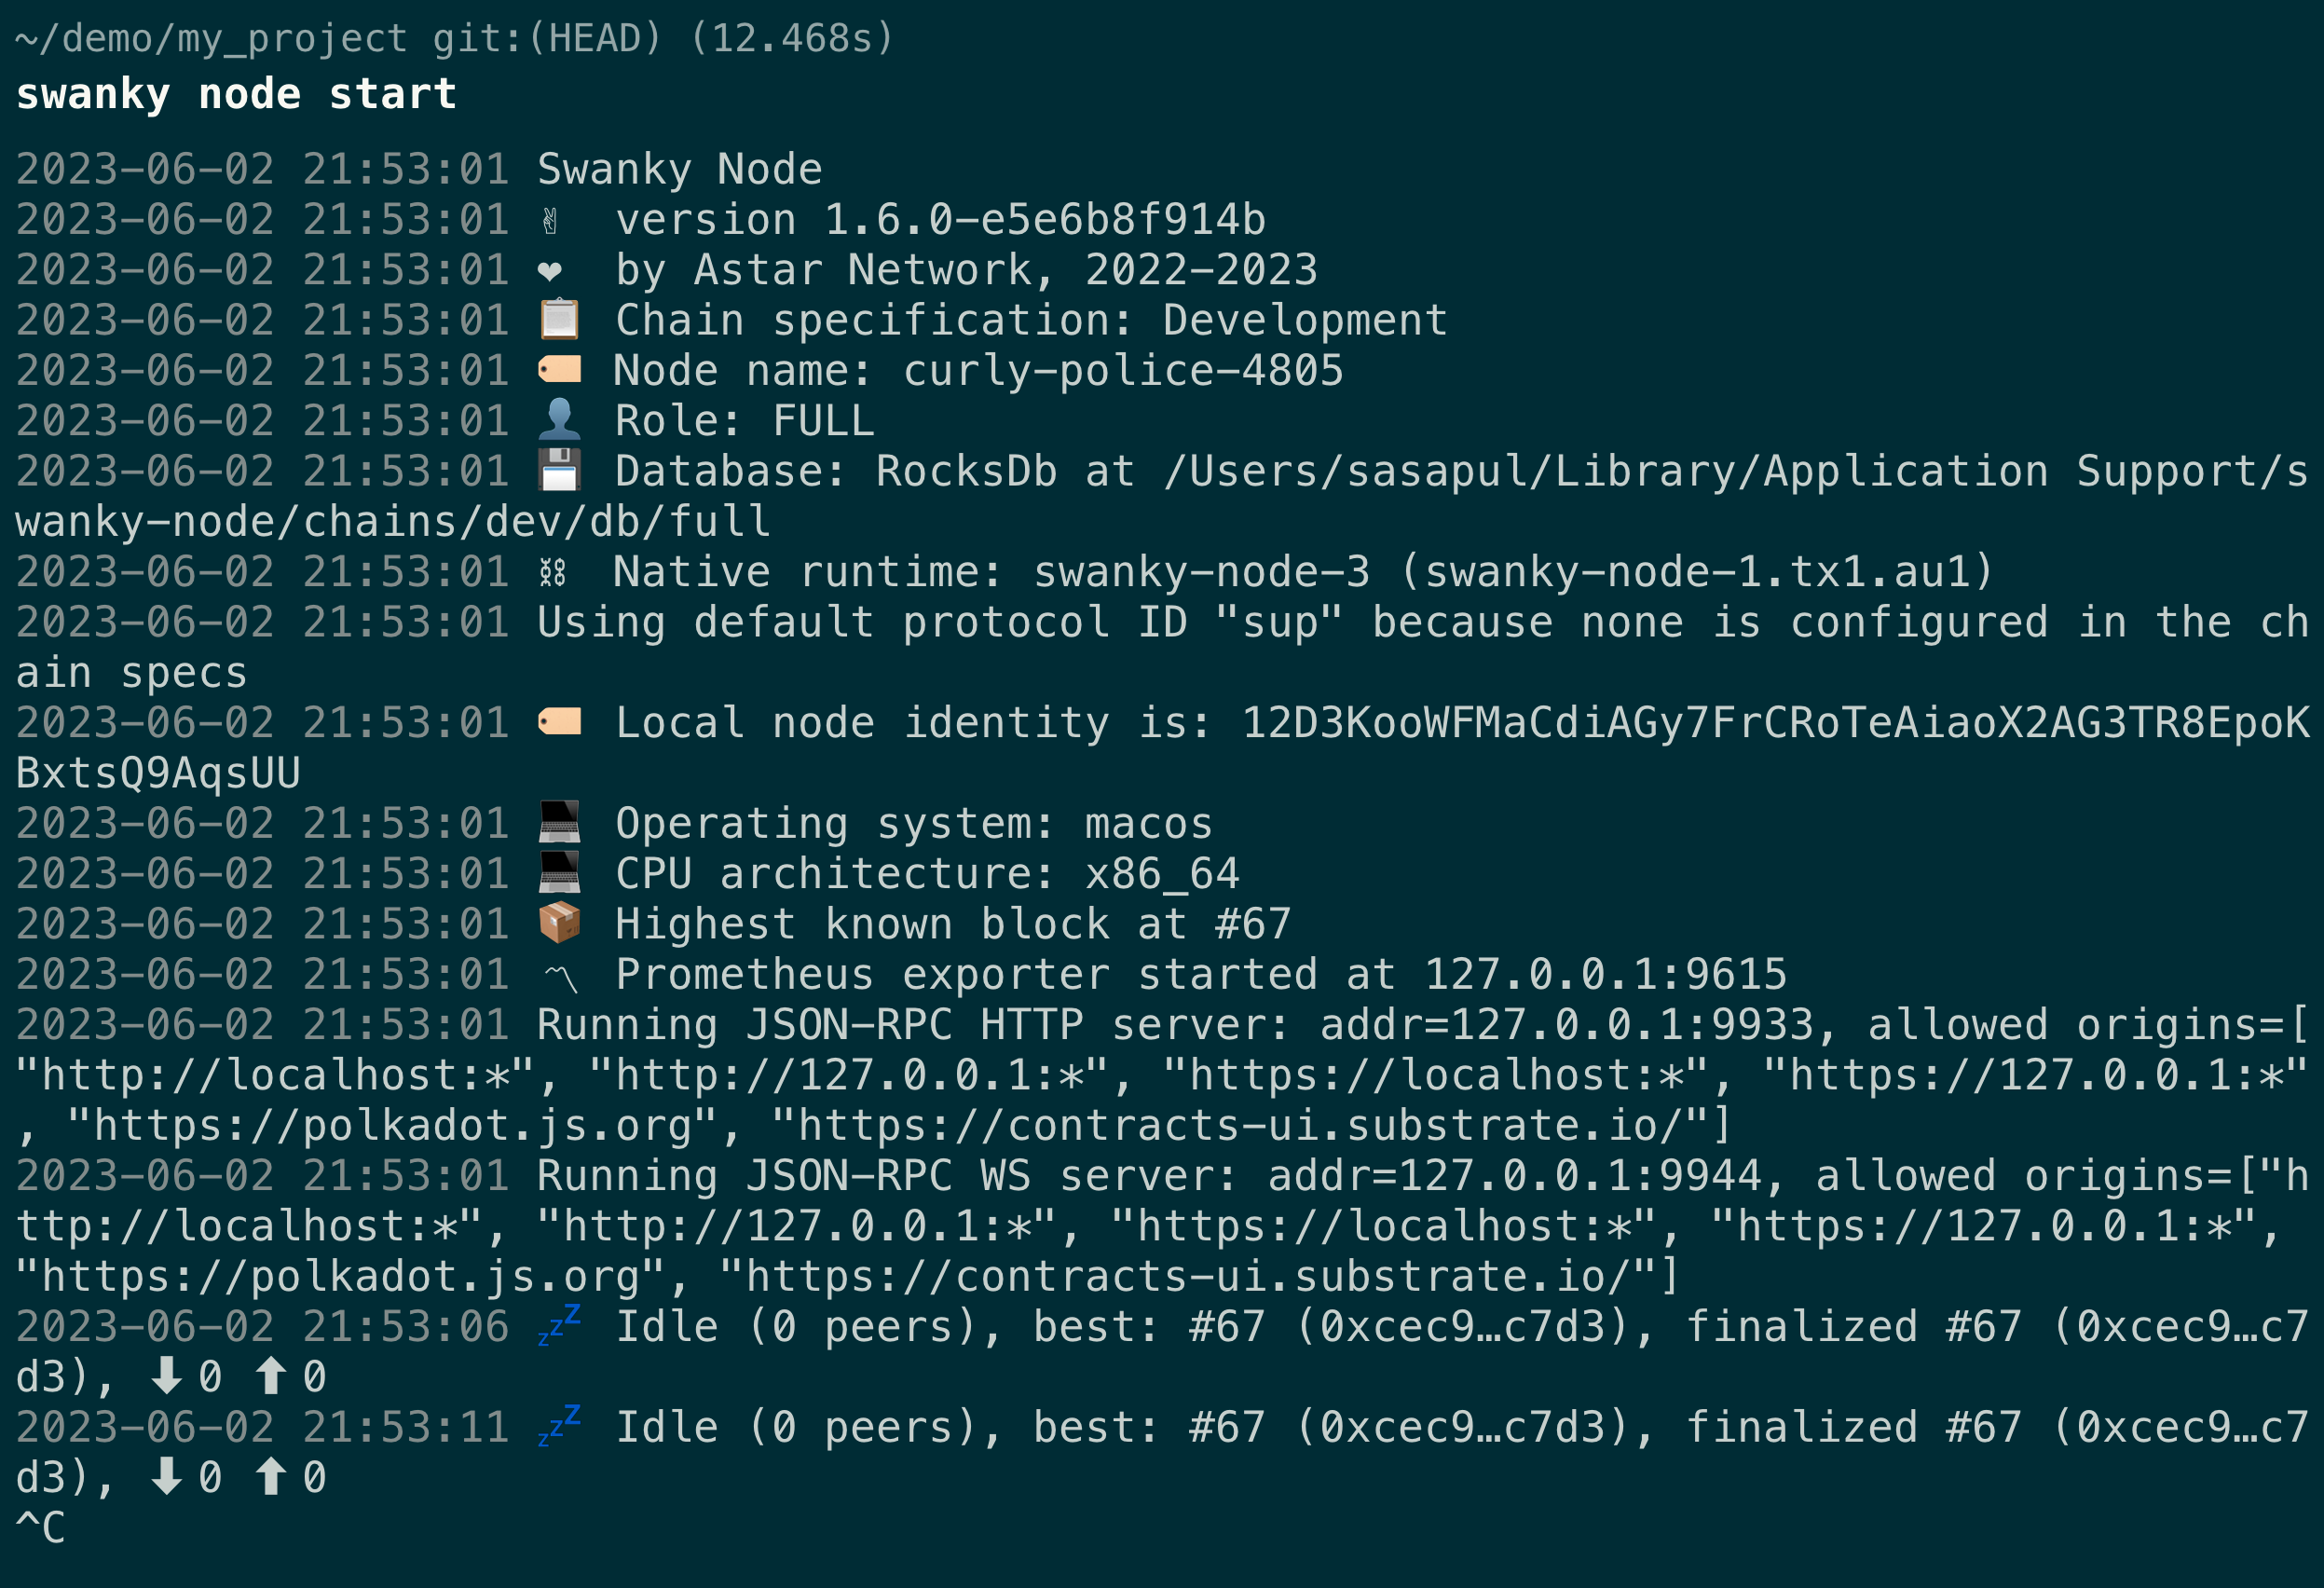
Note that node needs to be running if you are using a default local network with deploy, query and tx commands.
If you chose not to download the swanky-node during the init, or you changed the OS environment (for example switched to inside a dev container after running init on host OS, or vice-versa), you can run
swanky node install
to download the node for currently running platform.
If you want to use an external UI to interact with the node, you might run into some CORS issues.
This can be solved by passing a custom array of whitelisted urls using the --rpcCors flag.
Resources:
Using plugins
Swanky CLI's functionality can be extended by the use of plugins, and it's a way to add new, case specific commands without modifying the core codebase.
One WIP example is the Phala plugin
If you are interested in developing a plugin, you can refer to the Phala example, and the Oclif plugin documentation, or you can post a request in swanky-cli repo's issues.
Resources: